Controller
7 minute read
In this section you will create a Motorcortex USB Clonezilla Drive to install Motorcortex to your controller.
Prerequisites
- A Motorcortex.io account.
- A
USB Driveof at least 8Gb.
Create MCX-Clonezilla USB Drive
Please select the OS you are using:
-
Login to Motorcortex.io and go to the Motorcortex.io Store
-
Download the latest
MCX-Clonezilla Imageby pressing thedownloadbutton: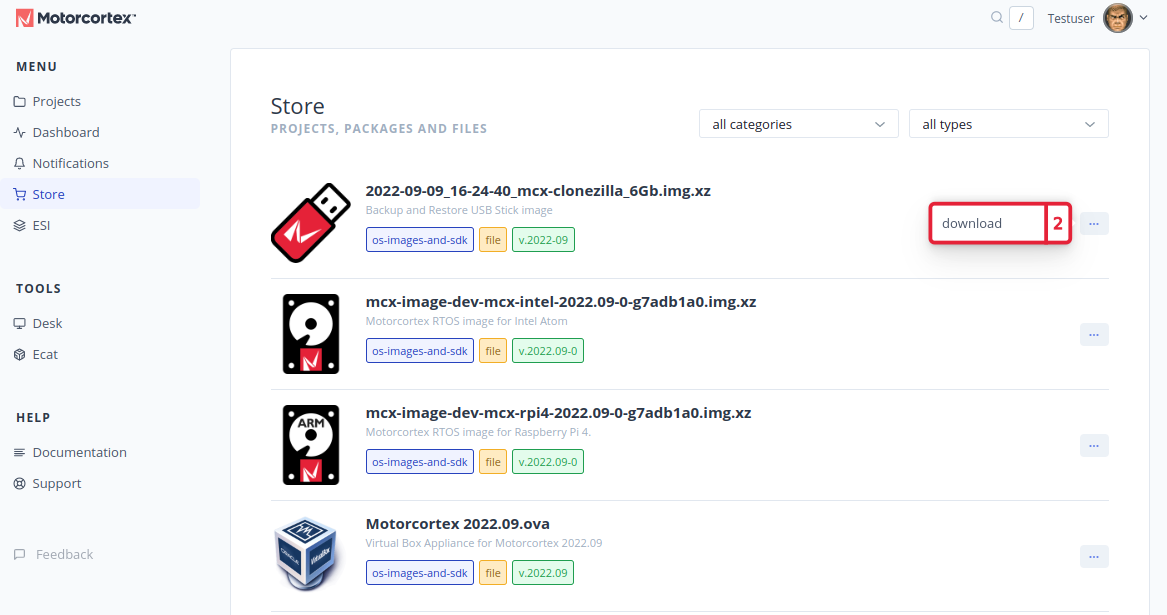
-
Insert your empty USB Drive into your PC.
Warning
Be aware that all of your files saved on the USB drive will be will be erased.
-
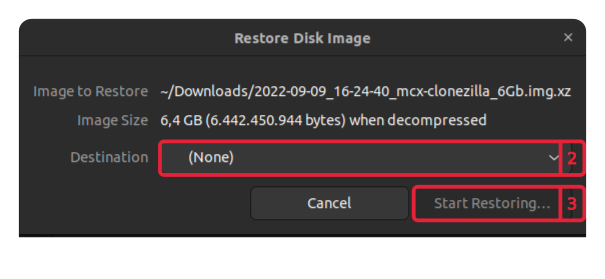
Right-click on the
.imgfile and selectOpen With Disk Image Writer. -
In the following window select the
Destinationthat you want to write the Motorcortex USB Clonezilla image file to. -
Press start restoring to create a MCX-Clonezilla USB Drive.
-
When restoring has completed, the system should automatically mount the ImageData partition of the USB Drive.
-
Copy the MCX-OS Image file (
.img.xz-file) that you downloaded from the Motorcortex Store (see Install) into theImageDatafolder.
-
Login to Motorcortex.io and go to the Motorcortex.io Store
-
Download the latest
MCX-Clonezilla Imageby pressing thedownloadbutton:
-
Insert your empty USB Drive into your PC.
Warning
Be aware that all of your files saved on the USB drive will be will be erased.
-
Write the image to your USB Drive. There are tools available to Create bootable USB drives in like Rufus.
-
When done, your USB Drive will be named ImageData, In this folder you can put the image that you want to install onto a controller.
-
Copy the MCX-OS Image file (
.img.xz-file) that you downloaded from the Motorcortex Store (see Install) into theImageDatafolder.

Booting From The Motorcortex USB Drive
-
Make sure your Controller is powered off.
-
Insert the Motorcortex USB Clonezilla Drive into your Controller. Make sure the image you would like to write to your controller is in the
ImageDatapartition onto the Drive. -
Power on the Controller.
-
Your Controller should automatically boot from the Motorcortex-Clonezilla USB Drive. If it does not boot automatically from USB check your Controller’s BIOS settings to enable booting from USB.
-
Log in to the Motorcortex-Clonezilla terminal
There are 2 ways to access the terminal of the MCX-Clonezilla:
By attaching a
Keyboardand aDisplayto your Controller you should immediately see a screen similar to below.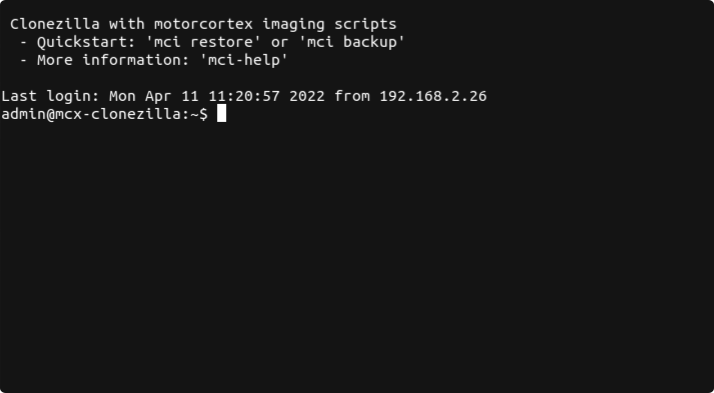
-
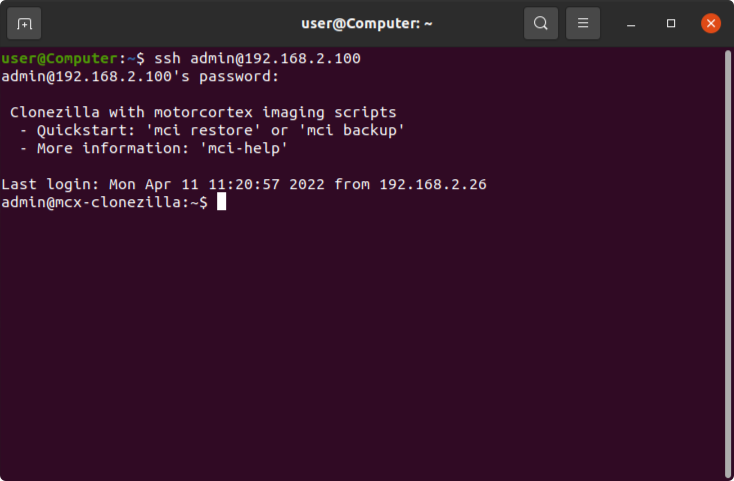
Connect your controller with your PC using the Ethernet port.
-
Make sure the ip address of your network adapter that is connected to the Controller is in the
192.168.2.xxxrange. How to do this is explained in Configure Your Network. -
Open a
terminal. -
Connect to your Controller by typing:
ssh admin@192.168.2.100 -
log in with password
vectioneer. -
The terminal should immediately show you a screen similar to below.
Select the option:
The following steps explain how to install a image.
-
To start the restore procedure type
mci restore -
Now the prompt will ask you what image you would like to restore. Choose the image that you would like to restore.
-
Second the prompt will ask you to choose the drive where you want to restore your image to.
-
Restoring the image will take some time. When the process is done, check for any errors in the console
Warning
Make sure that the image will fit on your disk. Otherwise your system may not function properly!
-
You will get the message
Donewhen the process is finished.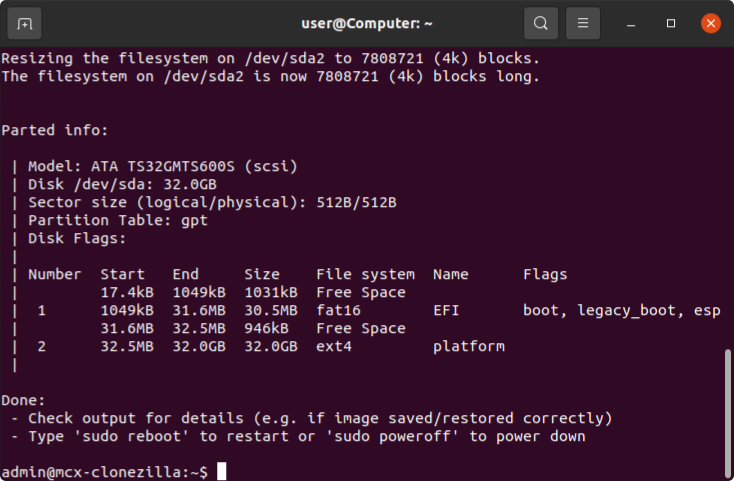
-
Remove the MCX-Clonezilla USB drive.
-
Now you can reboot or poweroff.
sudo reboot -
Wait for a couple seconds for the system to restart.
-
Congratulations you have installed mcx-OS onto your Controller!
Efficient Image Backup
Follow these steps to create a standard backup of your mcx-OS image:
-
Start the backup procedure
mci backupExpected output:
Choose Source Device: 1) sda /dev/sda ... Choose Target Image Directory: 1) /mnt/usb/2026-01-06_15-44-42_mci-fsa-image (new directory) ... [progress output] Done -
Select the source device
- When prompted, choose the disk you want to back up (usually
/dev/sda).
- When prompted, choose the disk you want to back up (usually
-
Select the target image directory
- Choose a folder on the USB drive to store the backup image.
-
Wait for the backup to complete
- The process may take some time. When finished, you will see
Done.
- The process may take some time. When finished, you will see
-
Safely remove the MCX-Clonezilla USB drive
-
Reboot or power off the system
sudo reboot -
Wait for the system to restart
-
Backup complete!
- You have successfully created a backup of your mcx-OS onto the Motorcortex USB drive.
Note: This backup image is not a raw image. To create a raw image, please follow the instructions below.
Raw Image Backup
Warning
Make sure you are using a USB drive with enough space to store the raw image!
To create a raw backup image of your mcx-OS (usable with tools like QEMU), follow these steps:
-
Verify the USB drive is mounted
cd /mnt/usb
ls -lart
Expected output:
total 1 drwxr-xr-x 2 root root 4096 Jan 6 12:00 . drwxr-xr-x 3 root root 4096 Jan 6 11:59 .. -
Create an empty disk image file
truncate -s 6G temp.img
ls -lart
This creates a 6GB empty image file named
temp.img. Expected output:-rw-r--r-- 1 root root 6442450944 Jan 6 12:01 temp.img -
Attach the image as a loop device
sudo losetup -fP temp.img
losetup -a
This attaches
temp.imgto the first available loop device (e.g.,/dev/loop1). Expected output:/dev/loop1: []: (/mnt/usb/temp.img) -
Backup mcx-OS to the virtual disk
mci backup- When prompted for the source, select the disk containing mcx-OS (usually
/dev/sda). - For the target image directory, select a folder on the USB drive (e.g.,
/mnt/usb/2026-01-06_15-44-42_mci-fsa-image). Expected output:
Choose Source Device: 1) sda /dev/sda ... Choose Target Image Directory: 1) /mnt/usb/2026-01-06_15-44-42_mci-fsa-image (new directory) ... [progress output] Done - When prompted for the source, select the disk containing mcx-OS (usually
-
Restore the backup to the virtual disk
mci restore -d /dev/loop1Replace
/dev/loop1with your actual loop device if different. Expected output:[progress output] Done -
Verify partitions on the loop device
lsblkLook for your loop device and its partitions (e.g.,
loop1p1,loop1p2). Expected output:NAME MAJ:MIN RM SIZE RO TYPE MOUNTPOINTS loop1 7:1 0 6G 0 loop ├─loop1p1 259:2 0 34M 0 part └─loop1p2 259:3 0 6G 0 part -
Detach the loop device
sudo losetup -d /dev/loop1(No output if successful)
-
Check the image file and its partition table
cd /mnt/usb
fdisk -l temp.img
This will display the partition table of
temp.img. Expected output:Disk temp.img: 6 GiB, 6442450944 bytes, 12582912 sectors Units: sectors of 1 * 512 = 512 bytes Sector size (logical/physical): 512 bytes / 512 bytes I/O size (minimum/optimal): 512 bytes / 512 bytes Disklabel type: gpt Disk identifier: 114BDD2A-88E9-4447-9C7B-6A84C294B34F Device Start End Sectors Size Type temp.img1 2048 71615 69568 34M EFI System temp.img2 71616 12582847 12511232 6G Linux filesystem
-
The next step is to set-up the connection between your controller and your laptop. Connect Your PC