Install
4 minute read
This chapter will explain how to install mcx-python. Please select the operating system you are u using:
Install Python 3
By default Python 3 should already be installed on your Ubuntu distribution.
If not use your package manager to install python3. On Ubuntu you can use apt in the command line:
sudo apt install python3
Installing Motorcortex-Python
Motorcortex-python can be installed by using the pip tool.
-
To be able to use pip to install python packages this first needs to be installed:
sudo apt install python3-pip -
Then download, build and install the motorcortex-python package via pip.
sudo -H pip3 install motorcortex-pythonNote
This will install motorcortex-python for Python3 for all users.
-
Congratulations Motorcortex-python is now installed
Install Virtual Environment
Motorcortex-python can also be installed inside a virtual environment. This can be useful if your system has a different python environment than the one required for Motorcortex or if you would like to keep the Motorcortex-python tools separate from the rest of the system for security reasons. A Virtual Environment, is an isolated working copy of Python which allows you to work on a specific project without worry of affecting other projects.
Installing Virtualenv
-
Check if virtual environment is already installed on your system you can check this using the following command:
virtualenv --version -
If you see a version number for instance 1.6.1 it is already installed. If not you will have to install Vitrualenv:
sudo apt-get install virtualenv
Setting up Vitrualenv
-
You will need a directory for your virtual enviroment. You may choose any location you desire:
mkdir ~/virtualenvironment -
To create a folder for your new app that includes a clean copy of Python3 run:
virtualenv -p python3 ~/virtualenvironment/mcx-env -
We have created this new folder called mcx-env. To begin cd into your new project:
cd ~/virtualenvironment/mcx-env/bin -
Now you are in your virtual environment folder you can activate your virtual environment:
source activate -
Notice your prompt will have a shell in this case (mcx-env). If you would like to leave your virtual environment type the following command:
deactivate
Installing Motorcotex-Python in Vitrualenv
-
Motorcortex-python can be installed by using the “pip” tool. download, build and install the motorcortex-python package via pip.
pip3 install motorcortex-python -
Congratulations Motorcortex-python is now installed in your virtual environment.
Install Python 3.7 or lower
Download Python 3 from the python website: https://www.python.org/downloads/windows/. Choose the appropriate installer for your system. Make sure you choose Python 3.7.
-
Launch the installer and choose
Customize installation.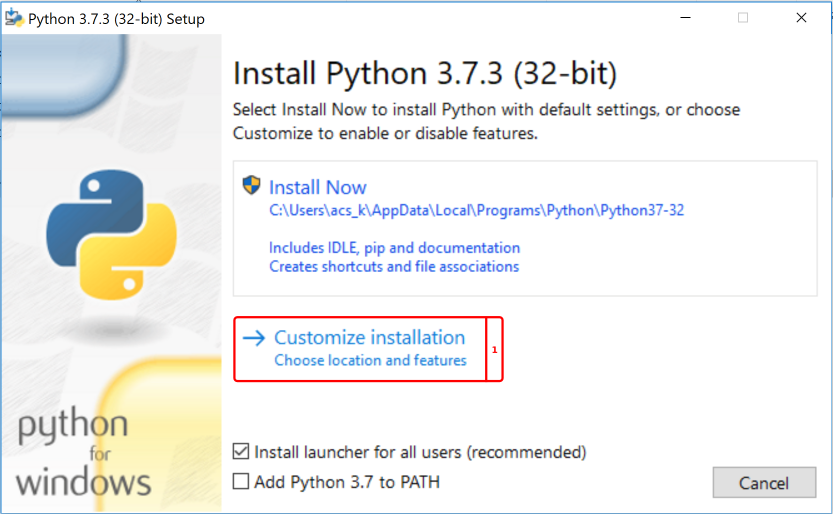
-
All options are selected by default (documentation and test suite are actually optional) Click
Next.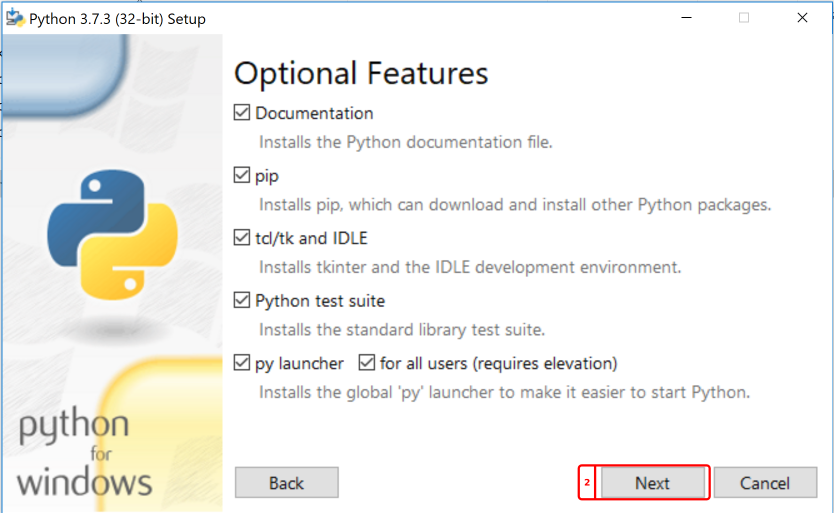
-
Under the Advanced Options select
Add Python to environment variables.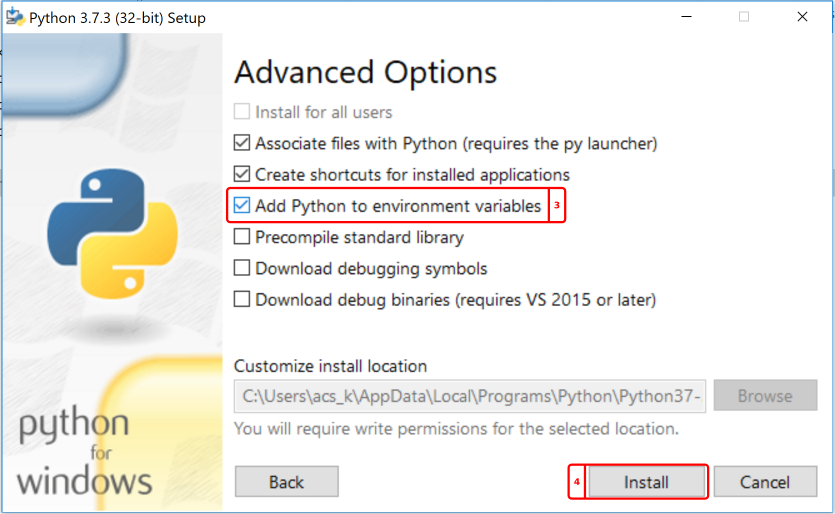
-
Click
Install. -
Congratulations Python 3 is now installed.
Installing Motorcortex-Python
Motorcortex-python is the core library required for any Motorcortex application. It provides convenient ways to communicate with Motorcortex-based applications.
Motorcortex-python can be installed by using the “pip” tool. You have to be connected to the internet to install packaged using pip.
- Open a
Command Promptby pressing theWindowskey and typing “cmd”.
Note
It may be necessary to use “Run as administrator” if installation commands fail.
- In the Command Prompt window type:
python -m pip install Motorcortex-python
- Congratulations
motorcortex-pythonpackage is now installed for the current user.
Alternative Installation Instructions
Alternatively the user can use the miniconda package management and environment management system.
Install Miniconda Python3
Download Miniconda Python 3 from the Conda website:
https://docs.conda.io/en/latest/miniconda.html. Choose the appropriate installer for your system.
-
Launch the installer.
-
Click
Next.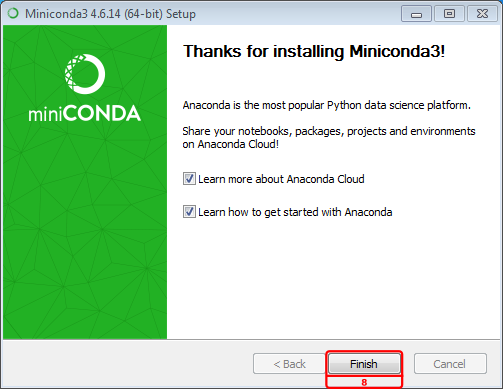
-
Click
I Agree.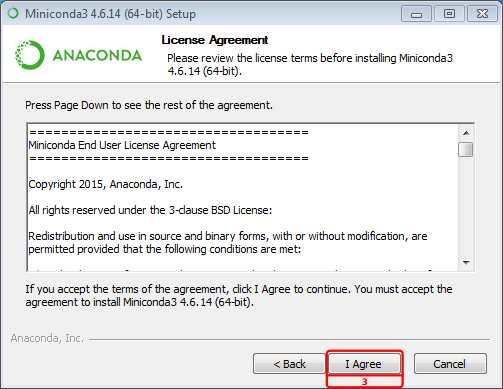
-
Select for who the installation is designated and click
Next.
-
Choose your desired destination folder and click
Next.
-
Select
Register Anaconda as my default Python --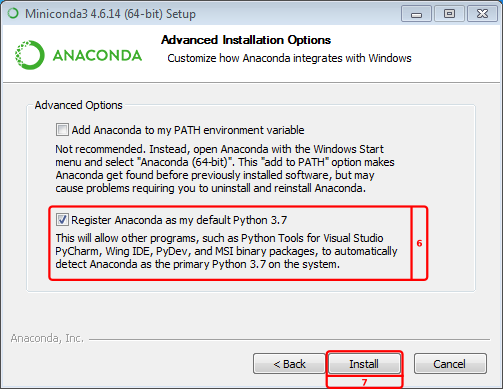
-
Click
Installto start the installation. -
Click
Finishto finish the installation.
Note
It is very convenient to use the Miniconda Cheetsheet when using miniconda.
Create environment
Open an Anaconda Prompt by pressing the windows key, type anaconda in the search field and select appropriate.
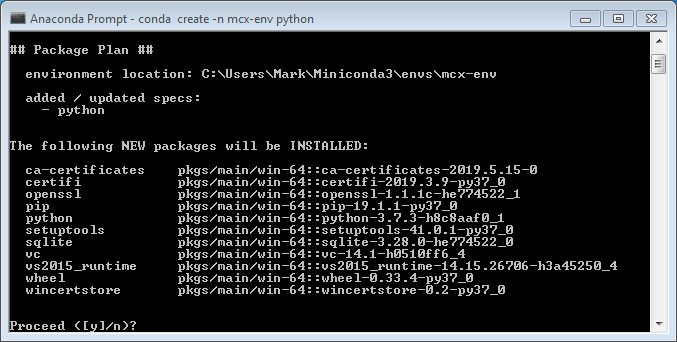
- In the Anaconda Prompt window, to create the mcx-env environment, type:
conda create -n mcx-env python=3.7
To remove an environment use ”conda env remove -n
ENV_NAME”
Activate environment
Activate the environment:
conda activate mcx-env
Note
To access this environment a next time open an Anaconda Prompt window and type conda activate mcx-env. To deactivate an environment type conda deactivate.
