Virtual Machine
7 minute read
A virtual machine can be used to try out Motorcortex on your PC. You will need a the Motorcortex .ova file as well as VirtualBox installed on your PC.
Installing VirtualBox
In this section you will install VirtualBox for running your Motorcortex virtual machine.
Please select the OS you are using:
This guide covers setting up and running a QEMU virtual machine on Ubuntu with TAP networking, UEFI firmware, and KVM acceleration.
Table of Contents
Prerequisites
System Requirements
- Ubuntu 20.04 or later (tested on 22.04/24.04)
- CPU with virtualization support (Intel VT-x or AMD-V)
- At least 8GB RAM (4GB will be allocated to VM)
- Sufficient disk space for VM image
- Download the MCX-RTOS image here: https://app.motorcortex.io/store/items
Check Virtualization Support
# Check if virtualization is enabled
egrep -c '(vmx|svm)' /proc/cpuinfo

# If output is greater than 0, virtualization is supported
# Also check:
kvm-ok

# Expected output: "INFO: /dev/kvm exists"
Installation
Install Qemu
# Update package list
sudo apt update

# Install QEMU, KVM, and OVMF (UEFI firmware)
sudo apt install -y qemu-system-x86 qemu-kvm ovmf bridge-utils net-tools
Setup some scripts
Download the following scripts:
Place the scripts in the same folder as your downloaded MCX_RTOS image.
NOTE: You may have to modify the name of the image file inside the start-qemu-mcx-image.sh script.
Make the start script executable:
chmod +x start-qemu-mcx-image.sh
Running
./start-qemu-mcx-image.sh
Understanding the Command
Let’s break down each component of the QEMU command:
sudo qemu-system-x86_64 -drive file=mcx-image-mcx-intel.rootfs-2026.05.1-0-g34c0e28-20260508091432.wic,format=raw,if=virtio \
  -m 4090 -bios /usr/share/ovmf/OVMF.fd \
  -cpu Skylake-Client \
  -smp cores=4 \
  -enable-kvm \
  -netdev tap,id=net0,ifname=tap0,script=network-up.sh,downscript=network-down.sh \
  -device virtio-net-pci,netdev=net0
Command Parameters Explained:
| Parameter | Description |
|---|---|
sudo |
Required for TAP networking and device access |
qemu-system-x86_64 |
QEMU emulator for x86_64 architecture |
-drive file=...wic,format=raw,if=virtio |
Virtual disk image using VirtIO for better performance |
-m 4090 |
Allocate 4090MB RAM to the VM |
-bios /usr/share/ovmf/OVMF.fd |
Use UEFI firmware instead of legacy BIOS |
-cpu Skylake-Client |
Emulate Skylake generation CPU |
-smp cores=4 |
Configure 4 CPU cores |
-enable-kvm |
Enable KVM acceleration for near-native performance |
-netdev tap,... |
Configure TAP network backend |
-device virtio-net-pci,netdev=net0 |
Add VirtIO network card |
-nographic |
optional: Disable graphical output, use serial console |
Download VirtualBox from the
https://www.virtualbox.org/wiki/Downloads website. Choose the correct operating system to download and install the .deb file.
-
After installing open
VirtualBox. -
In Virtual Box go to
File,Toolsand open theNetwork Manager.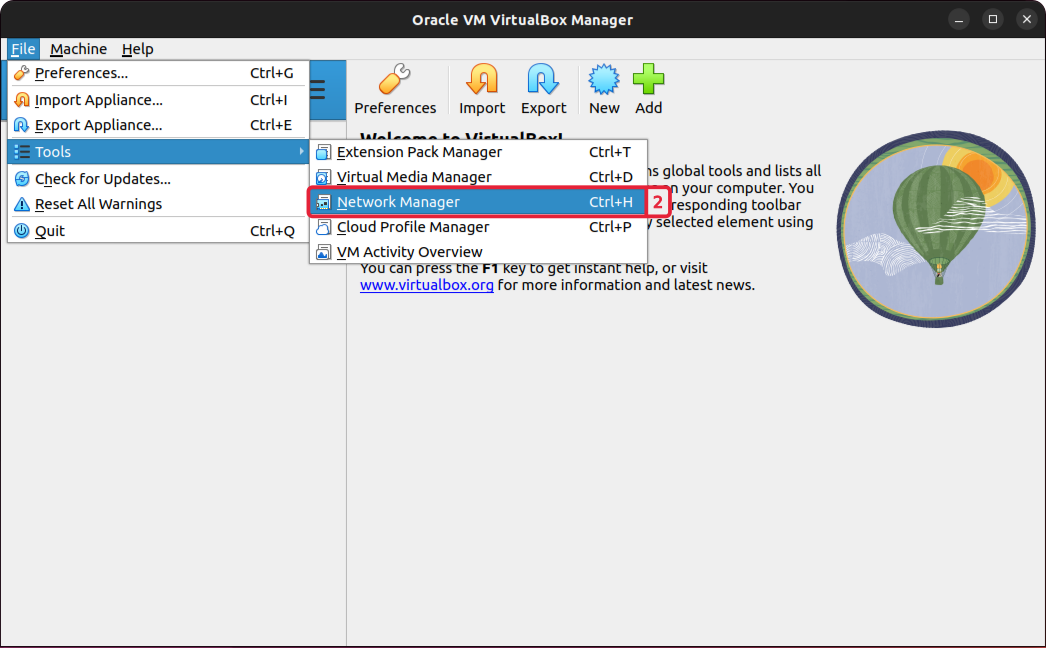
-
Press
Create. -
press
Properties. -
Go to the
DHCP ServerTab. -
Enable the
DHCP Server. -
Press
Apply.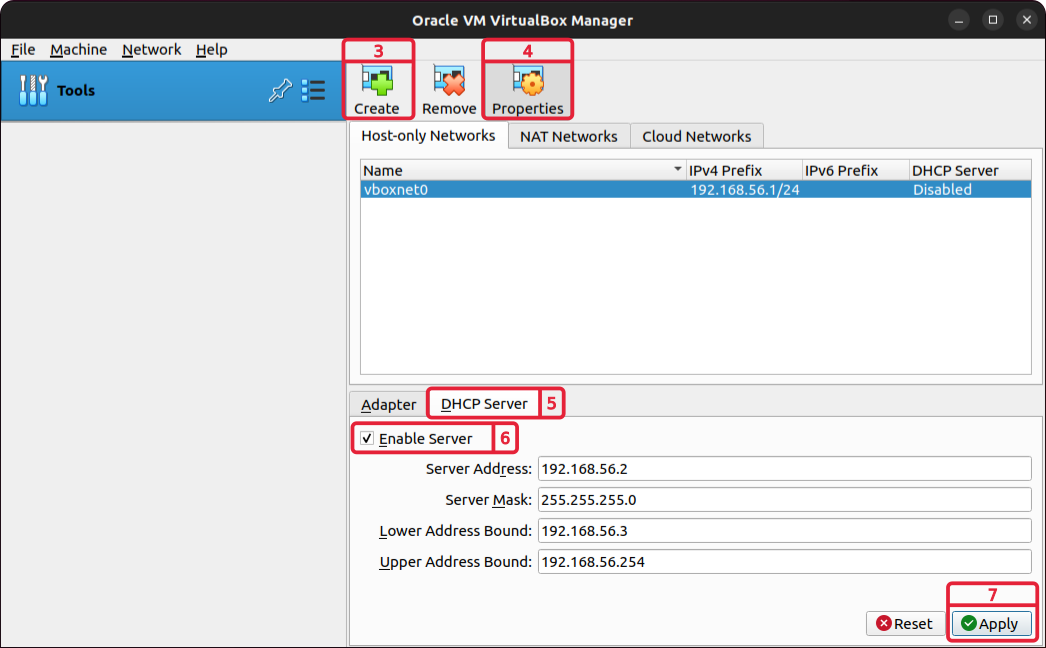
-
Congratulations your virtualbox is now ready to use.
Installing your Motorcortex Virtual Machine
Users of Motorcortex.io can download the Motorcortex xxxx.xx.x.ova file from the Store. If you want to configure your own virtual machine make sure to take a look at Virtual Machine Full Configuration.
-
In
VirtualBoxgo toFile,Import Appliance....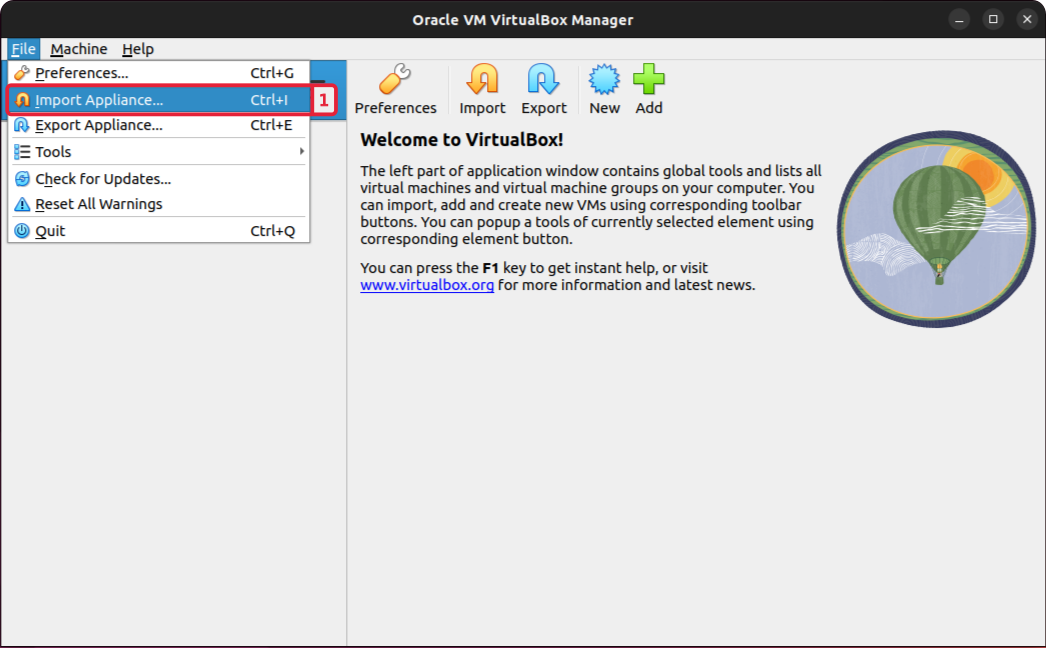
-
In the
Import Virtual Appliancewizard Choose theMotorcortex xxxx.xx.x.ovafile that you have downloaded. -
Press
Finishto create your Motorcortex virtual machine.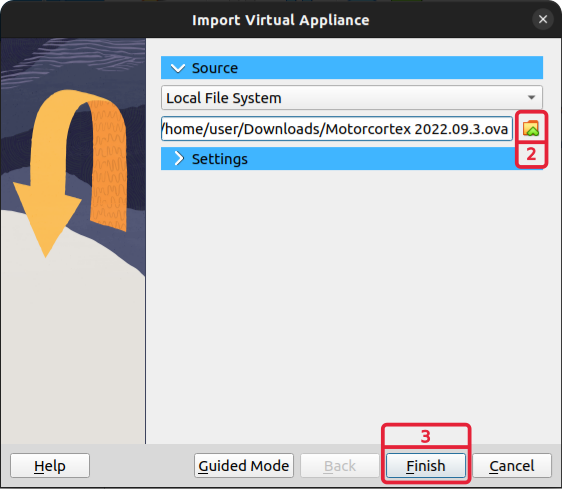
-
Congratulations your Motorcortex virtual machine is now ready.
Starting Virtual Machine
-
Open
Virtual Box, selectMotorcortex 2022.09and pressStart.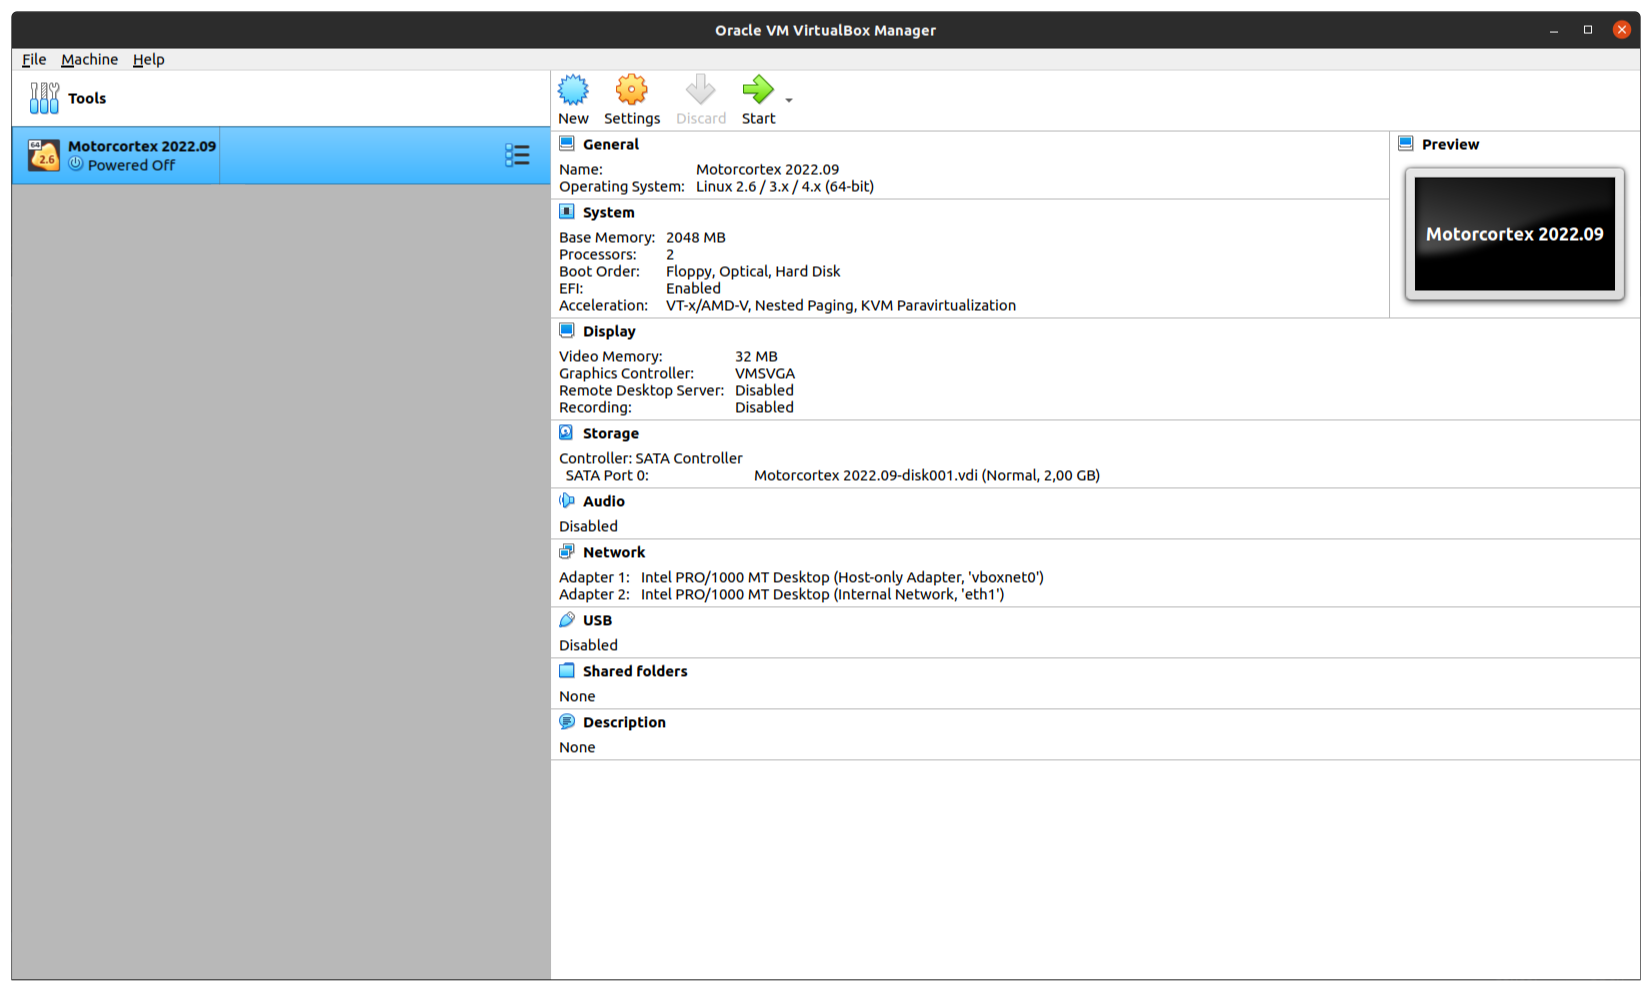
-
The virtual machine is starting, this can take a few seconds.
If the virtual machine does not start, a common virtual box error is:
Failed to load the NVRAM store from the file (VERR_PATH_NOT_FOUND).
Can't attach Nvram Storage driver (VERR_PATH_NOT_FOUND).
Result Code:
E_FAIL (0X80004005)
Component:
ConsoleWrap
Interface:
IConsole {6ac83d89-6ee7-4e33-8ae6-b257b2e81be8}
Solution: Change the virtual machine name from
Motorcortex 2024.01to for exampleMotorcortex 2024. Start the virtual machine again.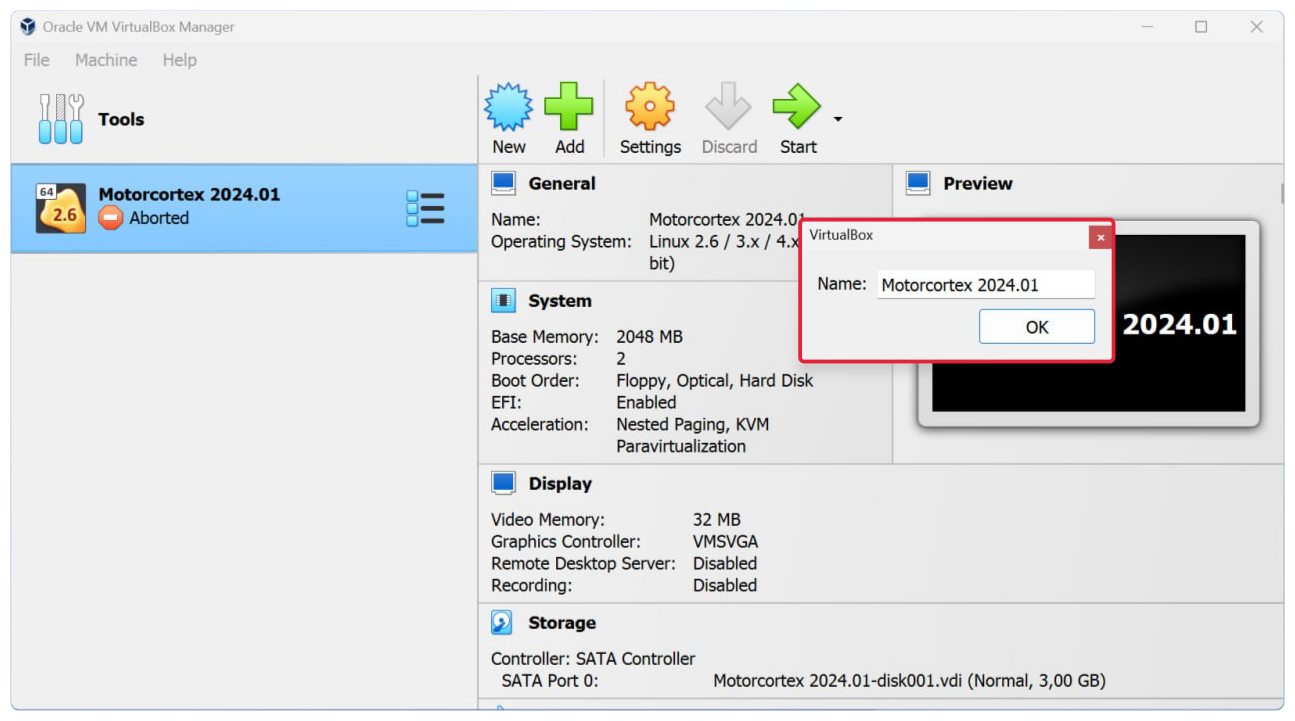
-
The virtual machine IP is shown in the MOTD for example
192.168.56.111: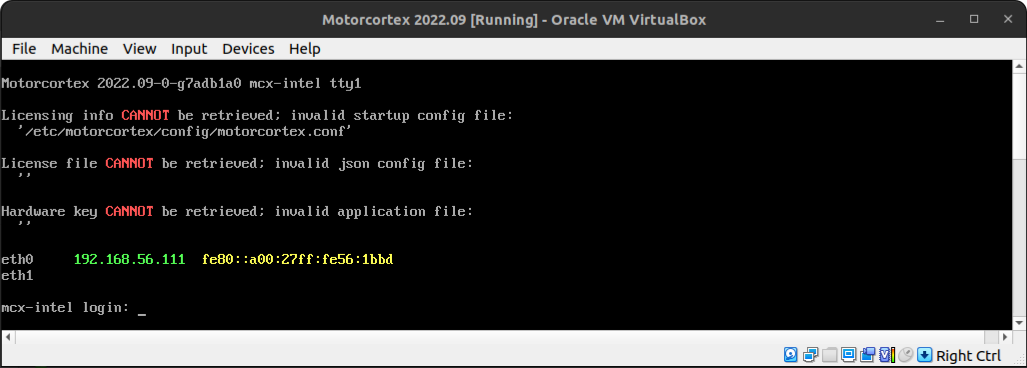
Use the
eth0virtual box IP address if you want to connect from yourlocal machinetovirtual machine. -
Log in to virtual controller.
- Login:
admin - Password:
vectioneer
- Login:
-
The command line should look like this:
mcx-intel:~$ -
Test your connection via external machine, on your local machine open terminal and login via
ssh admin@192.168.56.111, password:vectioneer.Note
When using virtual machine, make sure that your application is in Simulation Mode.
Note
If you would like to use a real controller after using the virtual machine run
sudo ifconfig vboxnet0 down. If you would like to use the virtual machine again usesudo ifconfig vboxnet0 up.Note
If you deploy packages to the controller, you should not use the default IP address, but the new virtual machine IP address
192.168.56.111.
Download VirtualBox from the
https://www.virtualbox.org/wiki/Downloads website. Choose the Windows operating system and download the .exe file.
-
Double click the
.exefile. -
The
setup wizardwill pop-up clickNext.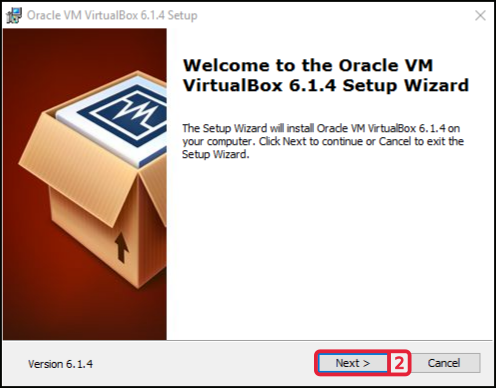
-
Click
Nextunless you want to change the location for the VirtualBox.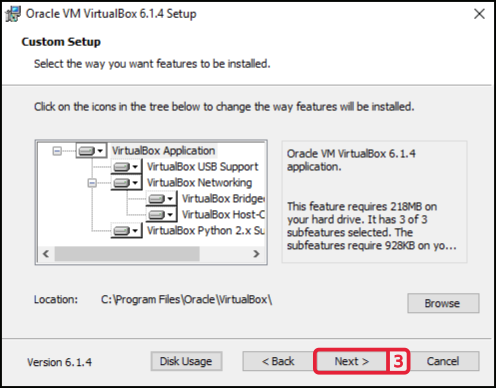
-
Click
Nextunless you want to change some of the custom install options.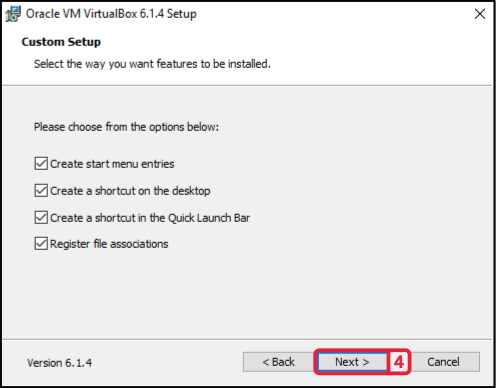
-
A warning will tell you that network connections will be disconnected temporarily. Click
Yes.
-
Click
Installto start the installation.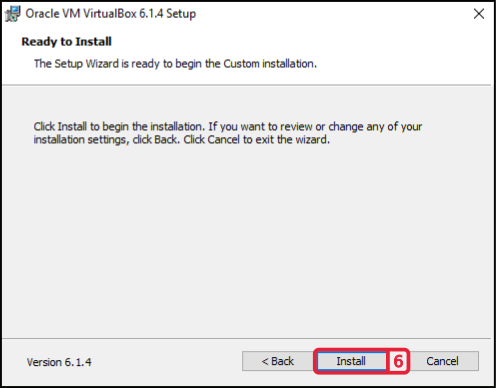
-
The installation will start. During the installation a security warning will pop-up click
Install.
-
Click
Finishto complete the installation.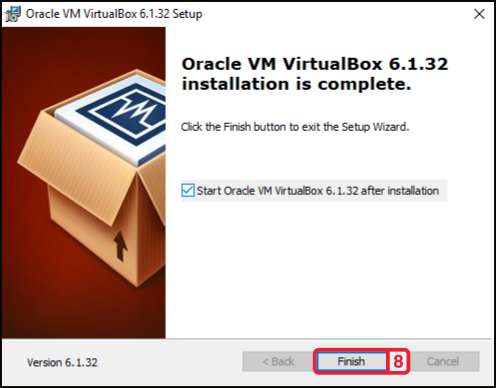
-
Congratulations you have installed
VirtualBox.
Add Host Network
-
After installing open
VirtualBox. -
Go to
Fileand open theHost Network Manager....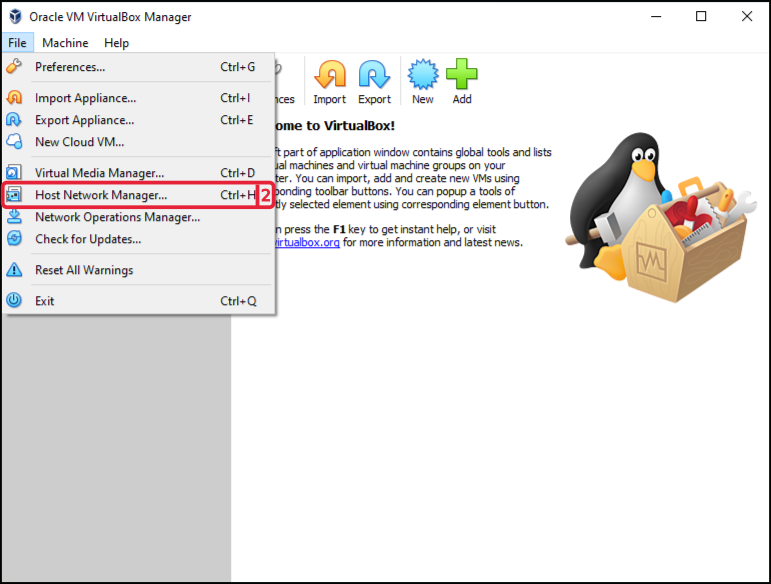
-
Press
Create.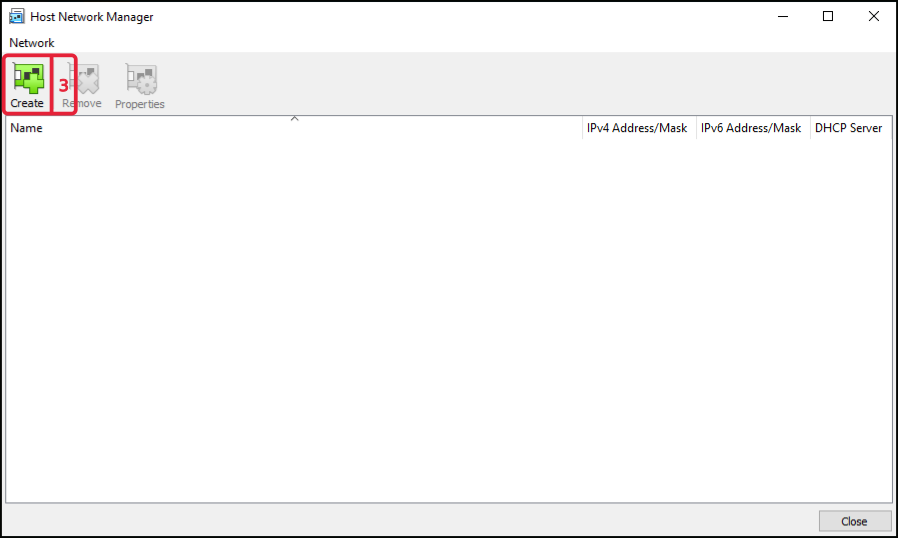
-
Check the
DHCP Server.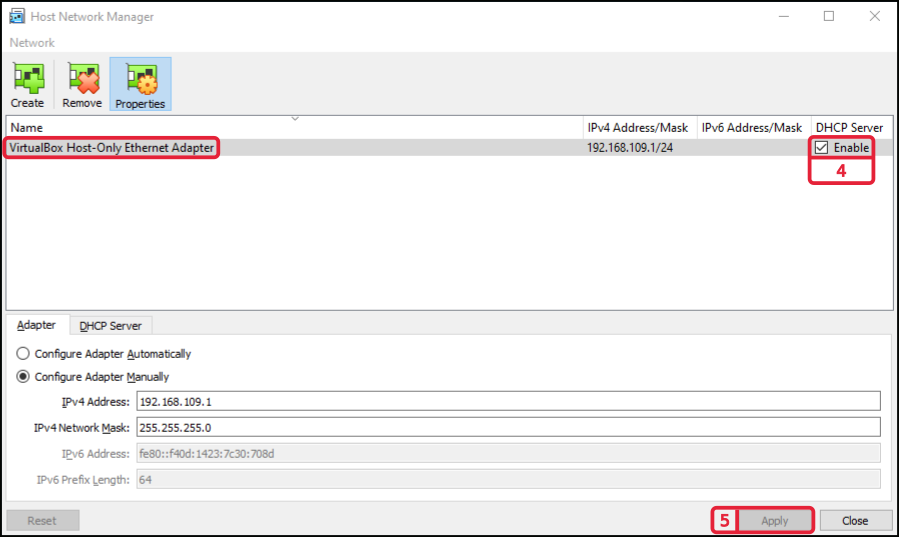
-
Press
Apply. -
Congratulations your virtual machine ready, now you only need to change your host-only ethernet settings.
Change Host-Only Ethernet Settings
-
After creating
Virtual Host-Only Ethernet Adapter. -
On you Windows PC, go to
Network Connection. -
Right-click on
Virtual Host-Only Ethernet Adapterand chooseproperties.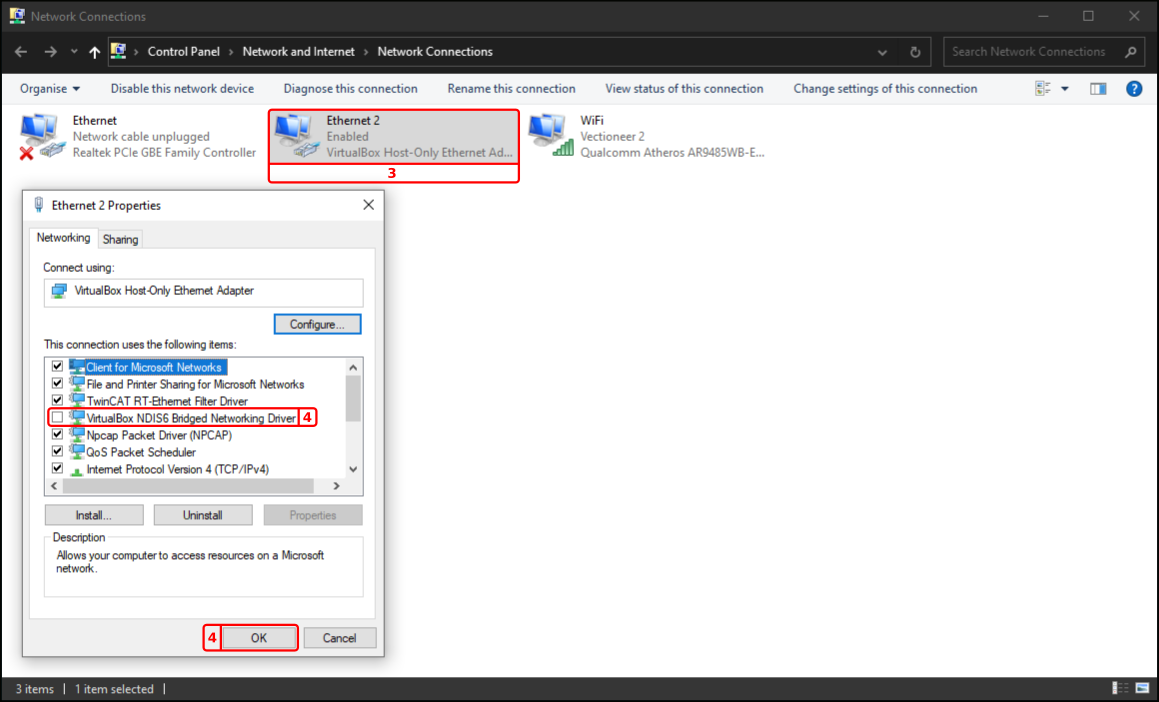
-
Disable the
VirtualBox NDIS6 Bridged Network Driver, byuntickingand pressOK. -
Restart connection, right-click
Virtual Host-Only Ethernet AdapterfirstDisablethenEnable. -
Congratulations you windows network host-only ethernet adapter settings are set correctly, now you are ready to install
Motorcortex virtual machine.
Installing your Virtual Machine
From the Motorcortex store you downloaded the Motorcortex .ova file for your virtual machine. If you want to configure your own virtual machine please check Virtual Machine Full Configuration.
-
Open
VirtualBox. -
Go to
Fileand clickImport Appliance.... -
At
Appliance to importChoose themotorcortex-xxxx-xx.ovafile and clickNext.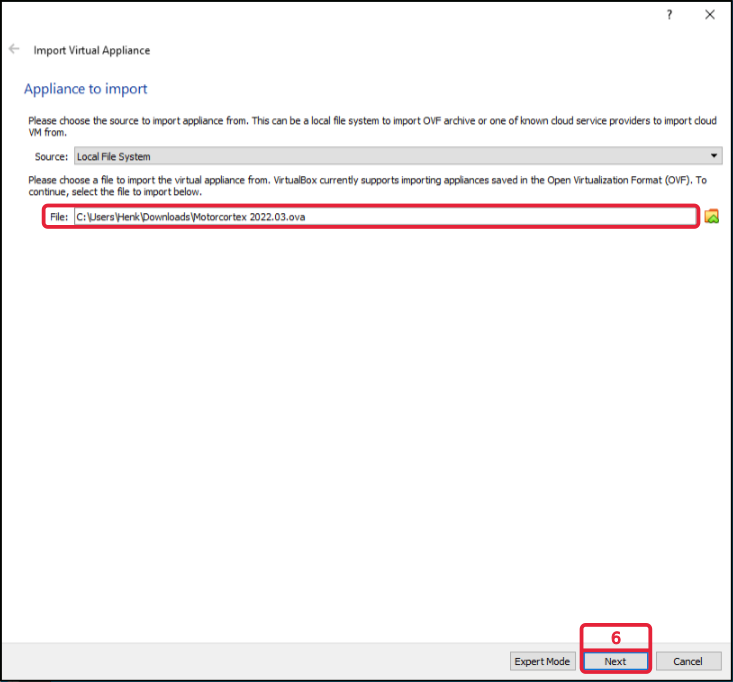
-
At the
Appliance settingspressImport.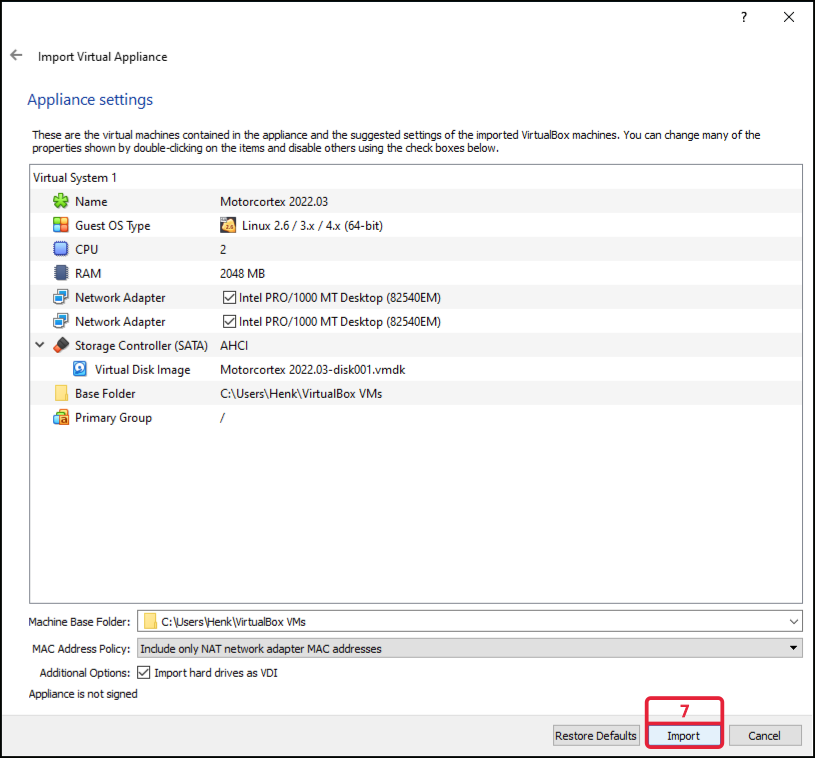
-
The virtual machine is now installed, before starting the virtual box you have to change
Adapter 1settings from defaultvboxnet0toVirtualBox Host-Only Ethernet Adapter.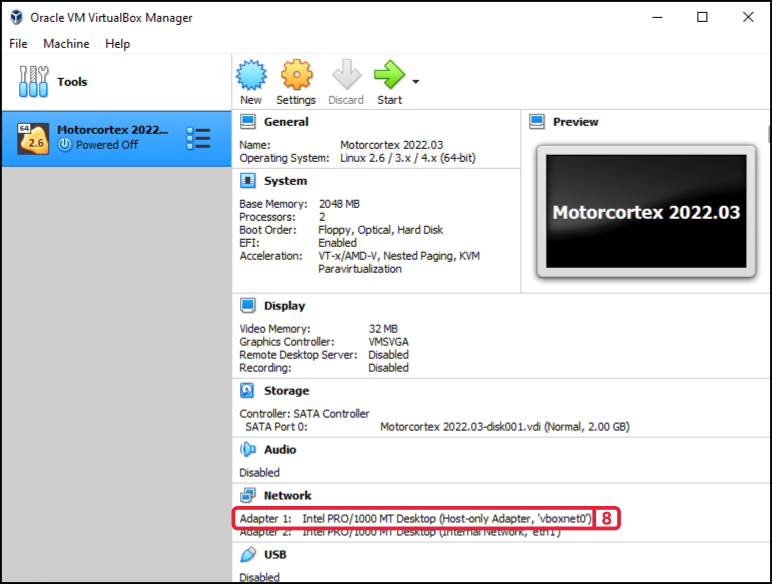
-
Select
virtual machinego toSettings, change theNametoVirtualbox Host-Only Ethernet Adaptor. PressOk.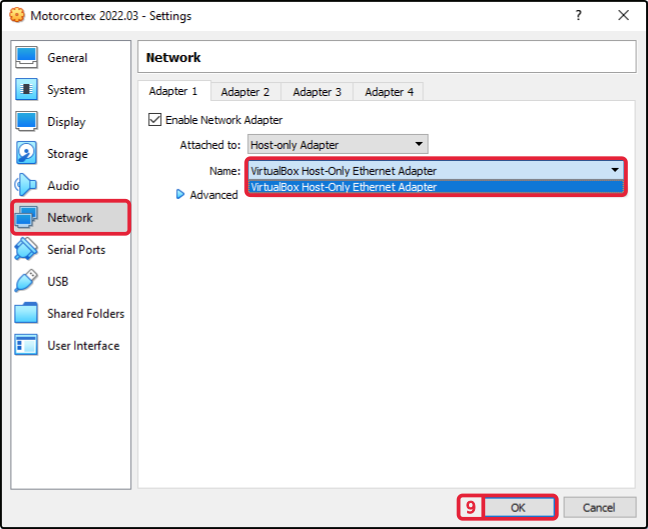
Note
Check if step 8 changed to
VirtualBox Host-Only Ethernet Adapter, else restart VirtualBox. -
The Virtual Machine is now installed and ready for use.
Starting Virtual Machine
-
Open
Virtual Box, selectMotorcortex 2022.09and pressStart.
-
The virtual machine is starting, this can take a few seconds.
If the virtual machine does not start, a common virtual box error is:
Failed to load the NVRAM store from the file (VERR_PATH_NOT_FOUND).
Can't attach Nvram Storage driver (VERR_PATH_NOT_FOUND).
Result Code:
E_FAIL (0X80004005)
Component:
ConsoleWrap
Interface:
IConsole {6ac83d89-6ee7-4e33-8ae6-b257b2e81be8}
Solution: Change the virtual machine name from
Motorcortex 2024.01to for exampleMotorcortex 2024. Start the virtual machine again.
-
The virtual machine IP is shown in the MOTD for example
192.168.56.111:
Use the
eth0virtual box IP address if you want to connect from yourlocal machinetovirtual machine. -
Log in to virtual controller.
- Login:
admin - Password:
vectioneer
- Login:
-
The command line should look like this:
mcx-intel:~$ -
Test your connection via external machine, on your local machine open terminal and login via
ssh admin@192.168.56.111, password:vectioneer.Note
When using virtual machine, make sure that your application is in Simulation Mode.
Note
If you would like to use a real controller after using the virtual machine run
sudo ifconfig vboxnet0 down. If you would like to use the virtual machine again usesudo ifconfig vboxnet0 up.Note
If you deploy packages to the controller, you should not use the default IP address, but the new virtual machine IP address
192.168.56.111.

The next step is to set-up the connection between your controller and your laptop. Connect Your PC