Home
18 minute read
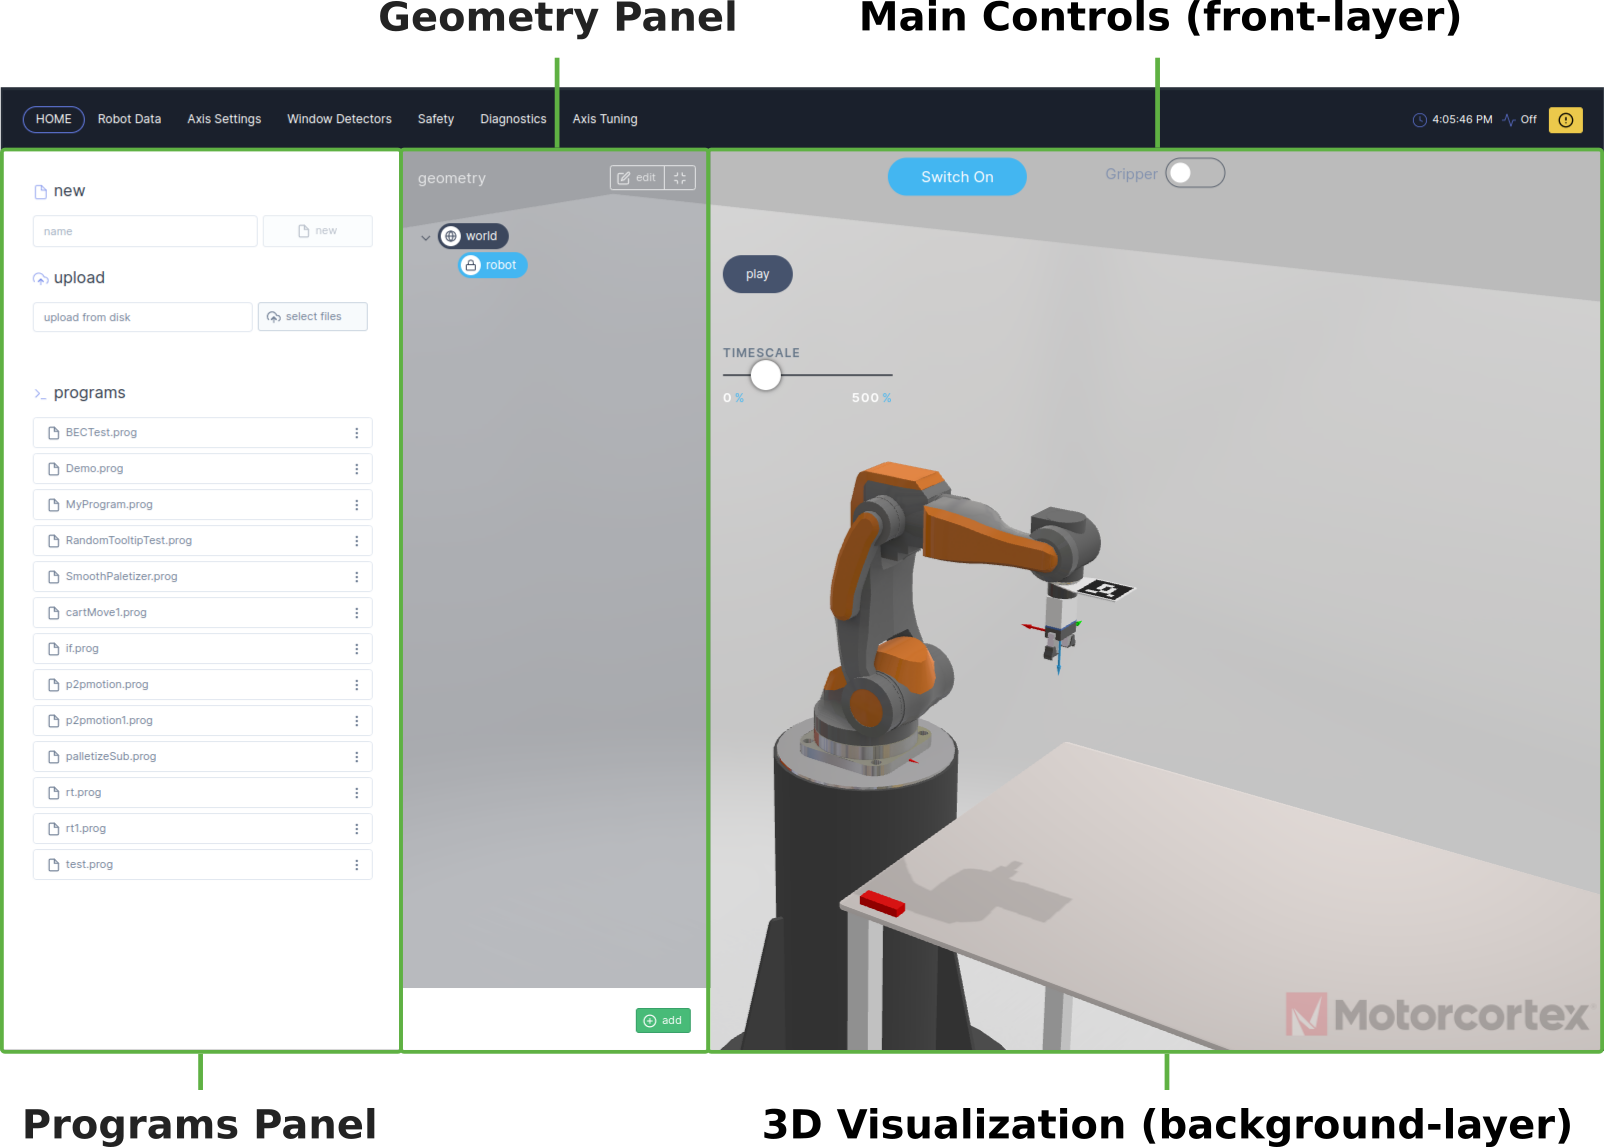
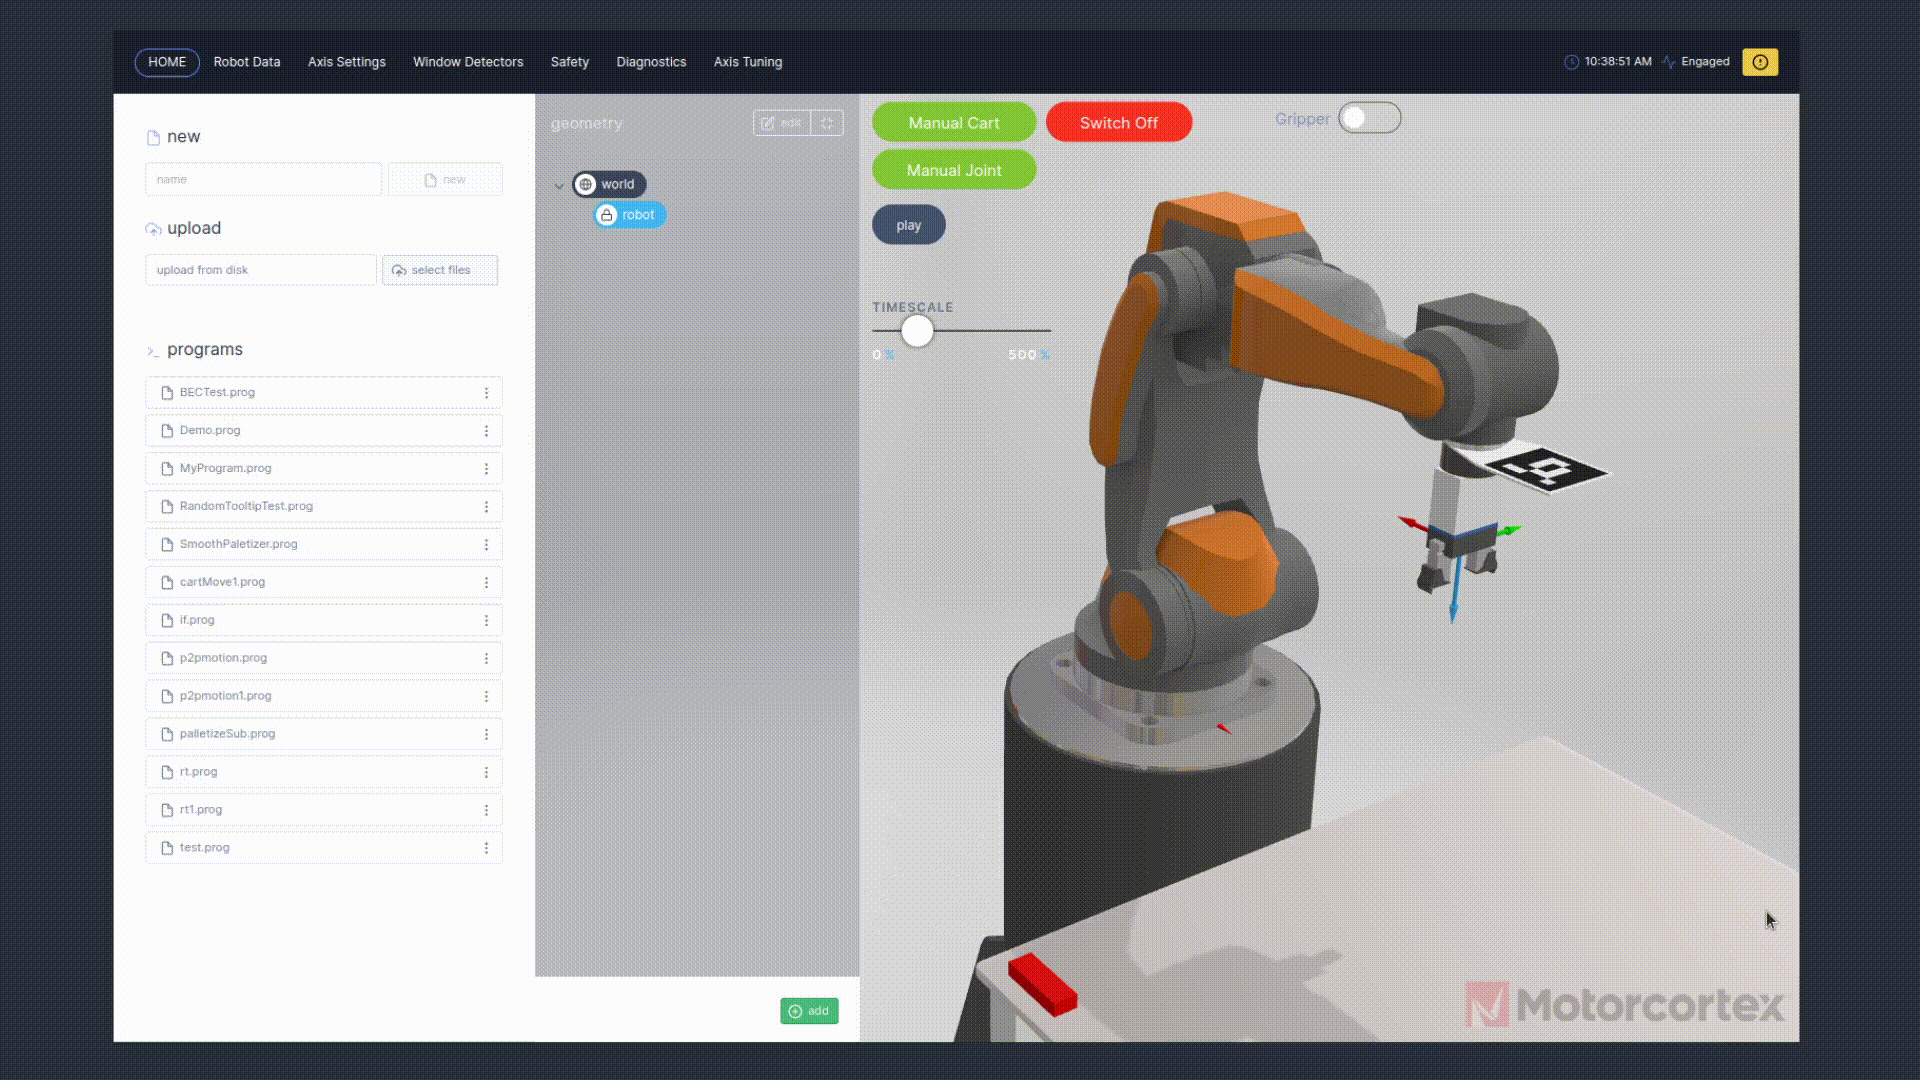
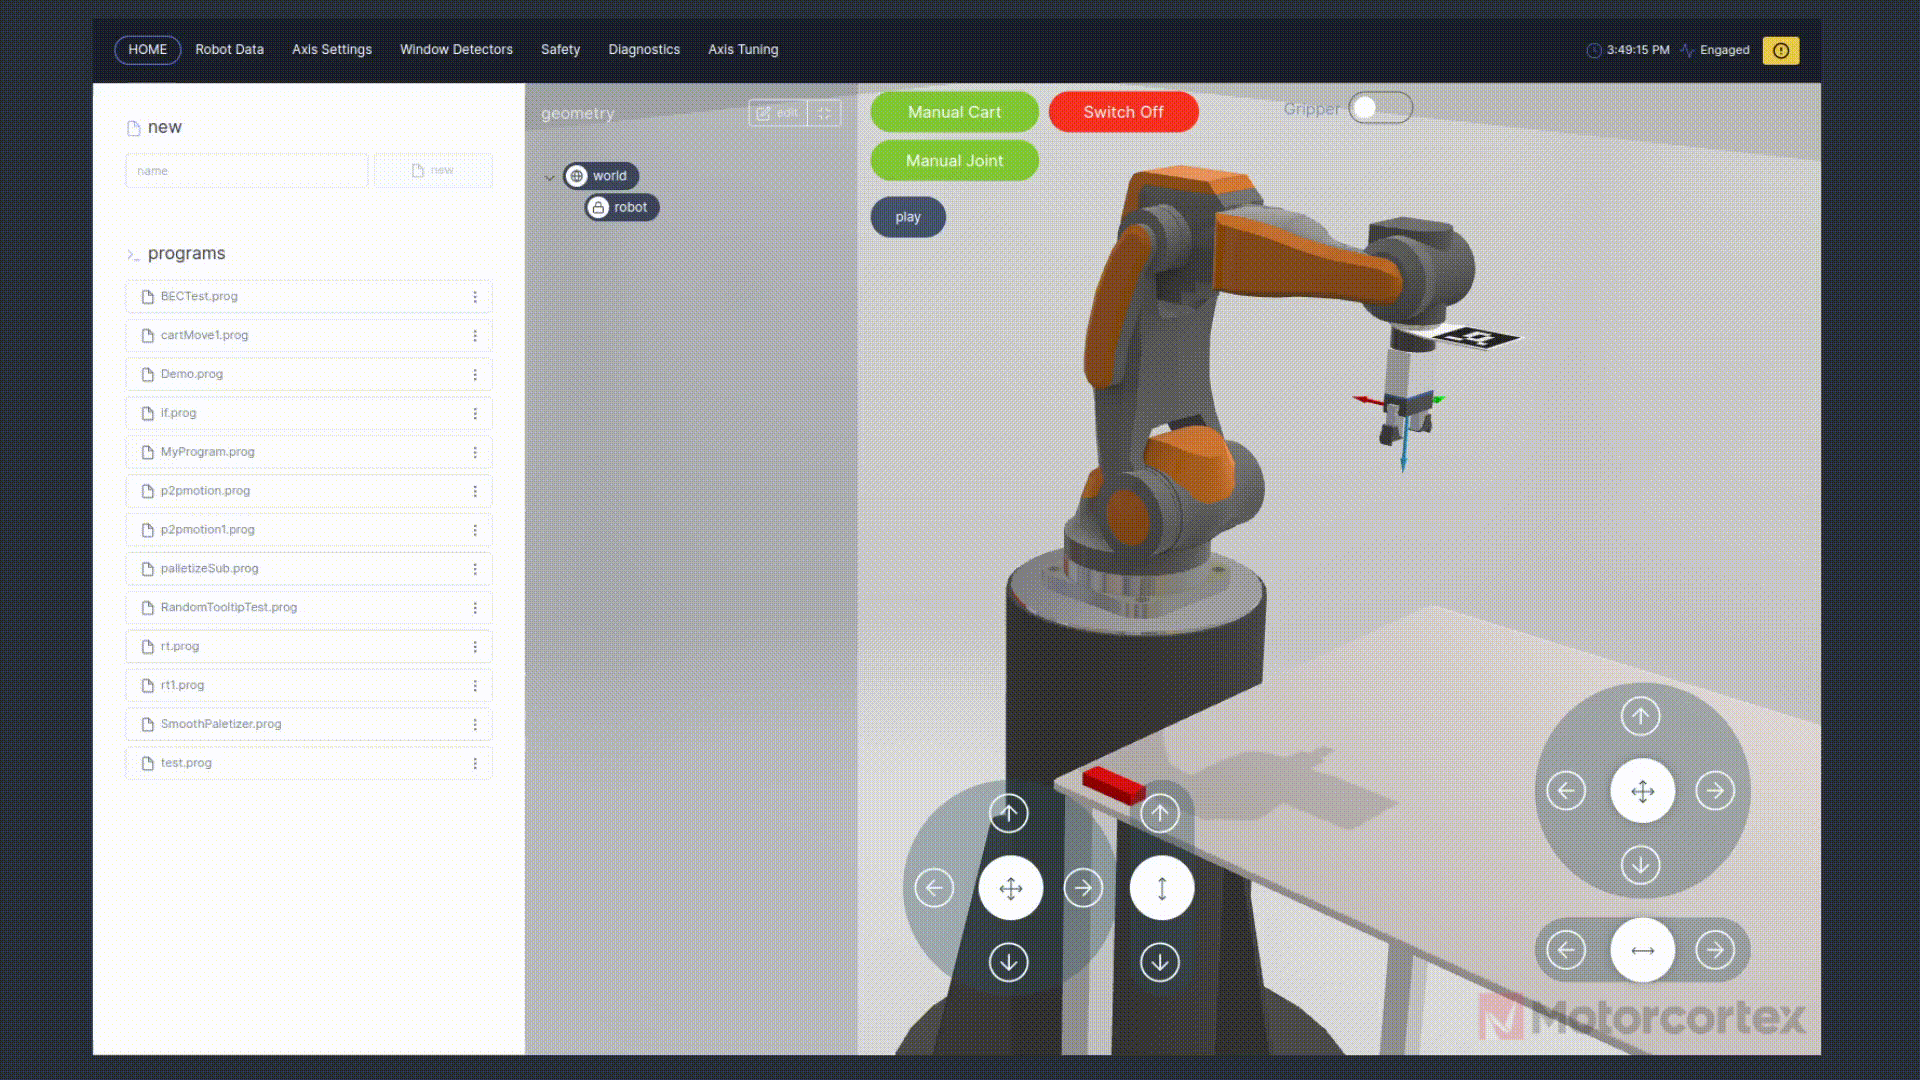
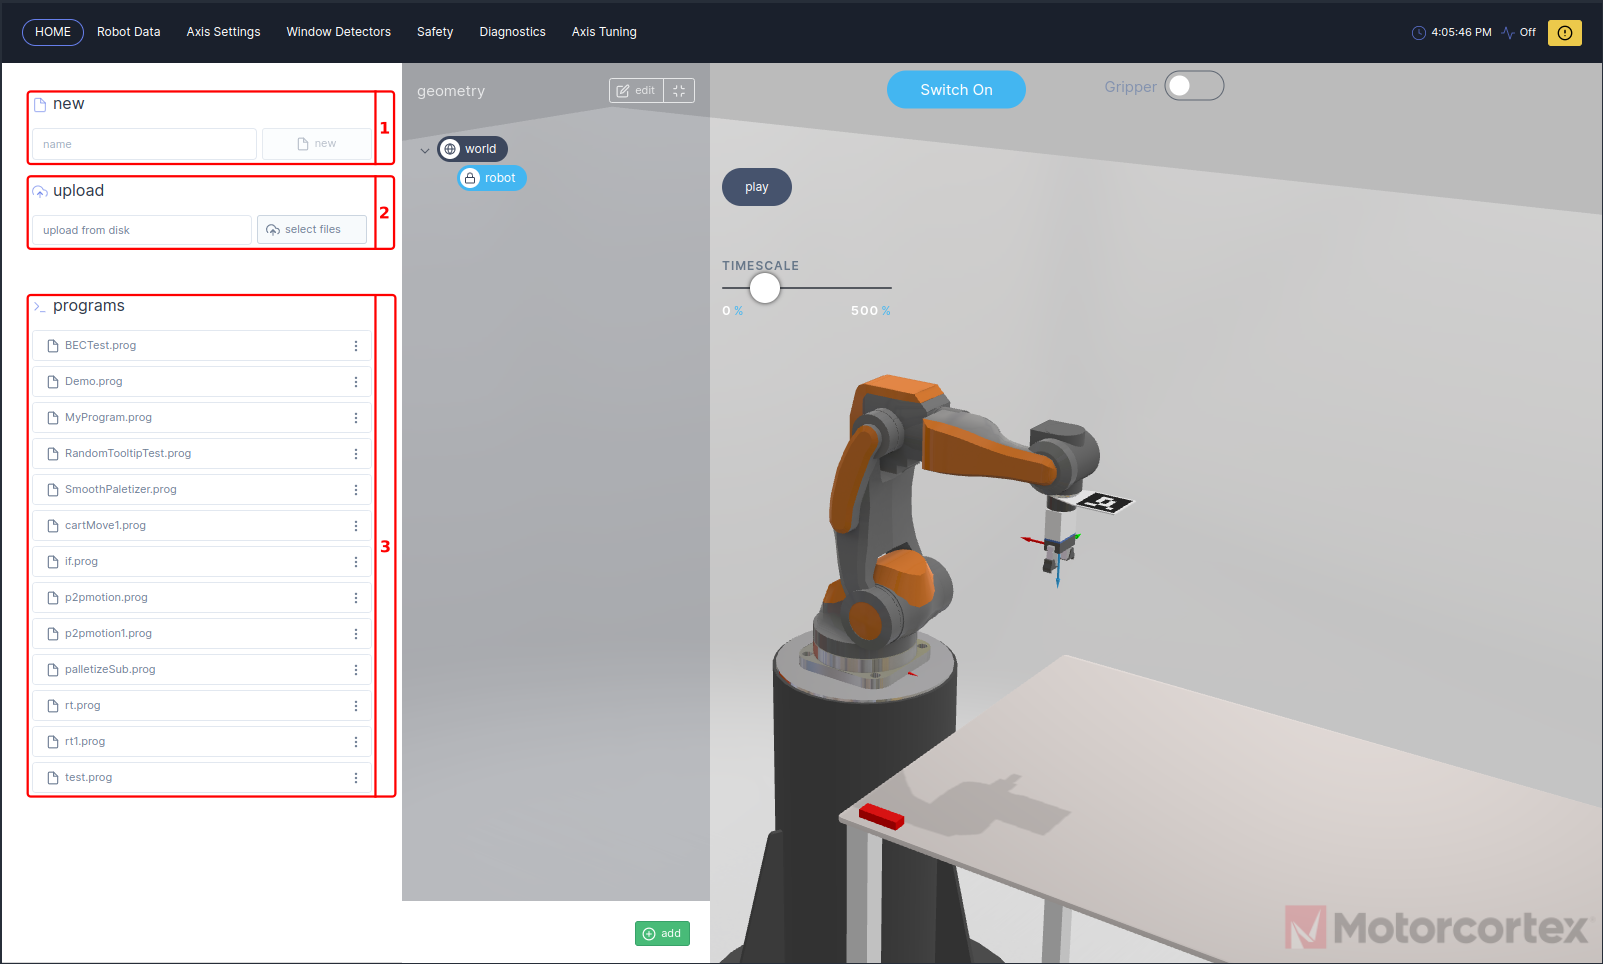
The Motorcortex Robot App contains a HOME tab, which provides the user with a control interface, the home tab is subdivided in: 3D visualization, main controls, geometry panel and a programs panel.
The background layer of the home tab contains a 3D Visualization of the robot application. You can adjust your 3D visualization be means of the changing the .json file. In this file you can assign a .gltf / .glb file containing a three dimensional scene with robot model.
For more information about how to set-up a .gltf file and create a .json file refer to 3D-Models.
The main function of the Main Controls is to switch on/off the robot and control the robot manually or automatic:
How to use main controls:
- Switch
on/offrobot.Switch On Switch Off
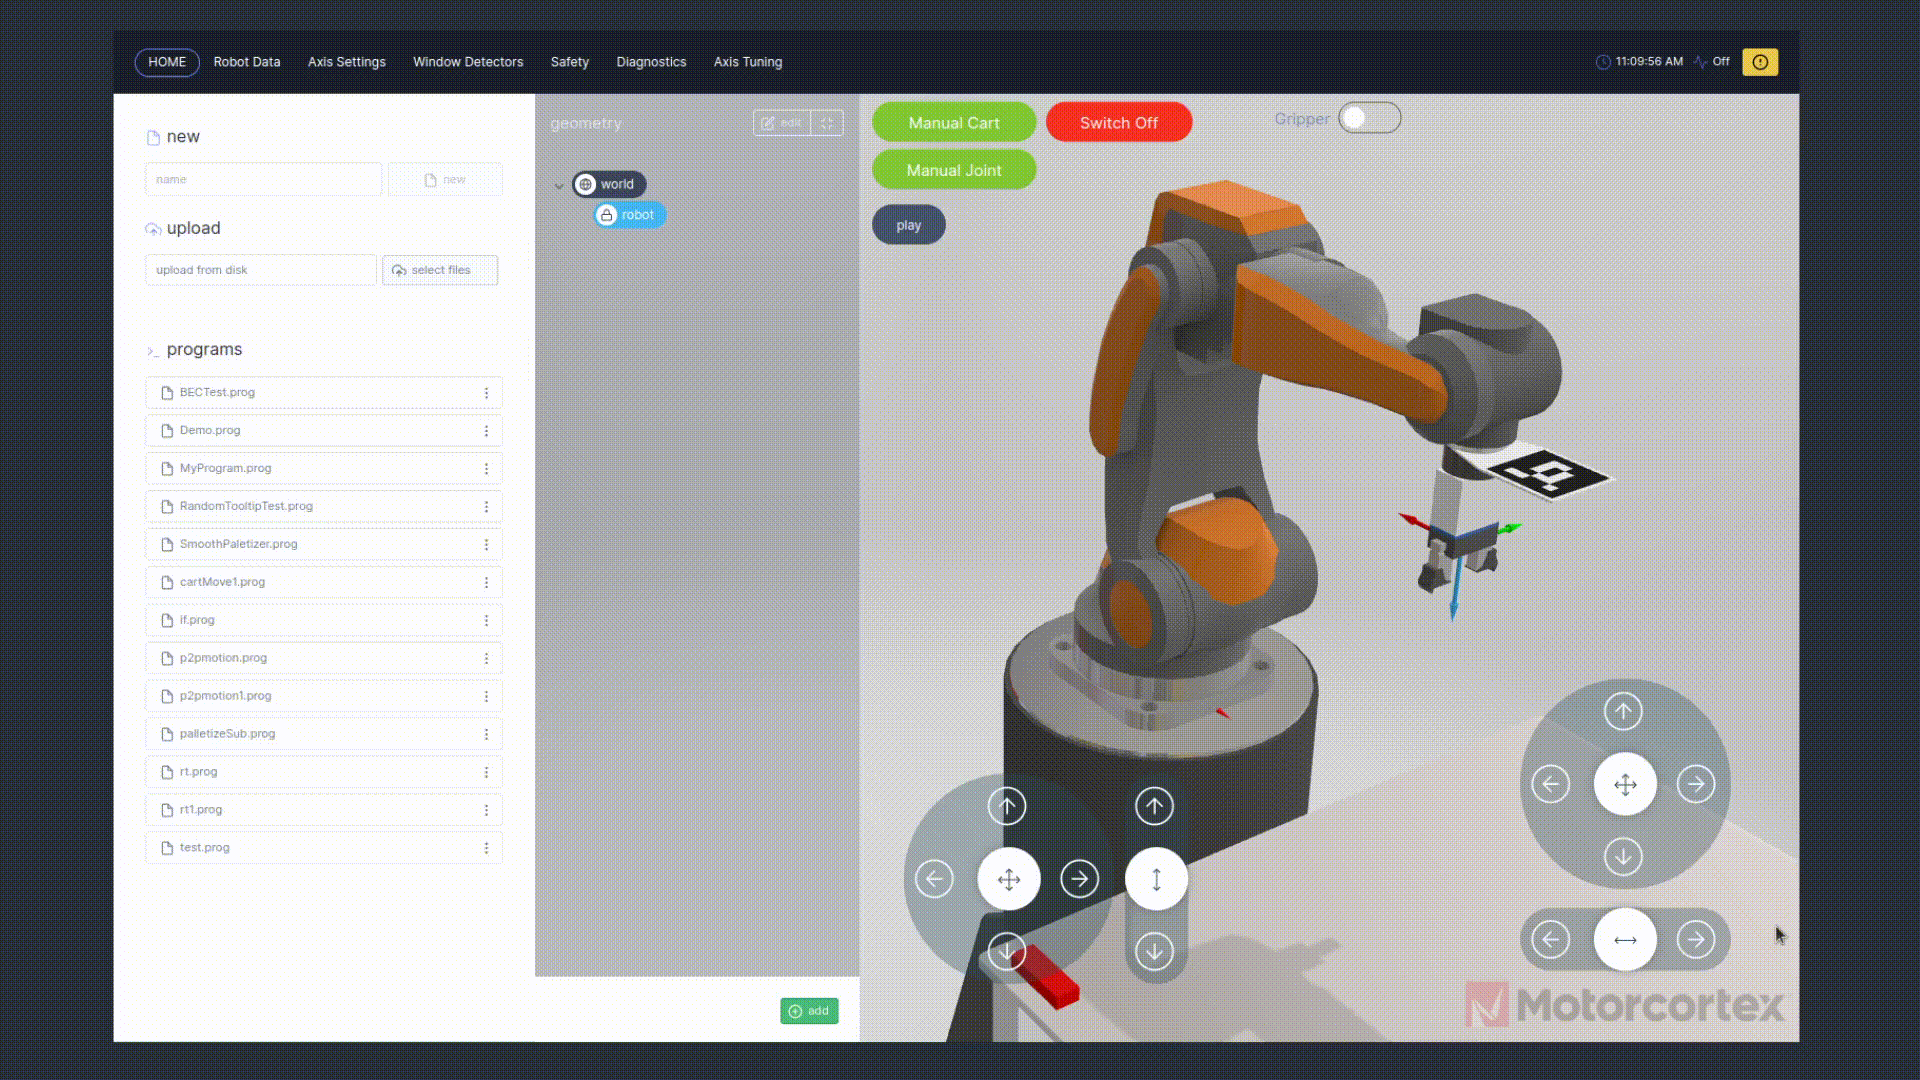
After the system is switched on the Manual cart and Manual joint modes become visible in the Main Controls.
-
Pressing
manual cartmode activates the cartesian coordination system. Enabling you to translate inx,yandzdirection withTranslation-joystickand rotate aroundx,yandzaxes with therotation-joystick.
Translation Joystick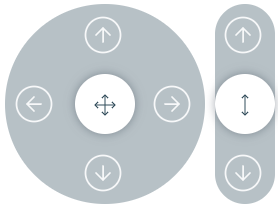 Rotation Joystick
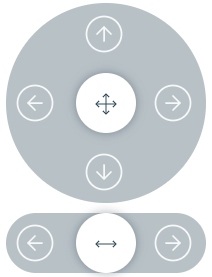
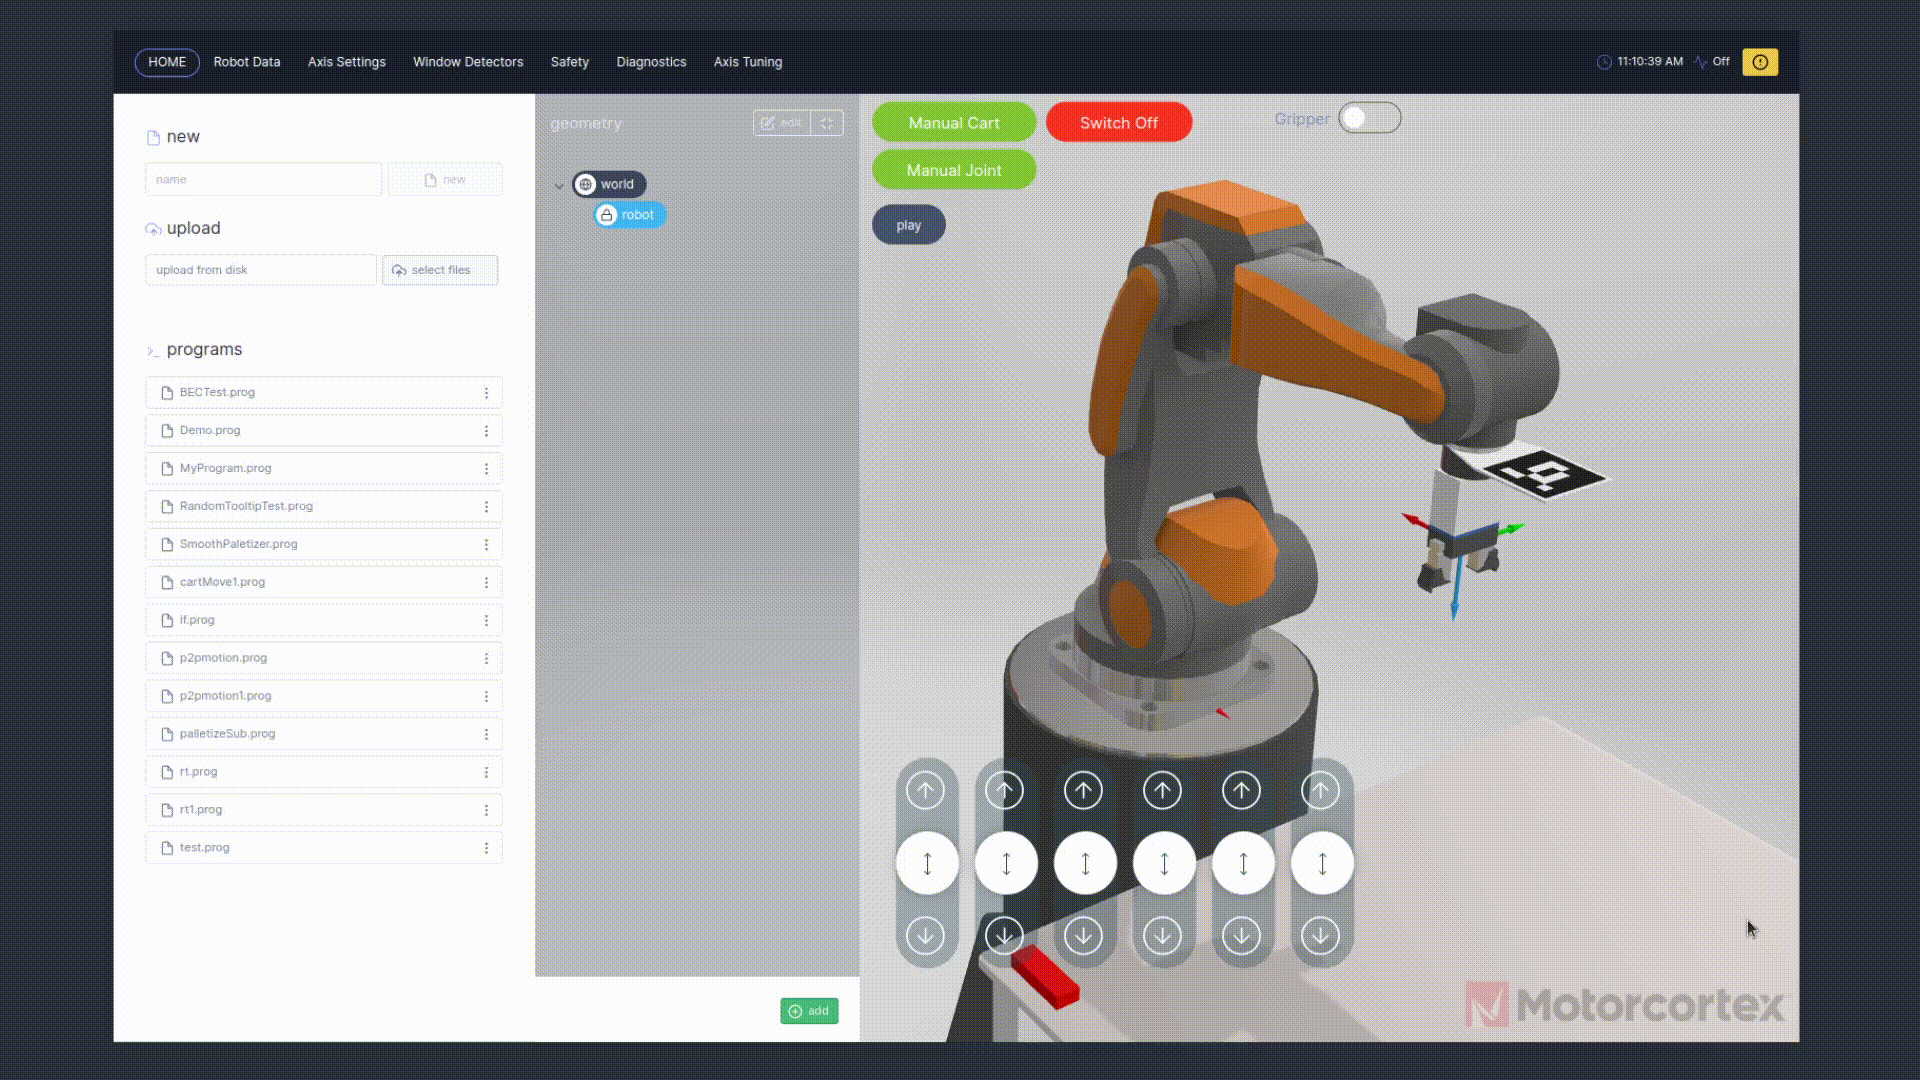
-
Pressing
manual jointmode activates joint mode. Enabling you to rotate each joint independently from each other.
Joint rotation Joysticks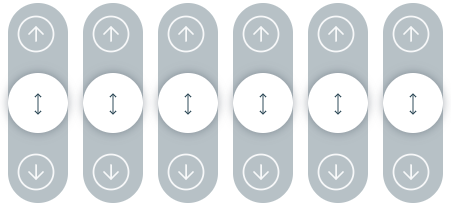
-
The gripper is used to pick up and drop down items, enable
Gripperwill close the gripper.
-
If you deployed a program, you can press
playbutton to start the program. If the robot is not in it’s initial start position it will not start. You should bring the robot to its initial start position. -
You can move the robot towards its initial start position by means of: pressing
move to startand then keep pressingHOLD to move to startuntil the robot reached its start position. Now you can pressplayto start the program.
The program keeps running until it is done or interrupted.
- You can press
pauseto temperately interrupt the program and pressplayto continue. - You can press
stopto exit the running program. - You can adjust the
timescaleto slow down er speed up your robot program. at 0% the robot does not move, at 500% the robot moves with 5 times its initial speed.
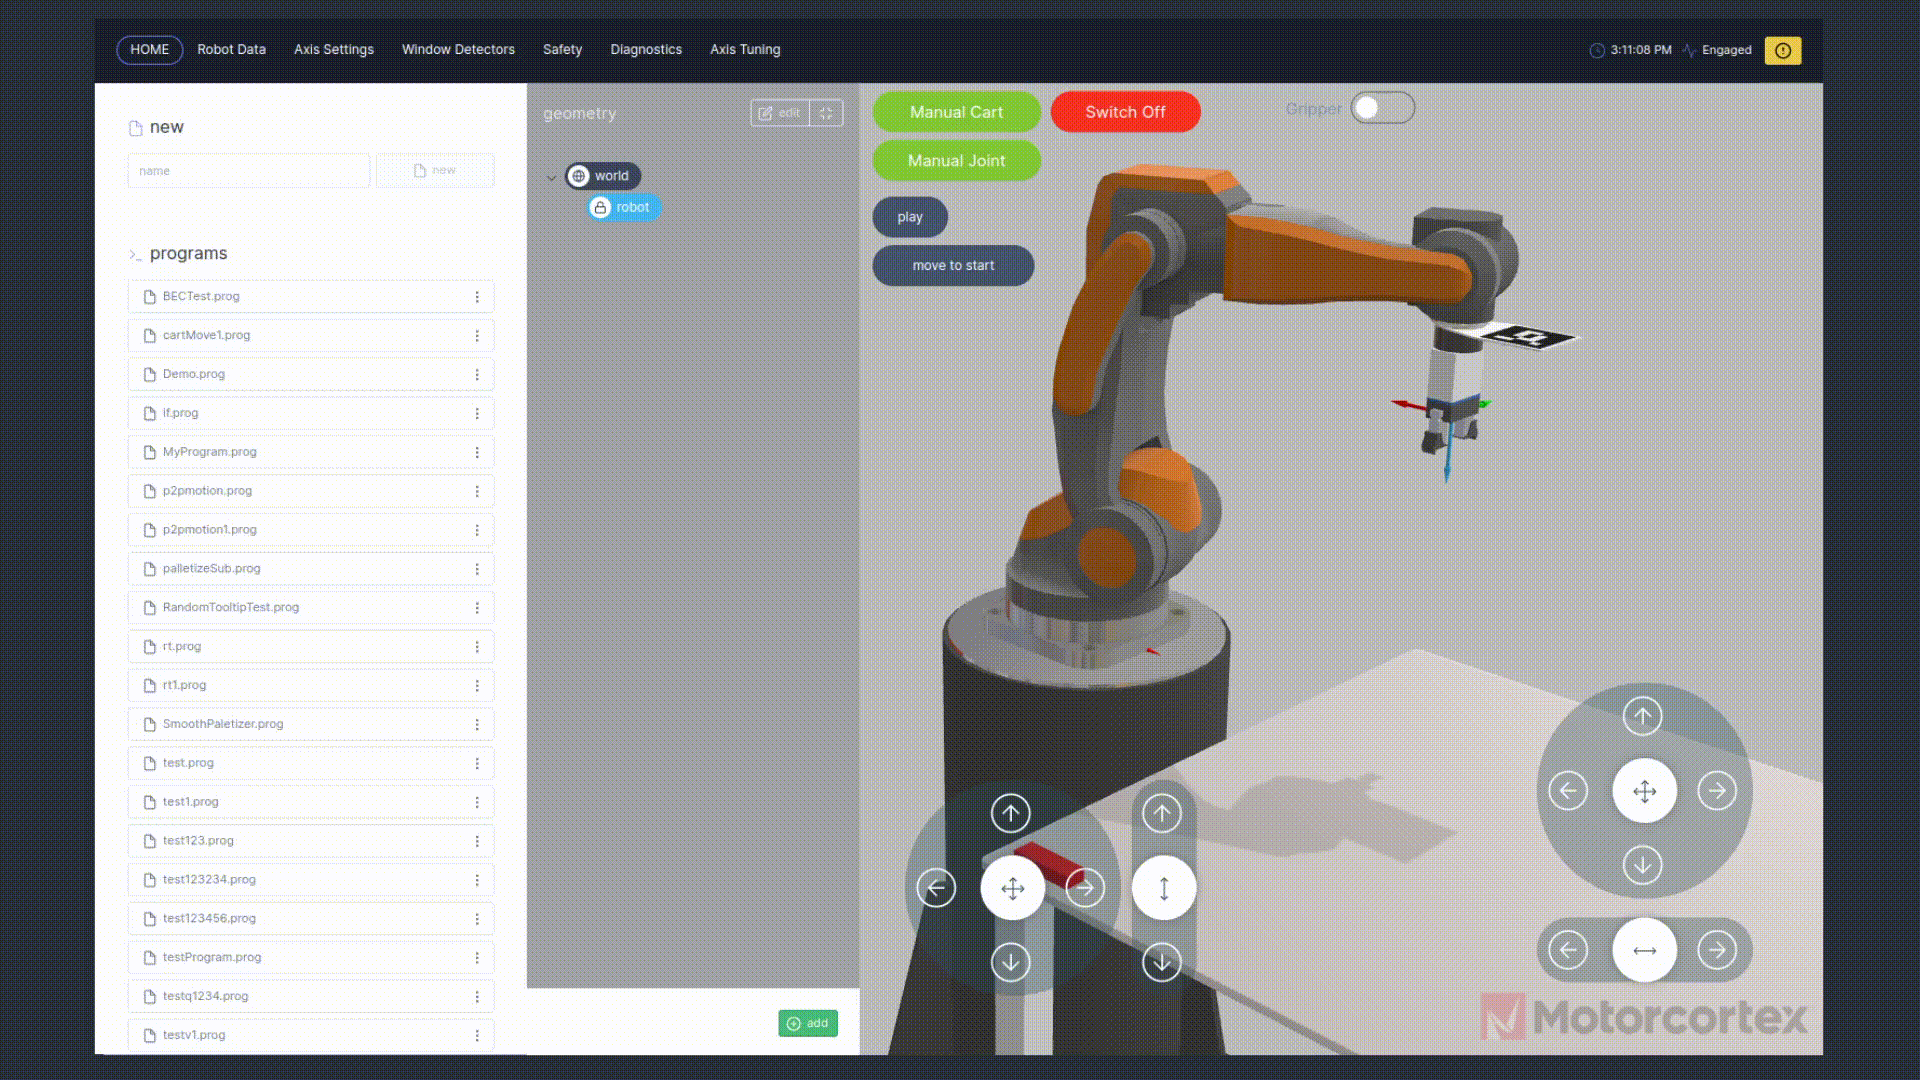
In the geometry panel you can create points, which are variables that can be assigned to functions in your robot program. The
world and
robot are prefixed and cannot be changed in the GUI preview mode.
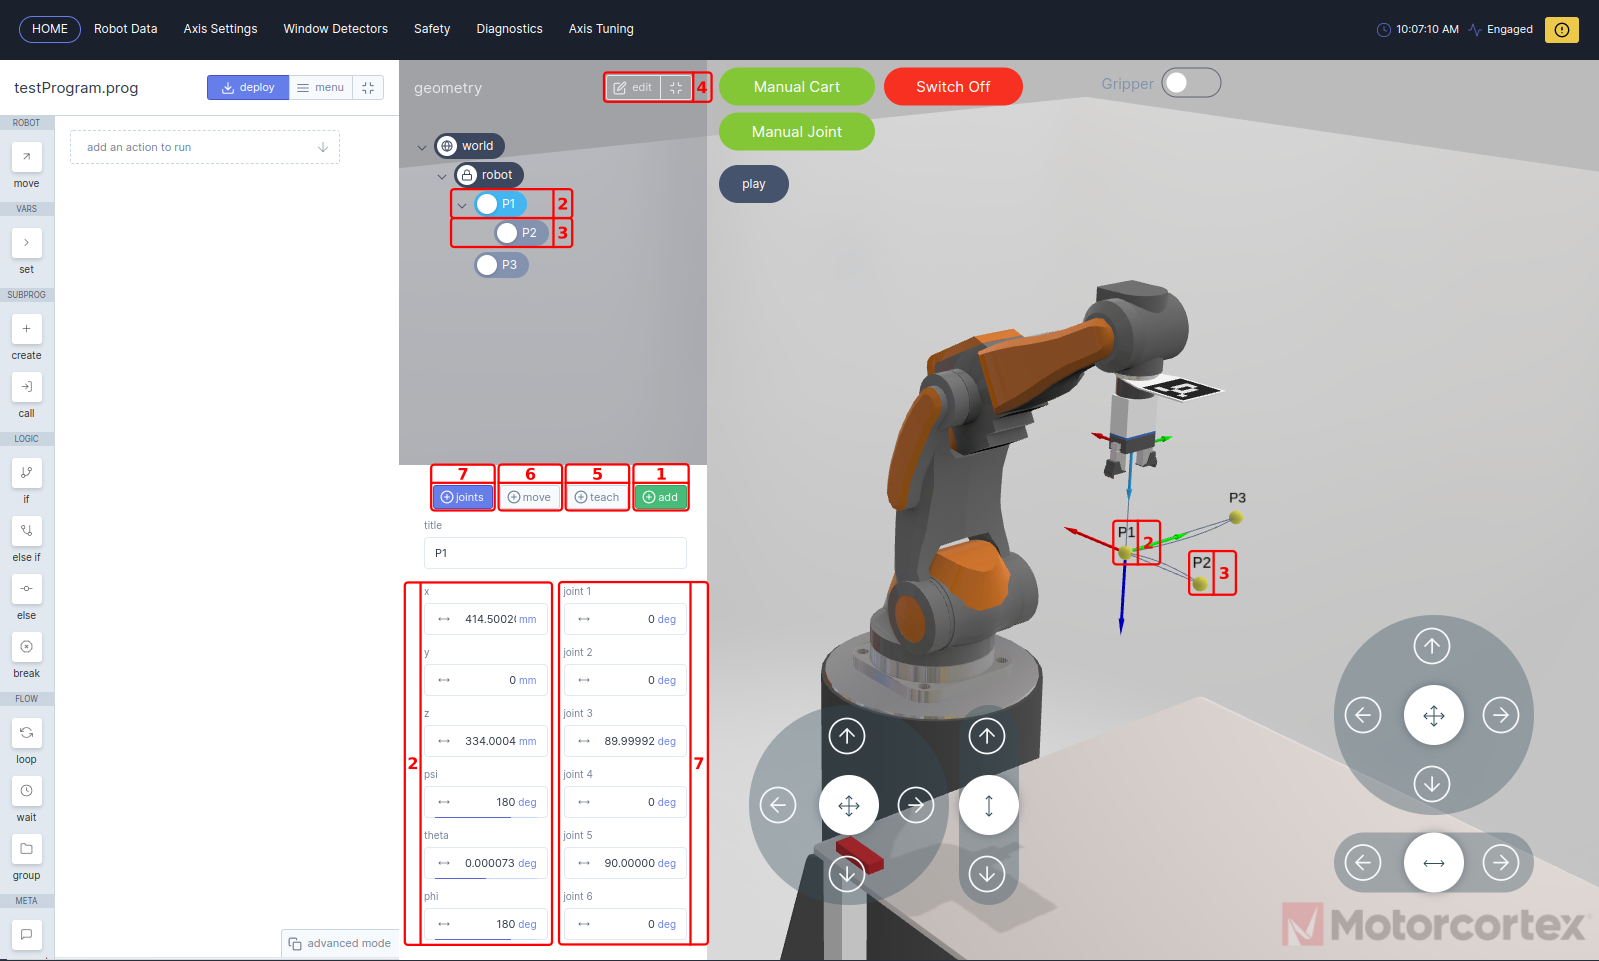
New points can be added when
robot, or other point is selected. The selected point is so called the parent of the added(child) point. If the parent point coordinates are changed the child point move respectively with it.
- Pressing
addwill create a new point with the current robot coordinates under the selected layer. - Point 1 is created after selecting
robotlayer and pressingaddbutton. The added point with nameP1is now visible in the3D-visualization. The coordinates of the point can be modified by changing the cartesian coordinatesxyandzvalues in combination with thepsi,thetaandphiEuler Angles. - Point 2 is a example point as child of
P1, if you changeP1thenP2move respectively withP1. - If you press
editbutton you can remove points from your geometry panel with/. - With
teachbutton, you can change to current point coordinates to the current robot coordinates. - If you want to move the robot to the selected point, you keep
movebutton pressed, until the robot reached the point. - With the
jointsmode selected, joint angels are added to the point geometry settings menu. Now you can change the point coordinates by means of robot joint angles.
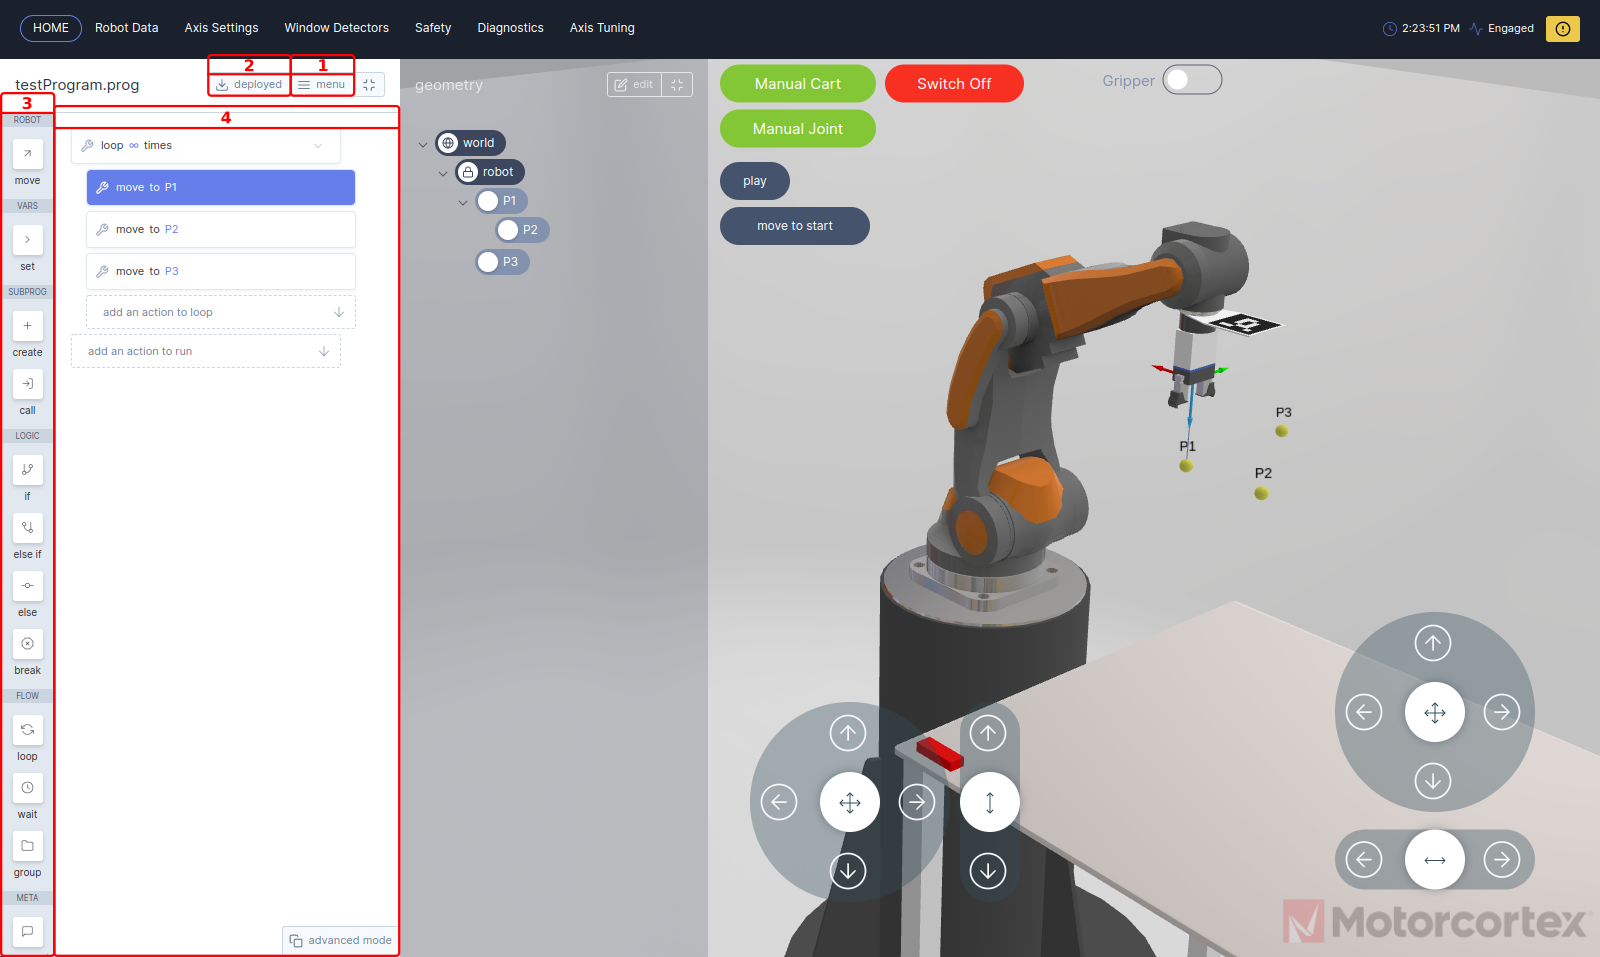
If you open the robot GUI. In the programs panel a program menu is shown, here you can open, upload or create a program for your application:
- With the
newbutton, you can create aempty program.Note
Step 2 is only available after you deploy the grid-files to your controller.
- With the
select filesbutton, you canuploada program stored from your local pc. - Inside
programsfield, you can select a program from you controller. Pressingfile.progwill open the program inprogram field.
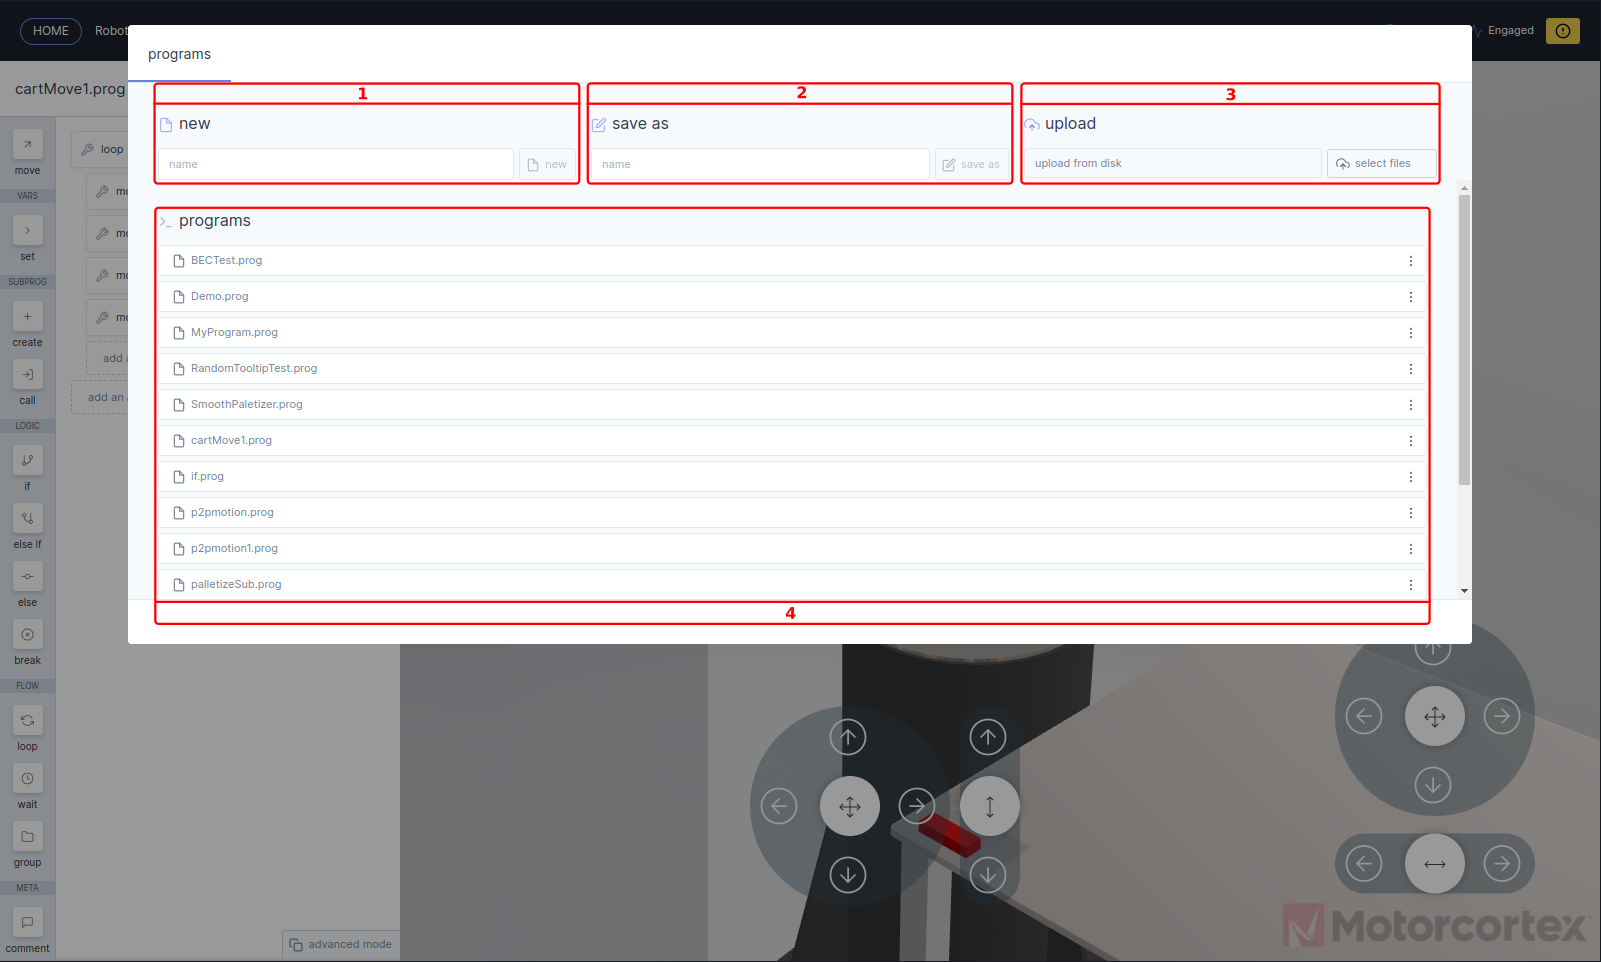
- With the
newbutton you can create aempty program. - With the
save asbutton, you can save and rename current program.Note
Step 3 is only available after you deploy the grid-files to your controller.
- With the
select filesbutton, you canuploada program from your local pc. - Inside
programsfield, you can select a program from you controller. Pressingfile.progwill open the program inprogram field.
Pressing
deploy button, will load the robot program to your controller.
Note
Deploy works only if the robot is switched on.
In the function block menu you can select function blocks to set up a program.
With the
move function block, you can move the robot by means of defining a path express in waypoints. You can assign a variables like points to waypoints. The robot can move to these waypoints in three different ways: linear, joint or circular. The path from one waypoint to another is called a segment and can be parametrized as described in the table below.
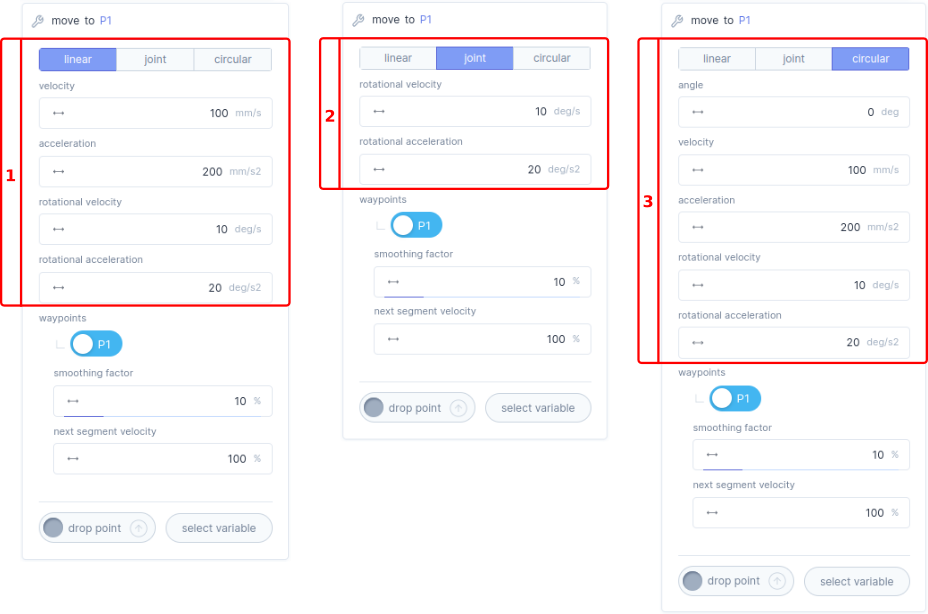
| Bar | Description |
|---|---|
| Linear | If you select linear mode the motion between the specified waypoints is executed in cartesian-space. |
Velocity |
Here you can define the velocity
of the linear movement in mm/s. |
Acceleration |
Here you can define the acceleration
of the linear movement in mm/s2. |
Rotational velocity |
Here you can define the rotational velocity
of the axis orientation in deg/s. |
Rotational acceleration |
Here you can define the rotational acceleration
of the axis orientation in deg/s2. |
| Joint | If you select joint mode, the motion between the specified waypoints are executed in joint-space. |
Rotational velocity |
Here you can define the rotational velocity
of the joints in deg/s. |
Rotational acceleration |
Here you can define the rotational acceleration
of the joints in deg/s2. |
| Circular | If you select circular mode, the motion between the specified waypoints is executed as a circular motion throughout the waypoints. |
Angle |
Here you can define the maximum allowable angle
of the motion deg. |
Velocity |
Here you can define the velocity
of the circular movement in mm/s. |
Acceleration |
Here you can define the acceleration
of the circular movement in mm/s2. |
Rotational velocity |
Here you can define the rotational velocity
in deg/s of the axis orientation in deg/s. |
Rotational acceleration |
Here you can define the rotational acceleration
in deg/s2 of the axis orientation in deg/s2. |
| General | In here you can assign a variable to the waypoint. |
Waypoint |
A waypoint is a variable like a geometric point to which the robot can move, you can have multiple waypoints in one
move function block. |
Smooth factor |
With smooth factor
you can smooth out the motion path between segments. This factor can be adjust in a range of 0 till 50%. |
Next segment velocity |
With next segment velocity
you can change the velocity for the next segment, the next segment velocity is defined as % of the parametrized initial velocity. |
Pressing
button gives you the option to delete the function block. |
With the
set function block, you can set variables or parameters to a specific value, or link to existing variables.
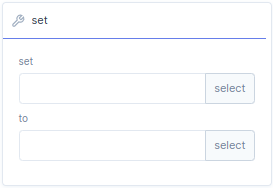
| Bar | Description |
|---|---|
set |
If you select set a menu will open where you can select a parameter or a local/global variable. |
to |
With to you can assign the set parameter to value, expression, parameter, local/global variable or function. |
Pressing
button gives you the option to delete the function block. |
With the
create function block, you can create or assign local variables to a existing program.
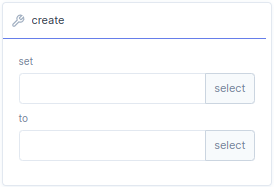
| Bar | Description |
|---|---|
set |
With set you can create a new local variable, or press select to assign a existing local variable or geometry. |
to |
With to you can assign a value, expression. or press select to assign an existing program. |
Pressing
button gives you the option to delete the function block. |
With the
call function block, you can call function that you can create with
create. A program can contain multiple methods, a methods can be compared with a sub program. In the call function block you can specify which method of the program you want to call.
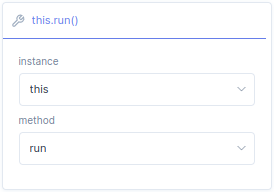
| Bar | Description |
|---|---|
instance |
With instance you select a
create variable which is assigned to a program. The default setting is this referring to the current program. |
method |
A instance contains a program that can have multiple methods, with method you can select one of the methods inside the program. The default setting is run referring to the first method of the current program. |
Pressing
button gives you the option to delete the function block. |
With the logic if function block, you can create a if-statement for a parameter, variable, function or program.
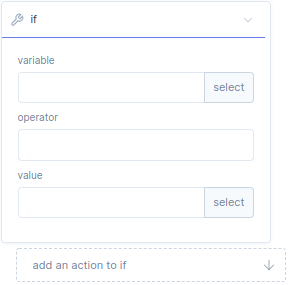
| Bar | Description |
|---|---|
Variable |
Here you define a value for the if statement, or press select to assign parameters, variables, functions or programs. |
Operator |
Here you define a function that acts on variable and value. |
Value |
Here you define a value, or press select to assign parameters, variables, functions or programs |
Add an action to if |
Here you can add function blocks, which will be executed after if statement is true. |
Pressing
button gives you the option to delete the function block. |
With the logic elif function block, you can create a elif-statement for a parameter, variable, function or program.
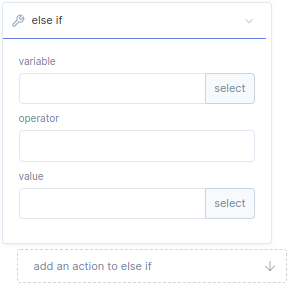
| Bar | Description |
|---|---|
Variable |
Here you define a value for the elif statement, or press select to assign parameters, variables, functions or programs. |
Operator |
Here you define a function that acts on variable and value. |
Value |
Here you define a value, or press select to assign parameters, variables, functions or programs |
Add an action to elif |
Here you can add function blocks, which will be executed after elif statement is true. |
Pressing
button gives you the option to delete the function block. |
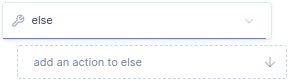
With the logic else function block, you can create a else-statement if the if or elif statement is false the else statement is true. The else function block is always combined with if or/and elif statement. In the Add an action to else you can add function blocks which will be executed after else statement is true.
With the logic
break function block, you can create a break-statement to break out of a loop.

With the
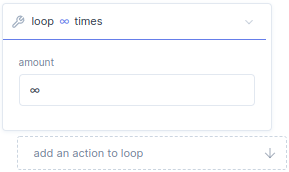
loop function block, you can create a for loop with iterations. Iterations is the amount of times the loop repeats itself and can be set with amount (default setting is infinity). With the add an action to loop you can add function block that are executed each iteration.
With the
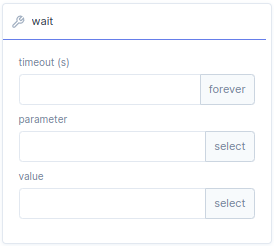
wait function block, you can create a wait-statement. The wait statement is used to suspend the execution program until some condition are satisfied, like a true statement or timeout is done.
| Bar | Description |
|---|---|
timeout(s) |
The wait function can be used as timeout, here you can define the timeout in seconds. Default setting is infinity. |
parameter |
With parameter you can set a target parameter. |
value |
In value you can specify a condition for the target parameter. if the condition is met it returns true statement. |
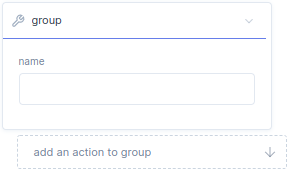
With the group function block, you can create a group. With the name you can assign a name to the group. In the Add an action to group you can add function blocks which will be executed after if the group is executed. Groups can be mode to create structure in your program.
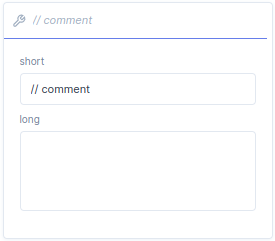
With the comment function block, you can create a comment. With the short you can assign a comment title/shot description and the full comment can be written in long.
In the program window you can create a program in
simple mode or
advanced mode.
With the simple mode programs screen, you can create a program by means of dragging and dropping function blocks to the add an action to the loop.


If you select
advanced mode in the programs panel, you can create a more advanced program. This program contains a main, a constructor and methods.
Each program requires a entry point, this is where your execution begins. In a new program this is called per default the main function.
Per default the first thing the main executes is the constructor, done to initialize the program. In the main you can add function blocks, to create a program or call a method of sub program.
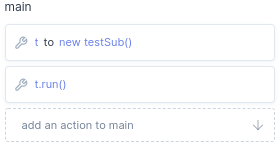
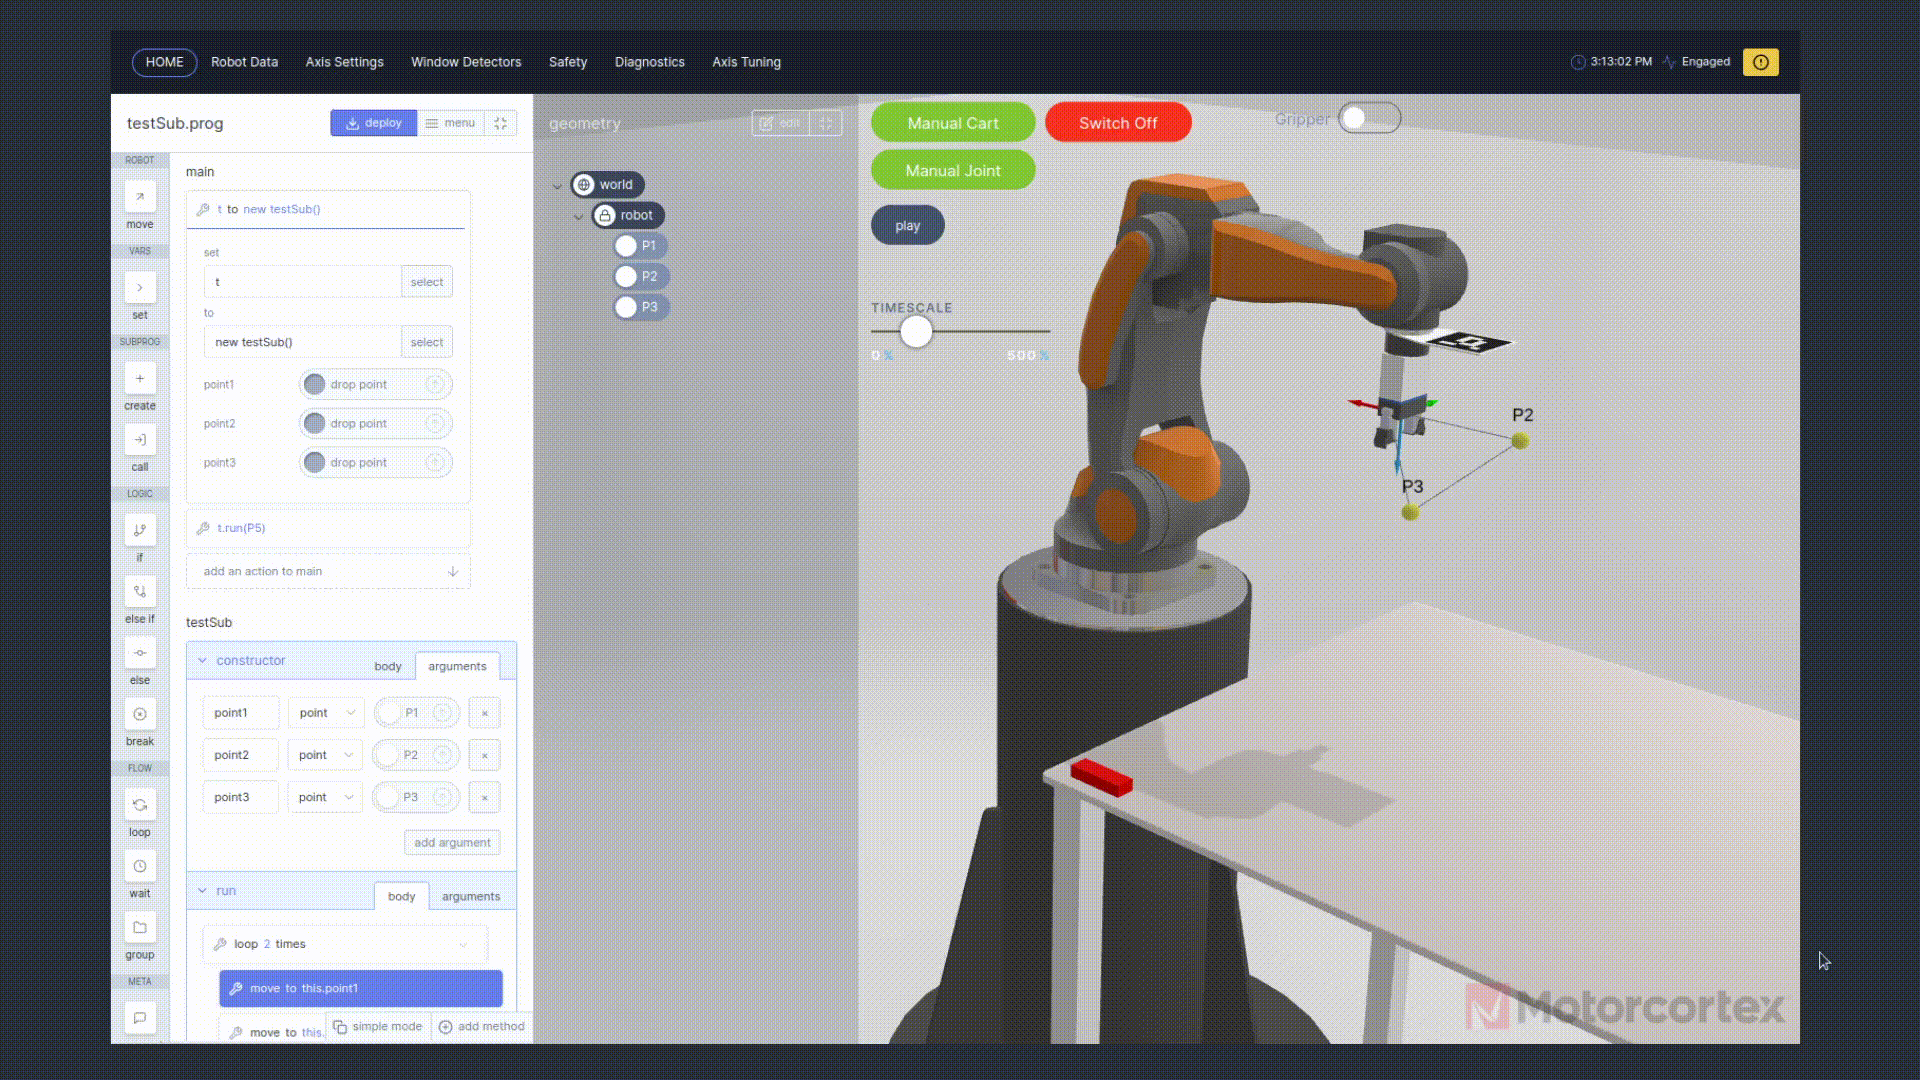
A new program contains at least one method, for this case per default the run method. In the main you can execute this method with the
create function block, in here you set a variable t to your program testSub.prog. With the call function block you can set instance to t or this and select the run method. This wil execute the run methods in the main function.
The constructor is a class in object oriented programming that initializes the program every time it is called. The constructor contains a body and arguments.
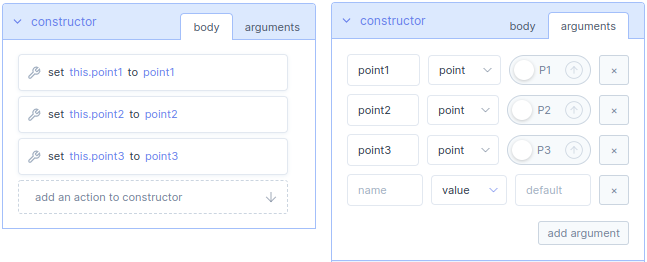
In the body you can add new actions. The actions can be added by means of dragging and dropping function blocks inside the constructor body.
In the arguments you can add, a new argument to the constructor. A argument in a constructor helps to initialize the program when it is called. With the add argument button you can add new arguments, it can either be a value or a point.
Check method part of the advanced program, for how to call a program and assign new values to the arguments of the constructor.
The program contains a default run method. A method is part of the program that you can execute with the
call function block. The run method contains a body and arguments.
In the body you can add new actions. The actions can be added by means of dragging and dropping function blocks inside the run method.
In the arguments you can add new arguments to the run method.
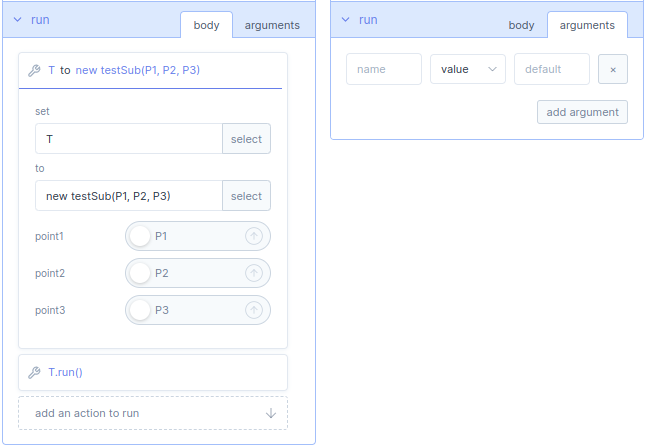
Inside a method, you can create a variable and link it to a program lke testSub.prog. The constructor of this program has arguments, which can be parametrized. For example you can use
create function block, in here you set a variable T to your program testSub.prog, which has point1, point2 and point3 as arguments, that can be assigned with a point or variable. With the call function block you can set instance to T or this and select the method in the program.