Motorcortex-DESK
13 minute read
Introduction
Motorcortex-DESK is a web-based application that can be used to visualize signals and parameters of a Motorcortex control system in real-time and it allows parameters to be changed or signals to be overridden. It is a very valuable tool when tuning or debugging a system’s behavior.
Warning
Using MotorCortex-Desk all parameters of the running control system are accessible and may be modified. Changing parameters may cause unpredictable or unstable machine behavior and may cause danger to personnel or cause damage to the machine or its surroundings. The tool should only be used by system experts that have detailed knowledge of the system and that know what the impact of parameter changes is.
Log-in
MotorCortex-Desk can be accessed via 2 locations:
Here is always the latest version of Motorcortex-Desk available. However you will require an internet connection and login.
- Open your browser and go to motorcortex.io and click on
Login.
-
Go to the
TOOLSon the left and click onDesk. -
The Motorcortex Desk login page will now open in a new tab in your browser.
Note
The Motorcortex desk is protected by a login because the user can manipulate signals and behavior of the control system.
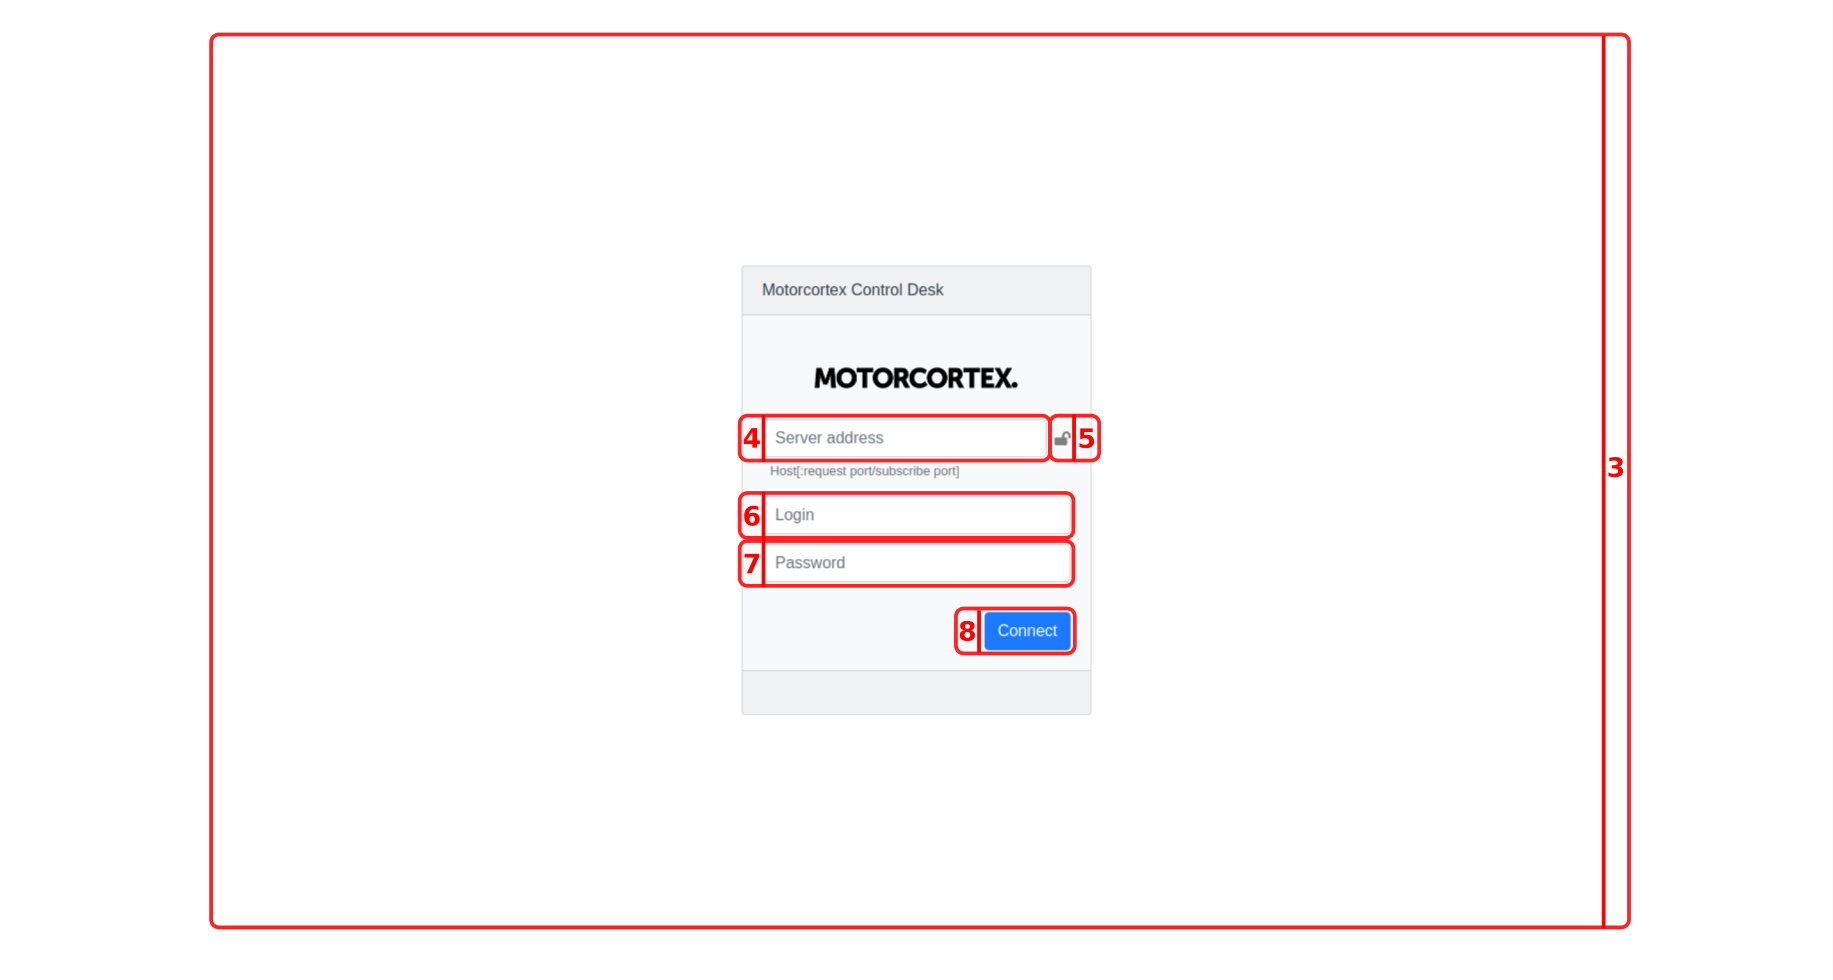
Server Addressis the IP address of the controller (Host), per default192.168.2.100. Optionally the request port and subscribe port can be defined. If nothing is filled-in for these ports, the default of5568/5567will be used./Option to choose asecureorunsecure connection. Default is secure.
Note
The user authentication is disabled at this stage. Meaning Login and Password is not required, every entry is valid. If user authentication is enabled fill in step 6 and 7.
Login, if user authentication is enabled you have to fill in the login name of your user account.Password, if user authentication is enabled you have to fill in the matching password to your login name.- Pressing
Connectestablishes a connection with Desk-tool.
Access the DESK tool straight from the controller (no internet access required).
Prerequisite
The additional DESK addon is required, purchasable through motorcortex sales.
- Open your browser and go to
[Controller IP address]:8000, per default 192.168.2.100:8000
Note
The Motorcortex desk is protected by a login because the user can manipulate signals and behavior of the control system.

Server Addressis the IP address of the controller (Host), per default192.168.2.100. Optionally the request port and subscribe port can be defined. If nothing is filled-in for these ports, the default of5568/5567will be used./Option to choose asecureorunsecure connection. Default is secure.
Note
The user authentication is disabled at this stage. Meaning Login and Password is not required, every entry is valid. If user authentication is enabled fill in step 4 and 5.
Login, if user authentication is enabled you have to fill in the login name of your user account.Password, if user authentication is enabled you have to fill in the matching password to your login name.- Pressing
Connectestablishes a connection with Desk-tool.
Screen lay-out
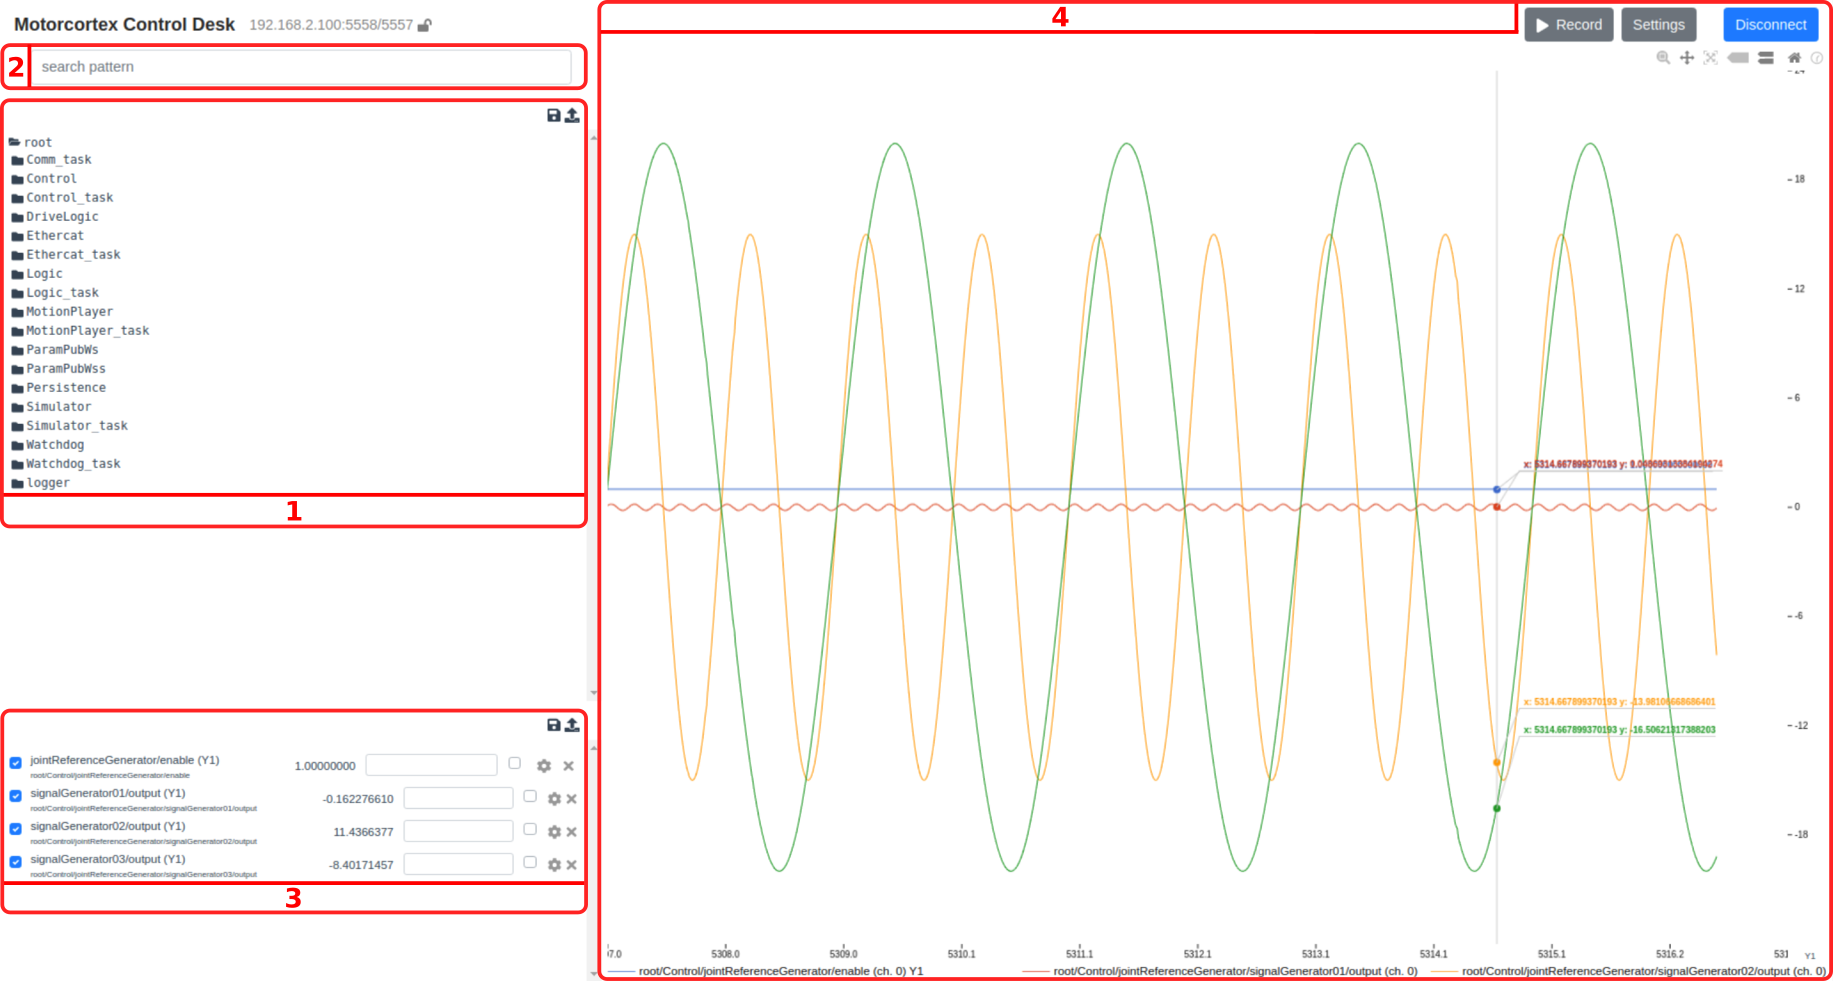
After logging in the Motorcortex Control Desk will show. The Desk screen consists out of 4 main parts:
- The
parameter threeholds all of the signals in the system and you can manually search for each signal and select these to show in the trace overview. - In the
search baryou can search for signals inside the Parameter Tree. - The
Trace Overviewis a container of all parameters selected in the Parameter Tree. - The
Plot Windowis a visualization of the selected signals in the Trace Overview.
Icons meanings
In Motorcortex-Desk the following icons are used:
Folder contains data objects and can be nested to create a parameter tree.
Input in this parameter type a value can be written. A typical use is an sensor.
Output this parameter type is read-only. A typical use is a set point value. The value is calculated within the MOTORCORTEX and shall not be overwritten.
parameter This is parameter type that is used to configure the system. Typical uses are motor parameters and system constants. Parameters are retrieved from the parameter list during start-up. If the user changes a value and wants to use in the future, he has to save the list before rebooting/switching off the controller. A parameter can be read and written.
Persistent these are values that contain process data that is continuously updated and will be retained through application restarts. Typical applications are running hours or counting.
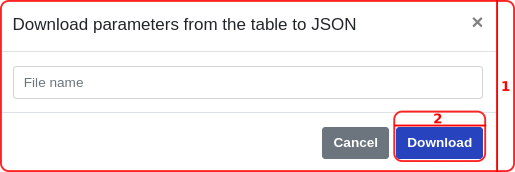
- pressing
Downloadwill pop-up a screen where you can fill in file name. - press
downloadto download parameters from the table tojson-fileformate.
Pressing
Upload will open local storage, where you can select .json-file from where you can upload a table to desk tool. For example:
[{"path":"root/Ethercat/Robot/Axis 1/Inputs/Torque actual value","value":183,"setValue":160,"overwrite":false}]
Select
Zoom to zoom in to a specific area, the specific area is selected by means of holding the left mouse click and drag over the to be zoomed in area.
Select
Drag view to drag the screen, hold left mouse click and move mouse to preferred direction.
Pressing
Zoom-fit will scales axes to view all signals.
Selecting Snap-single will snap cursor to closest trace point.
Selecting Snap-multi will snap cursor to time axis and show corresponding cursors on all visible signals.
Pressing
Home will center the the screen and shown current signals.
Selecting
clock will change the time range from relative time to Unix timestamp.
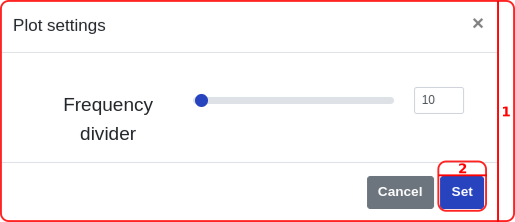
- Pressing
Settingswill opens the settings window, in here you can adjust thefrequency divider. With thefrequency divideryou can reduce the rate at which the server publishes its data. The server update rate is divided by this value; e.g. if the server has an update rate of 1000 Hz, a frequency divider of 100 will make the publisher send only every 100th sample, resulting in an update rate of the received data of 10 Hz. - Pressing
Setwill save the changed settings.
Pressing
Start recording will start a data trace of all plotted signals.
Pressing
Stop recording will stop the data trace, followed by saving the collected data in a .csv-file.
Pressing Disconnect will disconnects Desk from the controller and brings you back to the login screen.
Parameter Tree
In a MOTORCORTEX application all control objects are organized in a tree structure; the Parameter Tree. The Parameter Tree contains a snapshot of all the inputs, outputs and internal data of the control objects at the current time.
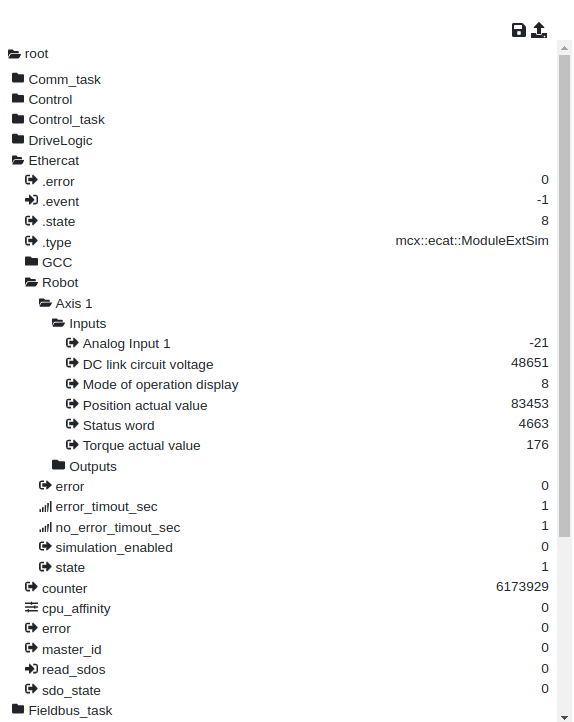
MOTORCORTEX has a tree structure in which the data objects are
published. Each task or objects inside a task can create their own
subtree (folder). Objects can be nested. In a general control
application there are usually a
Logic,
Control and also
EtherCAT folders that represent the data of different tasks. In the
EtherCAT
folder you will find the configured EtherCAT slave devices.
The names of the folders are configurable and the application developer can change these, but it is good practice to stick to some convention.
Inside the folders the data of the associated object is contained.
MOTORCORTEX currently supports the following data types: boolean,
integer, double or binary (e.g. a c-struct). Also arrays of the same
datatype are supported. Array elements start at index 0 (zero).
Search Bar
A parameter can be found by typing in its name in the Search bar.
It is also possible to search for a part of the name by using a *.
- Using an
*in front will show everything ending with the search term. - A
*behind the search term will show everything beginning with the search term. *Search term*will show everything with “Search term” in it.
Useful search terms are:
| Search term | Description |
|---|---|
*actual* |
Actual sensor values or derivatives of that (e.g. speeds and accelerations). |
*target* |
Setpoints to the actuators. |
*position* |
Positions. |
*velocity* |
Velocities. |
*raw* |
Raw sensor values. Raw sensor values can also be found in the field bus map (most times EtherCAT). Conversion of raw sensor values is normally done in the folder “Control”. |
*WindowDetector*, *high*, *low*, *tooHigh*, *tooLow* |
Errors, alarms, faults. |
Tracing Signals
Adding traces
-
Adding traces from parameter tree:A parameter from theParameter Treecan be added to a trace by double clicking on it. After that the signal will become bold in theParameter Treeand will appear in theTrace Overviewon the bottom left. -
Loading traces from a file:It is also possible to load a pre configured .json file with parameters into theTrace Overview. This can be done by clicking in theTrace Overviewon theupload buttonand afterwards selecting the desired .json file.
NOTE: the current trace signals will be replaced by the signals from the .json file. -
Saving traces to a file:To save all signals from theTrace Overview, press thesave buttonin theTrace Overview. After this a window will be shown where the name of the file can be defined. If nothing is filled in, the name will be “parameters.json”. As soon the download button is pressed, your web browser will automatically download the file. -
Removing a trace:This is easily done by clicking on theTrace Overview.
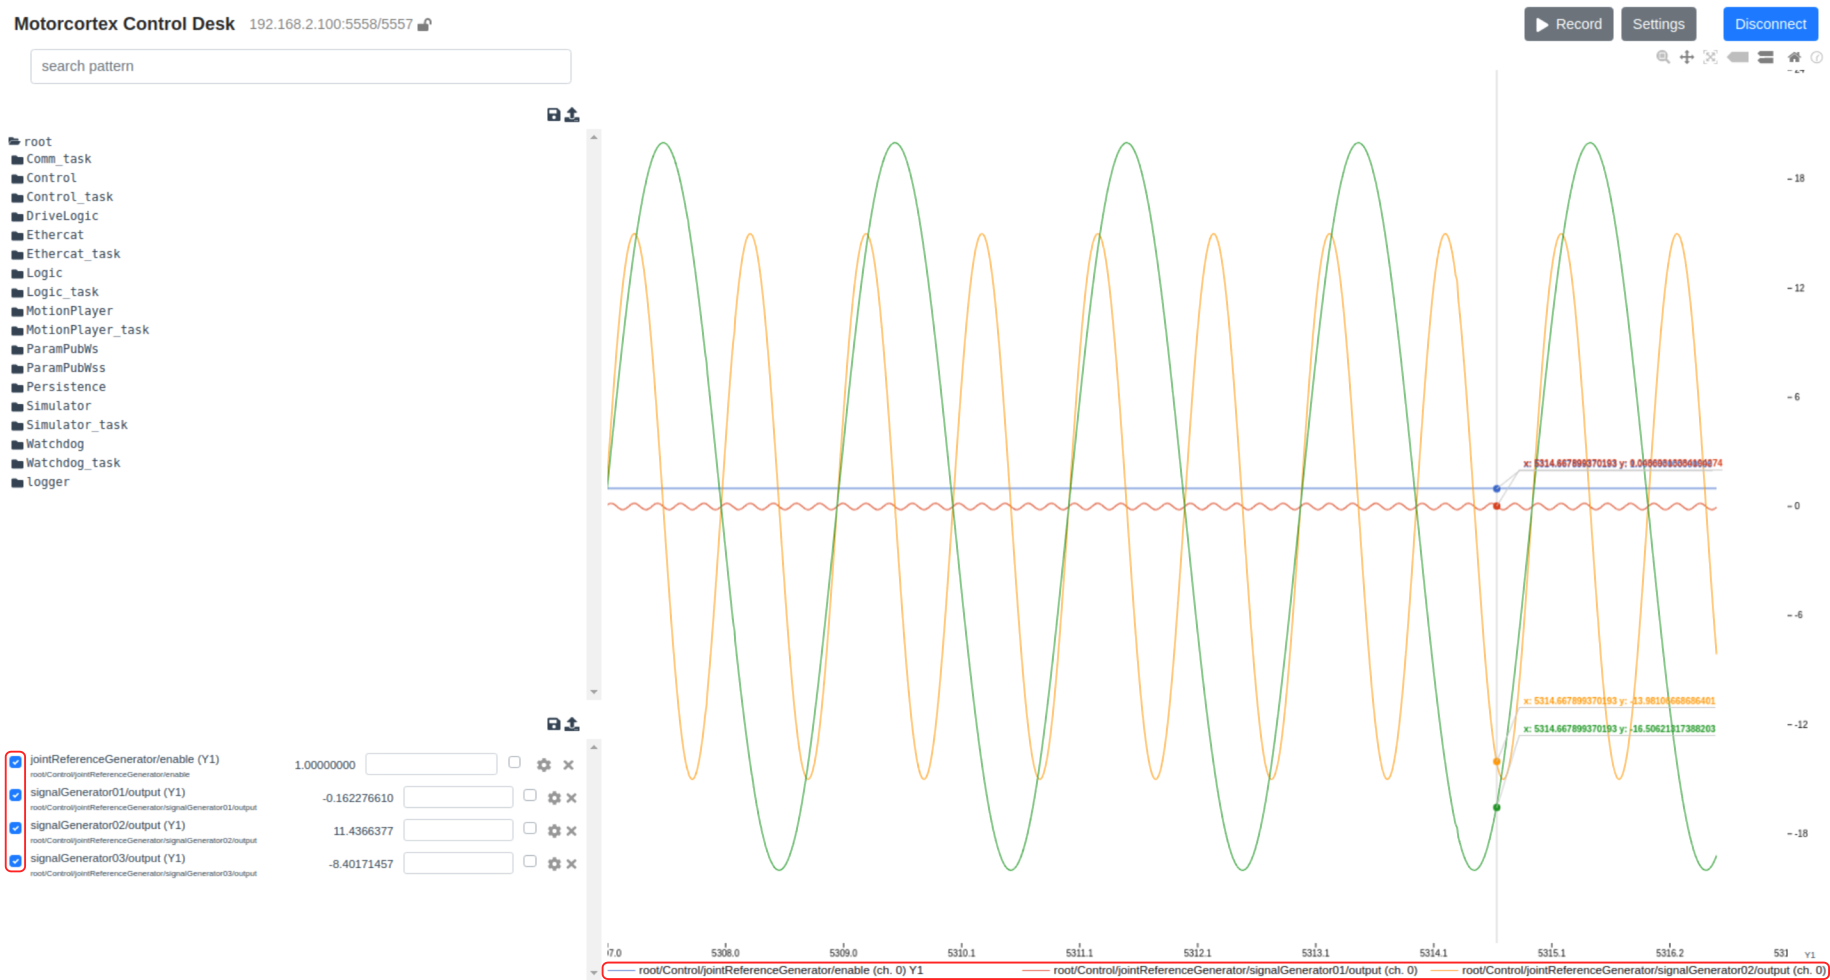
Plotting signals
The signal will be plotted if the
checkbox in front of the signal name in the trace overview is checked. The signal will appear in the Plot Window. At the bottom of the Plot Window is an overview of all plotted signals. The colored line in front of the signal matches with the signal line color in the plot.
Changing axis
In order to keep overview, it is possible to split the signals over 4 different Y-axes, each with their own ranges. This is especially handy when plotting Boolean and Integer values simultaneously.
The current axis is displayed directly behind the signal name and is per default “Y1”. It can be changed by clicking on it and selected. The axis are in the far right of the Plot Window, with the individual axis name at below them.
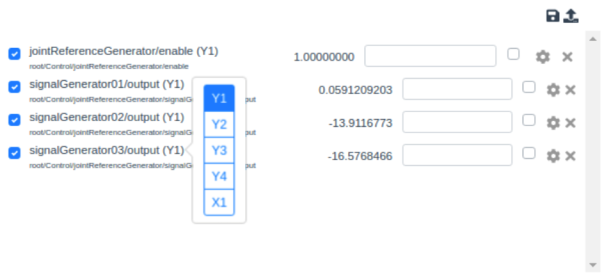
X-Y plot
In some case it can be convenient to not have the time on the X-axis, but a certain signal, e.g. for resistance plots. In order to use a signal as X-axis, select the axis value (e.g. Y1) and select X1.
NOTE: only 1 signal can be used as X axis.
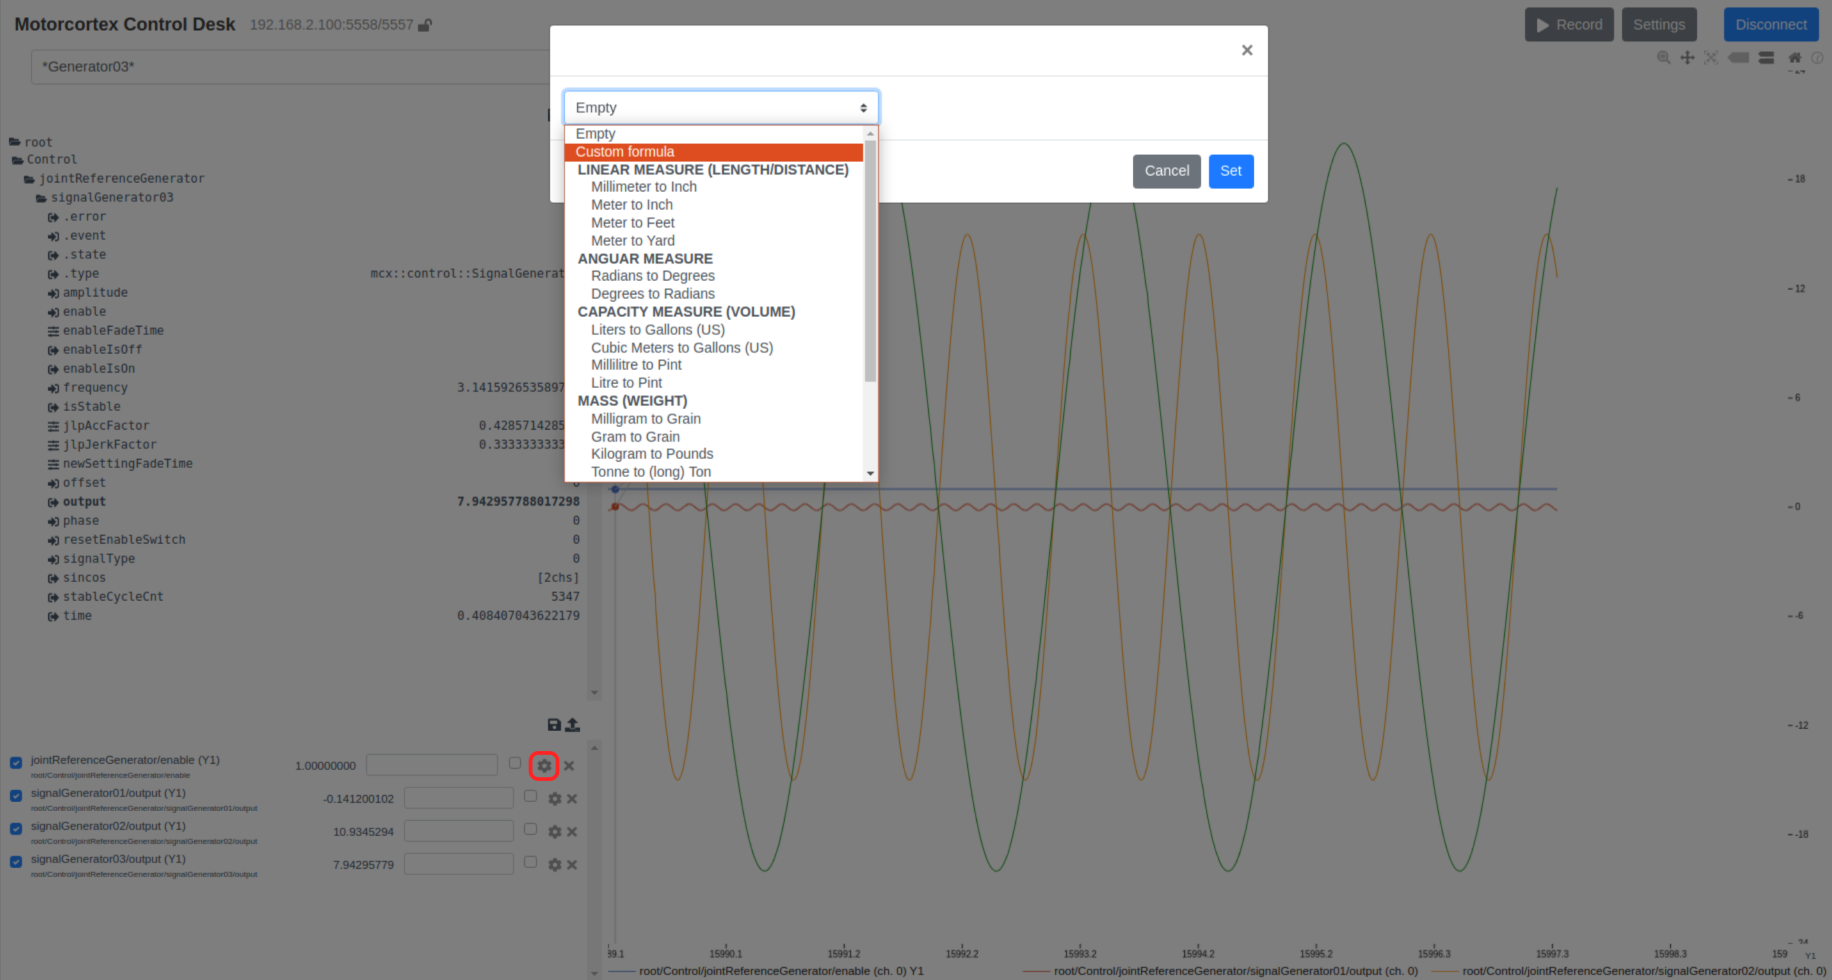
Scaling signals
It is possible to scale signals by pressing on the
cog button behind the signal in the Trace Overview.
Motorcortex-Desk contains many standard conversions, but it is also possible to define a custom formula.
Measuring
Make and save data traces
Before a data trace is started, all desired signals should be selected (and thus being plotted in the Plot Window).
To start the tracing, click on the
Record button.
To stop the tracing, click on the
Stop button.
After the trace will be straight away be downloaded to your computer. The format is a .csv-file, which can be opened in a text editor, but also in Microsoft Excel, Python or Matlab.
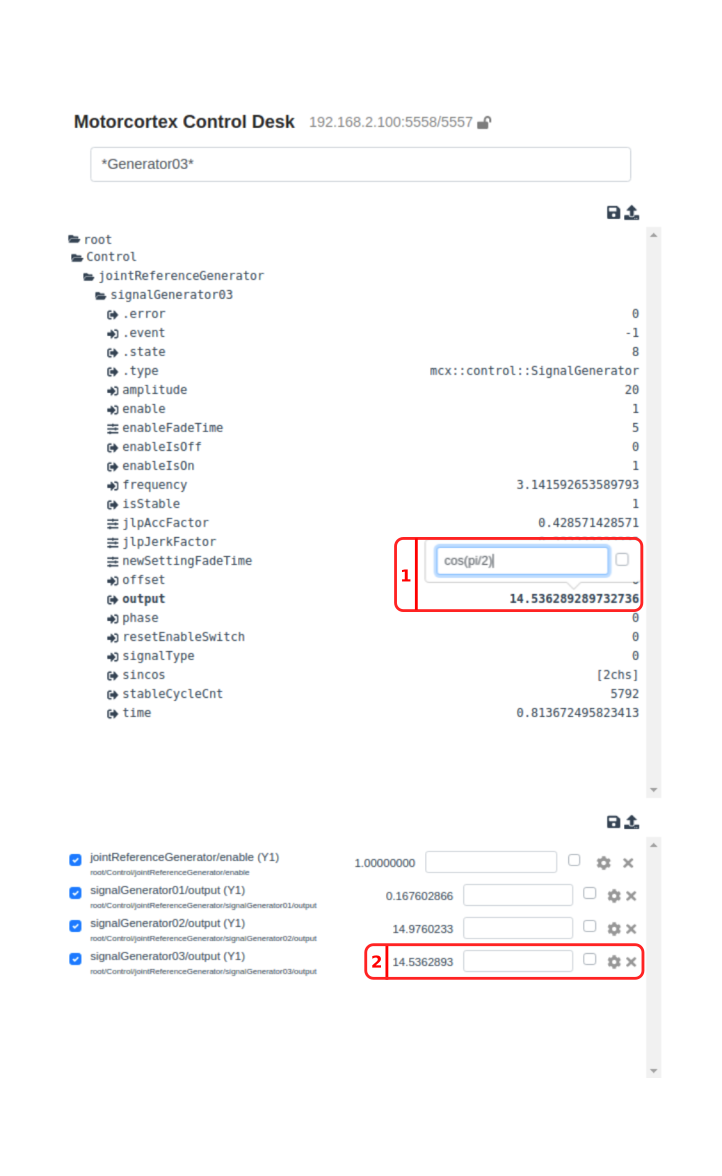
Changing values
Modifying a parameter value
A parameter can be changed in two locations:
- In the parameter tree by clicking on the value. This will open an input field where you can type the new value. The value will be taken over as soon as enter is pressed.
- By clicking on the input field behind the signal and its actual value and type the new value. The value will be taken over as soon as enter is pressed.
Note
MotorCortex-Desk accepts calculations and values from the math.js library and will directly fill-in the resulting values. So typing “cos(pi/2)” will result into a value of 0.
Warning
Changing parameters may cause unpredictable or unstable machine behavior and may cause danger to personnel or cause damage to the machine or its surroundings.
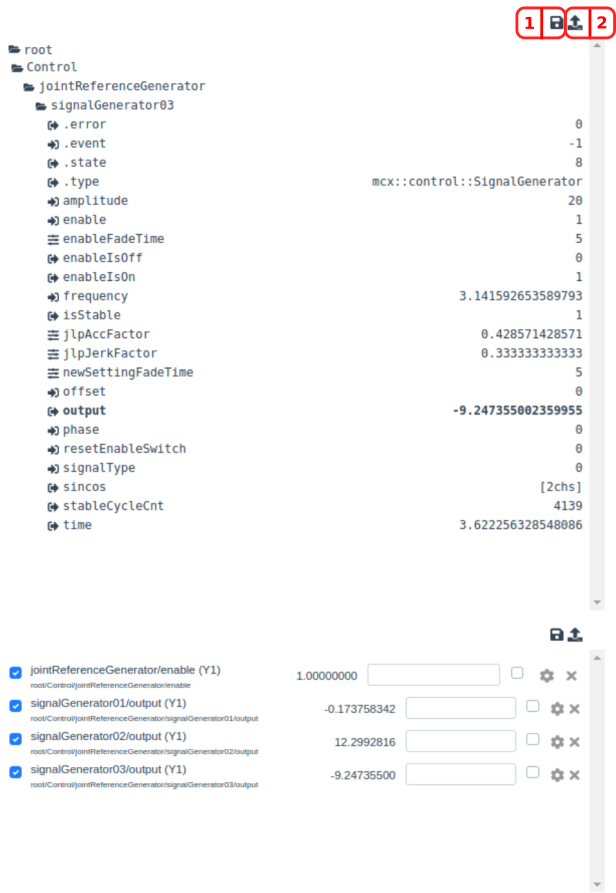
Saving and loading parameter sets
It is possible to save and load parameter list. In this way a functional configuration can be backed-up and reloaded easily.
- Saving the parameter set
To save the (changed) parameter files to the Motion Controller, click in the top right of the Parameter Window on the
save button. If no name is specified, the file will directly overwritecontrol.xmllocated on the motion controller in the folder/etc/motorcortex/config/control.
The controller will by default loadcontrol.xmlatstart-up. If the parameters are changed, but list is NOT saved, the unchanged control.xml will be loaded the next time the software is restarted.
Warning
If no file name is specified the original parameter file control.xml will be overwritten, without any backup of the old file. Any wrong filled in parameters will be also automatically loaded after the next reboot of system.
Warning
Changing parameters may cause unpredictable or unstable machine behavior and may cause danger to personnel or cause damage to the machine or its surroundings.
Note
The user is advised to save the current “control.xml” before overwriting the file.
- Loading a parameter set
To upload a parameter parameter file from your computer, click on the
upload buttonin the top right of the Parameter Window. Any new values will be straight away applied. Make sure that your system is in a safe state before uploading and keep a copy of the original parameter file.
Warning
Make sure that the system is in a safe condition and cannot start by itself.
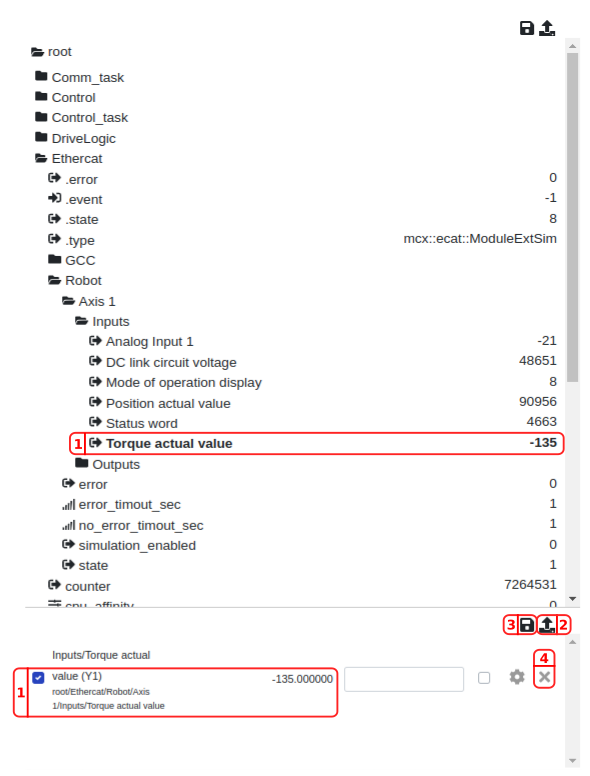
Overriding inputs and outputs
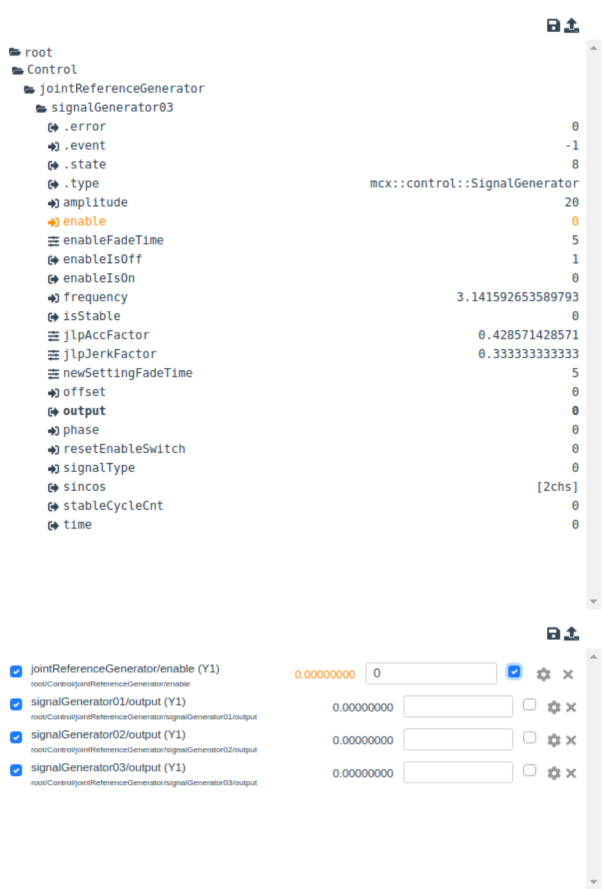
Sometimes it is needed to temporary overwrite an input or output (e.g. to test an output). This can be done by ticking the checkbox behind the signal, both in the Tracing Overview as in the Parameter tree. The signal will than become orange and will not change unless the user removes the overwrite or will fill in a different value.
An example is below: the enable of jointReferenceGenerator controls the enable of all 6 signalGenerators. If the enable of signalGenerator01 has to be disabled, while the rest have to stay enabled, an overwrite has to be applied to signalGenerator01/enable
Warning
Changing signal values during operation may cause unpredictable or unstable machine behavior and may cause danger to personnel or cause damage to the machine or its surroundings.
Warning
Make sure that trained personnel is operating MotorCortex-Desk and the system is or can be quickly put in a safe state (e.g. by pressing the emergency button that is within reach).
Note
Overriding inputs is not possible when the input is written to from inside the block. The value that is sent to the application is then immediately overwritten by the application itself.
Note
Overwritten values are shown in orange, but if the folder is closed, you will not see it anymore. If the software is restarted, all overwritten values are gone.