Network settings
6 minute read
Note
The following steps require you to establish a connect with the controller, checkout Remote Connection.
This page is applicable for the latest image version mcx-rtos-v.2025.03. For other mcx-rtos-images checkout: Older versions.
Network Configuration
This section describes how to configure your wifi, wired or etherCAT network.
Network Directory
Default network files are stored in the following directory:
/etc/systemd/network
├── 25-wifi-ap.network
├── 40-bridge-device.netdev
├── 41-bridge-inherit-mac.link
├── 42-bridge-dhcp-client-and-static.network
├── 43-bridge-bind.network
├── 51-ethercat.network
└── examples
    ├── 25-wifi-ap.network.in
    ├── 25-wifi-dhcp-client.network.in
    ├── 40-bridge-device.netdev
    ├── 41-bridge-inherit-mac.link		  t.network
    ├── 42-bridge-dhcp-client-and-static.network
    ├── 42-bridge-dhcp-client.network
    ├── 42-bridge-dhcp-server-and-static.network
    ├── 42-bridge-dhcp-server.network
    ├── 42-bridge-static.network
    ├── 43-bridge-bind.network
    ├── 50-wired-dhcp-client-and-static.network
    ├── 50-wired-dhcp-client.network
    ├── 50-wired-dhcp-server-and-static.network
    ├── 50-wired-dhcp-server.network
    ├── 50-wired-static.network
    ├── 51-ethercat.network
The network directory displays the default network configuration for WiFi, Wired and EtherCAT. The examples folder provides a set of predefined network settings, based on Systemd.network.
Note
When changing the network configuration, it is recommended to use the given examples as a template. Note that the network directory should only contain one set of 25-.., 42-.., 43-.. and 51-.. files.
Wired Network Configuration
How to configure the wired network settings:
- Configure default controller_ip_address
(192.168.2.100) - Configure default wired network device
(eth0)
-
Navigate to the network directory:
cd /etc/systemd/network -
Edit
42-bridge-dhcp-client-and-static.network:sudo nano 42-bridge-dhcp-client-and-static.networkDisplays the default configuration:
# Wired network settings
[Match]
Name=br0

[Network]
DHCP=yes
ConfigureWithoutCarrier=yes
IgnoreCarrierLoss=yes

[Address]
Label=br0:0
Address=192.168.2.100/24
This creates a
br0interface, with default ip address:192.168.2.100/24. Change"Address="to your preferred controller_ip_address. -
Edit
cat 43-bridge-bind.networksudo nano cat 43-bridge-bind.networkDisplays the default configuration:
[Match]
Name=eth0

[Network]
Bridge=br0
This binds the
br0interface to theeth0device, per default theeth0network device is reserved forwired network. Change"Name="to configure the assigned network device to your own preference.
Note
Make sure that the network device that you wish to assign to the wired network is not already taken by the EtherCAT Network Configuration).
-
Save the files and reboot your controller:
sudo reboot
Now your wired network settings are changed!
Note
Changes to controller_IP_address can required reconfiguration of your local network settings.
EtherCAT Network Configuration
How to change the etherCAT network configuration:
- Configure default etherCAT network device
(eth1)
-
Navigate to the network directory:
cd /etc/systemd/network -
Edit
51-ethercat.network:sudo nano 51-ethercat.networkDisplays the default configuration:
# EtherCAT network settings
[Match]
Name=eth1

[Network]
LinkLocalAddressing=no
IPv6AcceptRA=no
ConfigureWithoutCarrier=yes

#[Link]
#Unmanaged=yes
Per default the
eth1network device is reserved foretherCAT. You can change the network device assigned to etherCAT network to your own preference.
Note
Make sure that the network device that you wish to assign to the EtherCAT network is not already taken by the wired network configuration).
-
Save the file and reboot your controller:
sudo reboot
Note
The assigned etherCAT network device, must match the assigned network device in the EtherCAT Master Configuration.
WiFi Configuration
Create wifi access point on controller
Per default if the controller contains a Wi-Fi network card, the mcx-rtos creates an access point on the controller.
How to change the wifi configuration:
- Configure default ssid
(mcx-428c36) - Configure default psk
(vectioneer)
-
Navigate to the network directory:
cd /etc/systemd/network -
Edit the file
25-wifi-ap.network:sudo nano 25-wifi-ap.networkDisplays the default configuration:
# Wifi network settings [Match] Name=wlan0 [Network] Address=192.168.0.1/24 DHCPServer=yes [DHCPServer] PoolOffset = 10 PoolSize = 40 EmitDNS = yes DNS = 8.8.8.8 8.8.4.4 DefaultLeaseTimeSec = 600 MaxLeaseTimeSec = 7200 -
Change the security setting of your WiFi (only available, if your controller contains WiFi-module):
sudo nano /etc/wpa_supplicant/wpa_supplicant-wlan0.confBy default the WiFi connection is configured as an Access Point to which an external system can connect using the default passphrase “vectioneer”. The default configuration is shown below.
network={
    ssid="mcx-428c36"
    #psk="vectioneer"
    psk=373b4c981c2b7c30be346d560b6a7f04c313e7c66e841915db053d9d61a21bd7
    mode=2
    proto=RSN
    key_mgmt=WPA-PSK
    pairwise=CCMP
    group=CCMP
    frequency=2437
}
You can change the SSID by modifying the ssid field. You can enter a new passphrase by either putting the literal passphrase (readable) in quotes:
psk="mynewpassword"Or you can generate a password hash by using the
wpa_passphrasetool:wpa_passphrase {SSID} {NEWPASSPHRASE}This outputs a new hashed passphrase section that you can transfer into your configuration file.
-
Save the file and reboot your controller:
sudo reboot
Connect to existing wifi network
Connect your controller via wifi to an existing network via mcx-cfg-wifi command.
-
SSH to the controller
-
Use the
mcx-cfg-wifi,
usage: mcx-cfg-wifi INTERFACE [SSID [PASSWORD [KEYMGMT [AP]]]]
  KEYMGMT: Which wpa_supplicant key_mgmt to use (e.g. WPA-PSK)
       AP: Create network as local wifi AP when non-empty
To create a WiFi Access point:
mcx-cfg-wifi wlan0 myWifiName 'myWifiPassword' WPA-PSK AP
To log into an existing network:
mcx-cfg-wifi wlan0 myWifiName 'myWifiPassword'
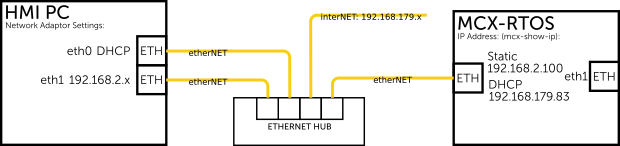
Connect MCX-RTOS to the Internet
How to connect MCX-RTOS to the internet:
-
Via wired network (Use Ethernet HUB)
-
The default wired network settings are DHCP and static network. (
42-bridge-dhcp-client-and-static.network) -
ssh to static controller IP
ssh admin@192.168.2.100 -
Use
mcx-show-ipto findDHCP IP(br0) address:br0 192.168.179.83 2a02:a467:d9a9:1:201:c0ff:fe2e:8b23 fe80::1c81:e2ff:fe4e:e0b6 br0:0 192.168.2.100 eth0 eth1 wlan0 192.168.0.1 fe80::cae2:65ff:fe42:7c28 -
ssh to DHCP IP
ssh admin@192.168.179.83. Now you established connection to controller with internet access. -
Test you connection:
ping www.google.comPING www.google.com(ams17s12-in-x04.1e100.net (2a00:1450:400e:810::2004)) 56 data bytes 64 bytes from ams17s12-in-x04.1e100.net (2a00:1450:400e:810::2004): icmp_seq=1 ttl=60 time=10.3 ms
Now your MCX-RTOS is connected to the internet.
Note
InterNET Network IP should differ from configured controller IP address range (br0:0 192.168.2.x and wlan0 192.168.0.x).
EtherCAT Master Configuration
The EtherCAT master needs to know which network device it will use for EtherCAT. The EtherCAT network device should not be configured for normal networking.
Make changes to the default mcx-rtos etherCAT configuration:
-
Open ethercat.conf in edit mode:
sudo nano /etc/ethercat.conf
Note
Make sure that the network device that you wish to assign to the EtherCAT driver is not already taken by the normal network configuration, see wired network configuration.
-
Modify the network device by changing the following line:
MASTER0_DEVICE="eth1"The configured MASTERO_DEVICE, needs to match the configured network device in the EtherCAT Network Configuration.
-
Modify the driver type by changing the following line:
DEVICE_MODULES="generic"
Refer to the EtherLAB documentation for a description of all available configuration options.
-
Save the file and reboot your controller:
sudo reboot
Configure etherCAT for CX5140:
-
Open ethercat.conf in edit mode:
sudo nano /etc/ethercat.conf
Note
Make sure that the network device that you wish to assign to the EtherCAT driver is not already taken by the normal network configuration, see wired network configuration.
- Change the default
MASTERO_DEVICE:"eth1"to registered ccat_netdev network device:
Note
Use following command to find ccat_netdev network device:
dmesg | grep ccat
[    5.868588] ccat: loading out-of-tree module taints kernel.
[    8.711092] ccat_netdev: DMA0 mem initialized
[    8.711104] ccat_netdev: DMA1 mem initialized
[    8.760589] ccat_netdev: registered ccat0 as network device.
MASTER0_DEVICE="ccat0"
The configured MASTERO_DEVICE, needs to match the configured network device in the EtherCAT Network Configuration.
-
Save the file and reboot your controller:
sudo reboot
Changing the Host Name
-
If you want to modify the system’s hostname you can change it by modifying
sudo nano /etc/hostnameand
sudo nano /etc/hosts -
Save the file and reboot your controller
sudo reboot