CiA402 drives
7 minute read
This page adds a CiA402CiA 402 is the CANopen device profile for servo drives and motion control, published by CAN in Automation. It defines how a drive behaves on the bus: its state machine, its modes of operation such as CSP, CSV and CST, and standard objects like the control word (0x6040). Over EtherCAT the profile is used through CANopen over EtherCAT (CoE). drive to the EtherCAT configuration and links it to your Motorcortex application. The examples use a Synapticon SOMANET drive and an Elmo Gold drive. It takes three parts; click one to jump to it.
How the drive connects
The drive exchanges data with the EtherCAT master through its PDOs. The rxPDO carries what the drive receives, such as targets and the control word; the txPDO carries what it sends back, such as actual values and the status word. Links in the EtherCAT configuration connect those PDO entries to parameters of the Motorcortex application.
The PDO entries shown are those of the Elmo example below. Your application may need others.
Before you start
- The robot application is deployed on your controller: see Deploy an application.
- You know how to open and use the ECAT tool: see Add a device.
- You have the ESI file for your drive. It must match the drive’s firmware version. Drive manufacturers supply ESI files on request or through their own tools.
Not sure which firmware your drive runs? Read it from the drive
Log in to the controller over SSH, then:
-
List the devices on the bus:
ethercat slaves0 0:0 PREOP + EK1914, 2 Ch. Safety Input/Output 24V, TwinSAFE 1 0:1 PREOP + EL6910, TwinSAFE PLC 2 0:2 PREOP + EK1110 EtherCAT-Verlängerung 3 0:3 PREOP + SOMANET CiA402 Drive 4 0:4 PREOP + 0x0000009a:0x00030924In this example the SOMANET drive is at position 3 and the Elmo drive at position 4. Run
ethercat slaves --helpfor the meaning of each column. -
Find the SDO that holds the software version. Search the SDO list of the drive at position 3:
ethercat -p3 sdos | grep -i softwareSDO 0x100a, "Manufacture Software Version" 0x100a:00, r-r-r-, string, 264 bit, "Manufacture Software Version" SDO 0x607d, "Software Position limit"Repeat with
-p4for the second drive. -
Read the version from
0x100a:00:ethercat upload -p3 0x100a 0:0 ethercat upload -p4 0x100a 0:0The example drives return:
- Elmo:
Twitter 01.01.16.00 08Mar2020B01G - SOMANET:
v5.0.3-16-g58c2f1c06
- Elmo:
-
Check that this version matches your ESI file.
Add the drive in the ECAT tool
-
Open the ECAT tool and check your connection.
-
Press
+ Add your first devices. -
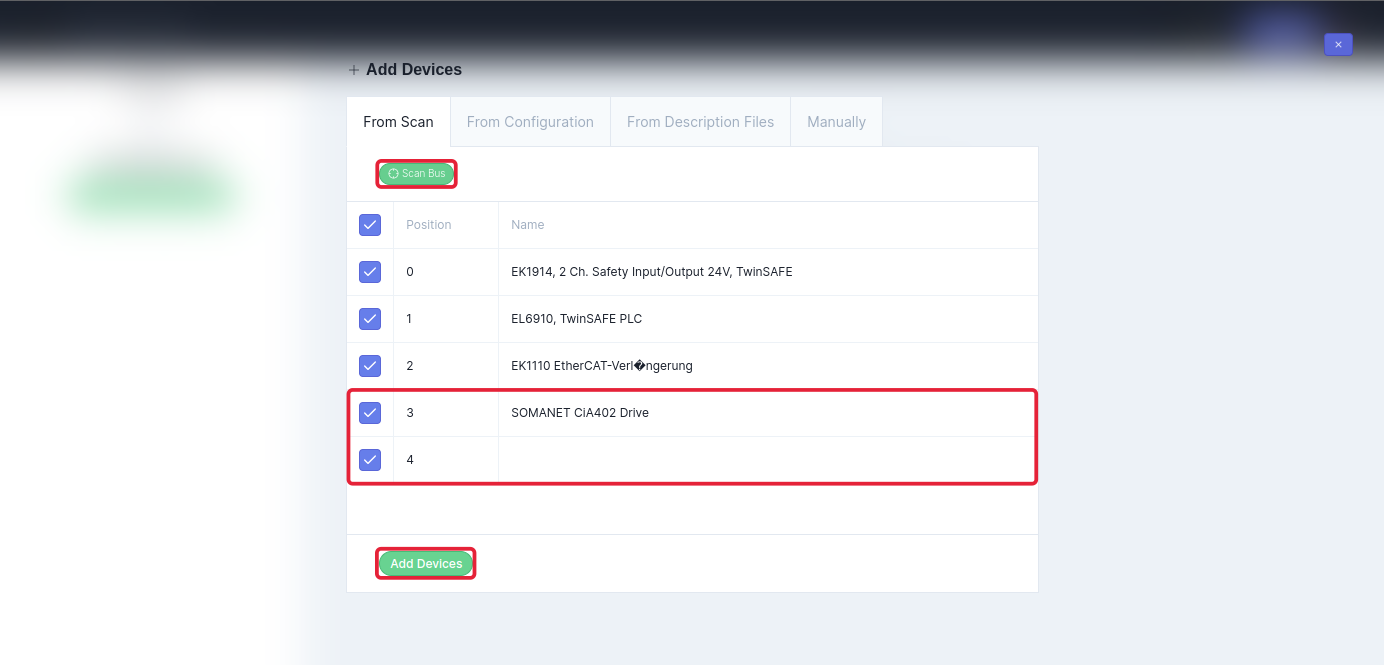
On the From Scan tab, press Scan Bus, select the drives, then press Add Devices.
-
Load the ESI file: select the drive, press next to the device name, choose ESI file and select the
.xmlfile. This works the same for every EtherCAT device.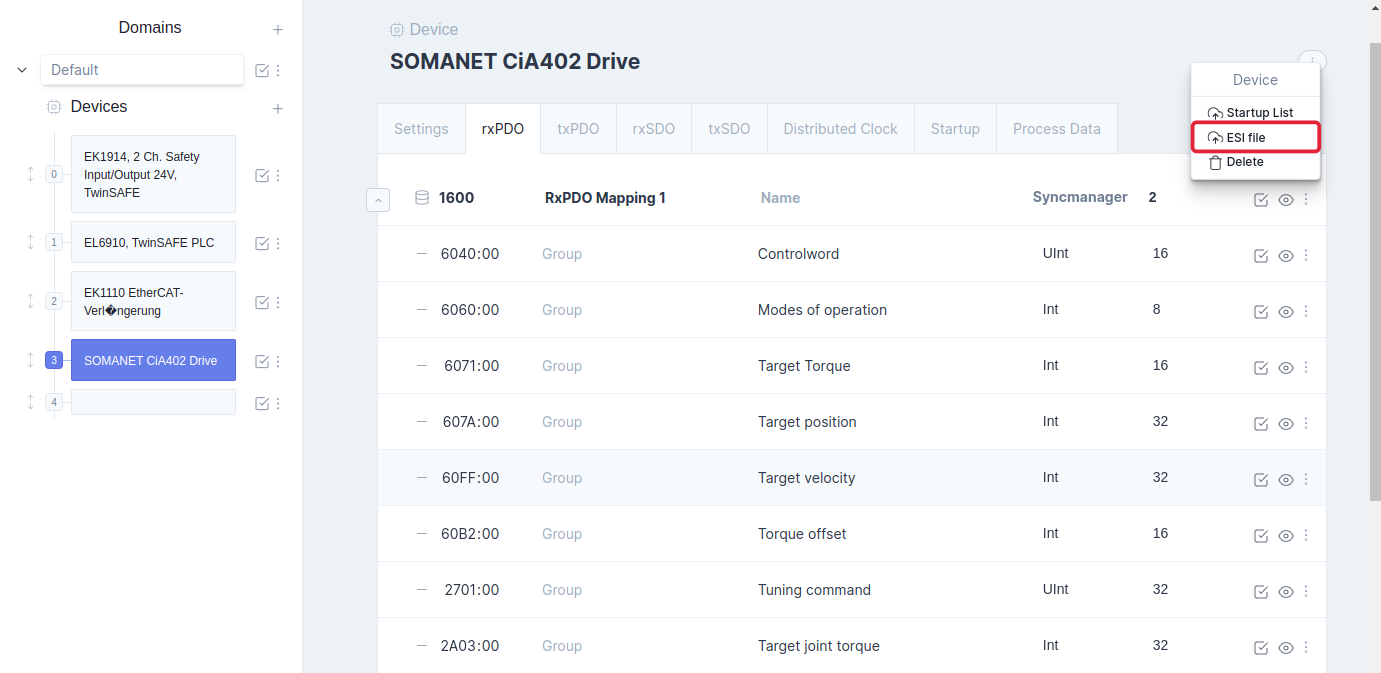
-
Check the PDOs. Every entry your application needs must be in an rxPDO or txPDO, see the table below. What this takes depends on the drive:
| Entry | CiA402 object | Direction | Needed |
|---|---|---|---|
| Controlword | 0x6040 | rxPDO | Always |
| Modes of operation | 0x6060 | rxPDO | Always |
| Target position | 0x607A | rxPDO | For CSP |
| Target velocity | 0x60FF | rxPDO | For CSV |
| Target torque | 0x6071 | rxPDO | For CST |
| Torque offset | 0x60B2 | rxPDO | Optional: a torque feedforward in CSP and CSV |
| Statusword | 0x6041 | txPDO | Always |
| Position actual value | 0x6064 | txPDO | Always |
| Velocity actual value | 0x606C | txPDO | Recommended |
| Torque actual value | 0x6077 | txPDO | Recommended |
The standard robot configuration maps all three targets, so the drive mode can change without a new PDO mapping. It also links a torque sensor entry, a vendor-specific object, for the sensor torque transformation.
Synapticon SOMANET
The SOMANET ESI file comes with its PDOs already mapped, so there is usually nothing to add. In the example above, RxPDO Mapping 1 (0x1600) holds the controlword, modes of operation and the three targets, and the txPDO holds the statusword and the actual values.
- Open the rxPDO tab and check that every rxPDO entry from the table is there.
- Do the same on the txPDO tab.
- If an entry is missing, add it to a PDO as shown in the Elmo tab.
The SOMANET drive also offers a TorqueSensor entry in its txPDO. The standard robot configuration links it to …/sensorTorqueActual.
Elmo Gold
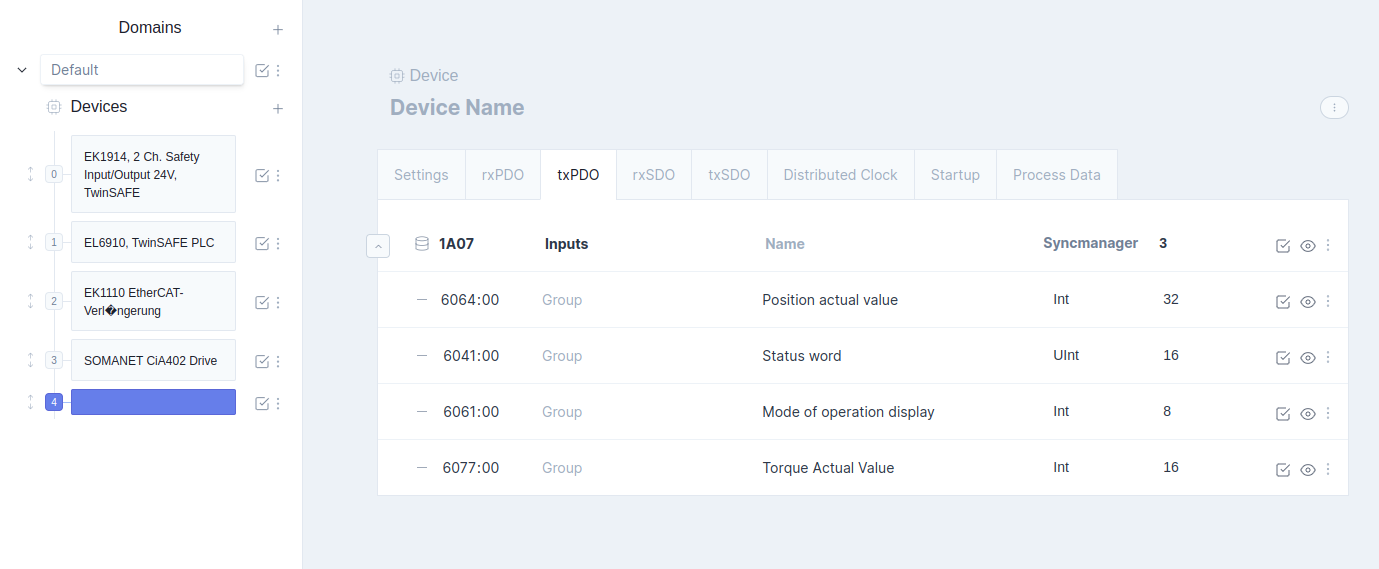
The Elmo ESI file offers many PDOs, most of them pre-configured with fixed entries. Use the freely configurable rxPDO 0x1607 and txPDO 0x1A07 instead, and add the entries from the table yourself.
-
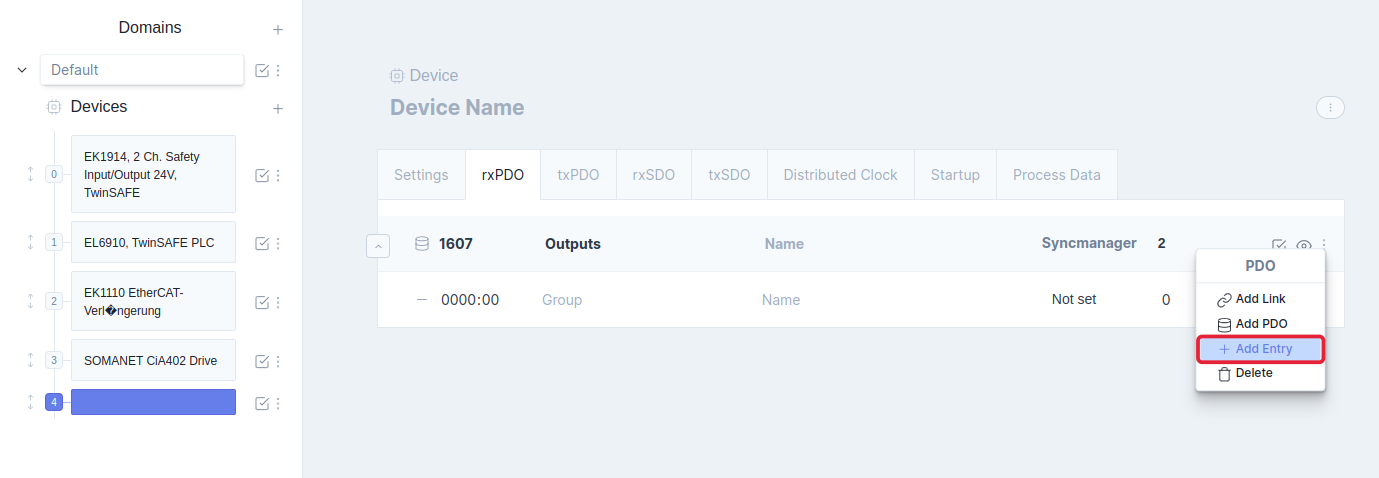
On the rxPDO 0x1607, press and choose Add Entry.
-
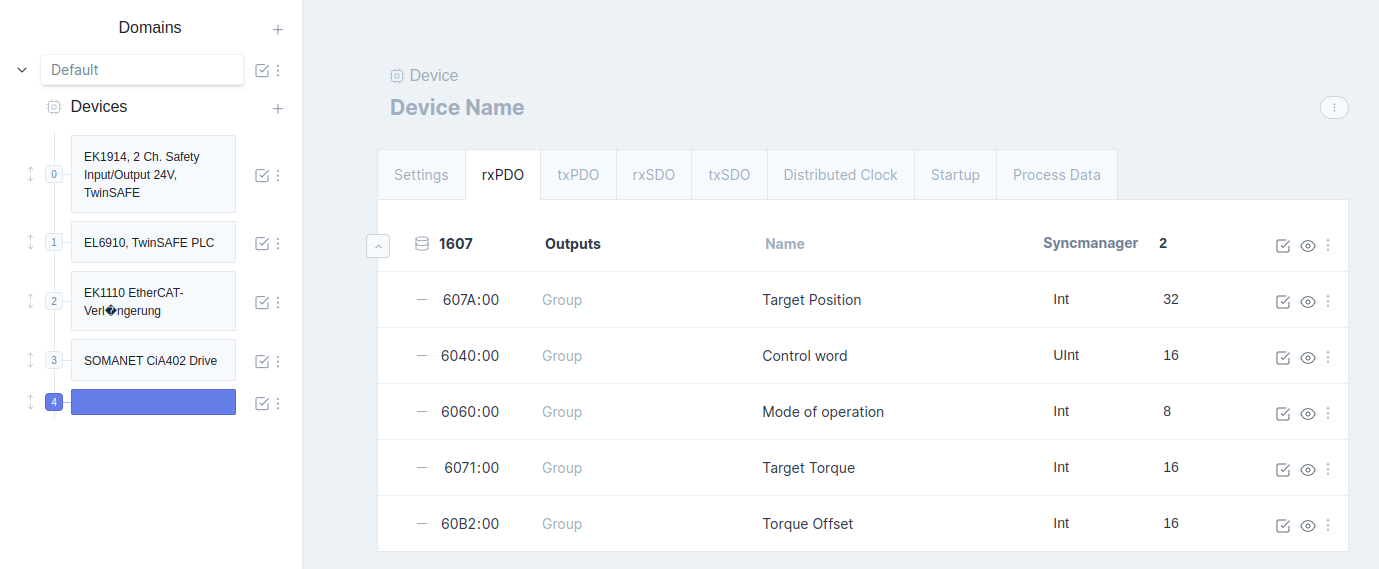
Add every rxPDO entry your application needs. This example is for CSP with a torque offset:
-
Do the same on the txPDO 0x1A07:
Other drives
Every vendor sets up its ESI file differently. There are two kinds:
- Already mapped, like the Synapticon: the PDOs come with their entries. Check that every entry from the table is there.
- Fill it yourself, like the Elmo: pick a configurable rxPDO and txPDO, and add the entries as shown in the Elmo tab.
The drive’s manual says which PDOs can be changed and how many entries each can hold. Map only the entries you need: every entry adds to the data sent each cycle.
Link the drive to the application
Info
For the full explanation of production, simulation and mixed set-ups, see Simulating devices.
The application only receives and sends drive data through links. Each drive entry can carry two: a production link to the application, which is always connected, and a simulation link to the simulator, which only counts while the drive is simulated. This is one axis of the standard robot configuration; paths starting with …/ are under root/AxesControl/actuatorControlLoops/actuatorControlLoopNN/, where NN is the axis number.
- In the ECAT tool, open the drive’s rxPDO and txPDO tabs and add a production link to each entry, as on the left of the map. Use the axis number in
actuatorControlLoopNN. Array parameters, such asDriveLogic/driveOpMode, take the axis number minus one as the channel. - To run without the drive, add the simulation links on the right as well. Open each simulation link’s properties with and switch Simulation on; the turns blue.
- On the drive’s Settings tab, link Link Simulation to
root/DriveLogic/driveSimulationwith the drive’s channel, so the drive logic simulates the drive too.