Window detectors
6 minute read
A window detector watches one value of one axis. While the value stays inside its window nothing happens. Past low or high the application raises a warning; past tooLow or tooHigh it makes an emergency stop.
Using the standard robot GUI?
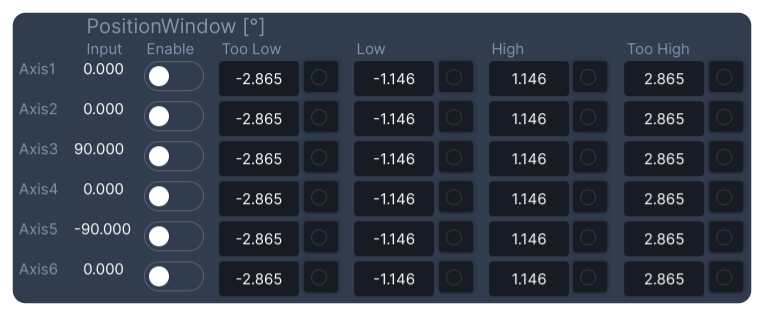
The robot GUI shows the detectors on its Alarms tab, one row per axis. It shows positions in degrees; the parameters are in rad. See Robot alarms.
How a detector behaves
- It latches. Once a level is reached, its output (
isLow,isHigh,isTooLow,isTooHigh) stays true until the errors are reset, even if the value comes back. - It can wait. With
timeWindowset, the value must stay past a level for that many seconds before the detector trips. Use it for noisy values or short spikes at start-up. - It only counts while the axes are engaged. The robot application ignores the detectors in Off, Idle, homing and the other states where the axes are not engaged.
- It must be switched on twice. The detectors in an actuator control loop only run when that loop’s
windowDetectorsEnableis1; it is0by default. Each detector also has its ownenable, which is1by default.
The parameters
Every detector has the same parameters. The values are in the unit of what it watches: rad or m, rad/s, rad/s², Nm.
| Parameter | What it does | Default |
|---|---|---|
enable |
Switch this detector on | 1 |
low, high |
Warning levels | -0.02, 0.02 |
tooLow, tooHigh |
Emergency stop levels | -0.05, 0.05 |
timeWindow |
Seconds the value must stay past a level before it trips | 0 |
autoreset |
1 releases the outputs as soon as the value is back inside, instead of latching |
0 |
To set one up in Desk:
- Set
root/AxesControl/actuatorControlLoops/actuatorControlLoopNN/windowDetectorsEnableto1for each axis. - Open the detector, for example
actuatorControlLoop01/positionWindowDetectorfor the position of axis 1. - Set
tooLowbelowlow, andtooHighabovehigh. Leave some room between the warning and the emergency stop so that the warning comes first. - Set
enableto1, then save the parameter tree.
The detectors
| Detector | Watches | Warning | Emergency stop |
|---|---|---|---|
| Setpoint jump | How far the setpoint moves in one cycle | WA_SETPOINT_JUMP (210) |
Smooth stop and forced disengage, FD_SETPOINT_JUMP (309) |
| Position | The actual position | WA_POSITION_WINDOW_EXCEEDED (201) |
ES_POSITION_WINDOW_EXCEEDED (601) |
| Tracking error | Position target minus actual position | WA_TRACKING_ERROR_WINDOW_EXCEEDED (202) |
ES_TRACKING_ERROR_WINDOW_EXCEEDED (602) |
| Velocity | The actual velocity | WA_VELOCIY_WINDOW_EXCEEDED (204) |
ES_VELOCIY_WINDOW_EXCEEDED (604) |
| Acceleration | The actual acceleration | WA_ACCELERATION_WINDOW_EXCEEDED (205) |
ES_ACCELERATION_WINDOW_EXCEEDED (605) |
| Torque | The actual torque | WA_FORCE_WINDOW_EXCEEDED (203) |
ES_FORCE_WINDOW_EXCEEDED (603) |
The codes are those of the robot application, which receives every detector’s state through the standard base.link.json.
The setpoint jump detector catches a setpoint that jumps, for example a wrong target or a link that suddenly delivers another value. It watches how far the axis setpoint moves in one cycle, before and after the limiter, and takes the larger of the two.
It works on all axes at once, so it does not use windowDetectorsEnable: each axis has its own detector at root/AxesControl/axesSetpointJumpDetectors/windowDetectorNN.
| What | Details |
|---|---|
| Unit | rad or m per cycle |
At low or high |
Warning WA_SETPOINT_JUMP (210) |
At tooLow or tooHigh |
The axes make a smooth stop and the application forces a disengage, FD_SETPOINT_JUMP (309) |
| Paused | While the axis runs open loop, for example while it is referenced |
| Standard robot configuration | Enabled; low, high at -0.02, 0.02; tooLow, tooHigh at -0.05, 0.05 |
To choose the levels, work out the largest step a real move makes: the highest velocity times the cycle time. Set high a little above it and tooHigh well above it, and the negative levels the same.
The position window watches the actual position, so it catches an axis that is outside its range whatever the setpoint says. The limiter only keeps the setpoint in range; this detector is the check on the axis itself. It matters most for axes driven by a velocity or torque setpoint.
| What | Details |
|---|---|
| Path | actuatorControlLoopNN/positionWindowDetector |
| Watches | actuatorPositionActualFiltered, in rad or m |
| Standard robot configuration | Present but disabled, with the default levels |
Set low and high just outside the limiter’s position limits, and tooLow and tooHigh a little further out, still inside the mechanical end stops.
The tracking error window watches how far the axis is from where it should be: the position target minus the actual position. A large error means the axis is blocked, has hit something, or the drive or controller is not doing what it should.
| What | Details |
|---|---|
| Path | actuatorControlLoopNN/positionErrorWindowDetector |
| Watches | actuatorPositionError, in rad or m |
| Standard robot configuration | Present but disabled; high at 0.02 and tooHigh at 0.15 |
To choose the levels, plot actuatorPositionError in Desk during the fastest moves you make. Set high and low a margin beyond the largest error you see, and tooHigh and tooLow further out.
The velocity window watches the actual velocity, so it catches an axis that moves too fast, for example after a wrong transformation or a drive fault.
| What | Details |
|---|---|
| Path | actuatorControlLoopNN/velocityWindowDetector |
| Watches | actuatorVelocityActualFiltered, in rad/s or m/s |
Set high and low a little beyond the limiter’s velocityLimit, and tooHigh and tooLow further out.
The acceleration window watches the actual acceleration, worked out from the filtered actual velocity. It catches jolts, such as a collision or a sudden drive reaction.
| What | Details |
|---|---|
| Path | actuatorControlLoopNN/accelerationWindowDetector |
| Watches | actuatorAccelerationActualFiltered, in rad/s² or m/s² |
Because it is a derivative, this value is noisy. Set the levels a good margin beyond the limiter’s accelerationLimit, and use timeWindow to ignore short spikes.
The torque window watches the actual torque at the load, which reveals a collision, a blocked axis or a load that is heavier than expected. It exists on axes whose drive reports a torque.
| What | Details |
|---|---|
| Path | actuatorControlLoopNN/torqueWindowDetector |
| Watches | actuatorTorqueActualFiltered, in Nm |
To choose the levels, plot actuatorTorqueActual in Desk during normal work, including the heaviest load. Set high and low a margin beyond what you see, and tooHigh and tooLow below what the mechanics can take.
Next: Tune the controllers, if the drive runs CSV or CST. Otherwise go on to step 4: set up the mechanism.