Joint jog limits
2 minute read
The joint jog limits keep each joint inside a range while you jog it in manual joint mode. They are separate from the axis limiter, which limits every mode: set the jog limits a little inside it, so a jog stops before the limiter has to step in.
Using the standard robot GUI?
The jog limits are under Joint Jog Limiters on the robot GUI’s Axis Limiters tab, one row per axis. Press Save Settings to keep your changes.
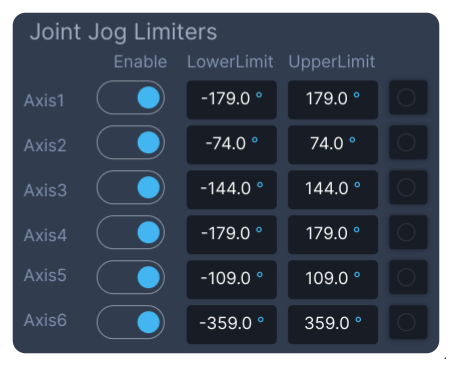
- Enable:
outputLimiterEnable. - LowerLimit and UpperLimit:
outputLimiterMinandoutputLimiterMax. The GUI shows them in degrees. - The light:
outputLimiterIsActive, on while the joint is outside its range.
Outside the range, a joint can only be jogged back towards it:
Parameters
Each axis has its own set, under root/ManipulatorControl/jointCompliance/Controllers/admittanceControlNN/positionIntegrator/, with NN the axis number: 01, 02 and so on.
| Parameter | What it does | Standard robot configuration |
|---|---|---|
outputLimiterEnable |
1 switches the limits on. They are switched on again at every start-up |
1 |
outputLimiterMin, outputLimiterMax |
The jog range, in rad | For example ±3.124 on axis 1, ±1.292 on axis 2 |
outputLimiterClampDisable |
1: outside the range, the joint only stops moving further out. 0: the target is pulled back onto the limit at once |
1 |
outputLimiterIsActive |
Output: 1 above the upper limit, -1 below the lower limit, 0 inside |
Warning
Keep outputLimiterClampDisable at 1. With 0, switching to joint jog outside the range makes the joint jump to the limit.
What happens at a limit
- While a joint is outside its range, the robot shows warning 112,
WA_JOG_JOINT_JOYSTICK_OUTSIDE_LIMITS_ERROR, with the axis number. Jog the joint back into its range to clear it. - The limits apply to joint jog only. Cartesian jog, programs and the joint trajectory input are limited by the axis limiter instead.
Set the limits
- Find the range of each joint on the robot’s data sheet, and keep a margin to the axis limiter.
- Write
outputLimiterMinandoutputLimiterMaxfor each axis, in rad. - Jog each joint slowly to both limits in simulation mode, and check that it stops there and that warning 112 appears.
- Save the parameter tree.