Environment Setup
15 minute read
The main tool for building, testing and deploying software is CMake. It is widely accepted and supported by many IDEs, which means that the user is free to choose from various development environments.
To make things more convenient, there are Motorcortex plugins for VSCode and CLion. While the same setup can be done manually, these plugins simplify the process and provide templates to get started quickly. Thus, VSCode and CLion are the recommended IDEs for developing Motorcortex Control applications.
Installing Motorcortex Extensions
You can find the installation guide for the Motorcortex VSCode extension here.
Setting up the Project
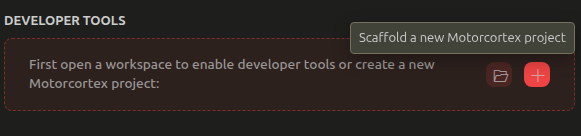
As the Motorcortex VSCode extension requires to know that you are creating a control application, you need to either create a new project or setup an existing project:
Creating a New Motorcortex C++ Control Project
Use the button scaffold new Motorcortex C++ Control Application in the Motorcortex extension view to create a new Motorcortex C++ Control application. This will create a new folder with the necessary files and structure for a Motorcortex Control application.
You can also use the command palette (ctrl+shift+p) and search for Motorcortex: Create C++ MCX Control App.
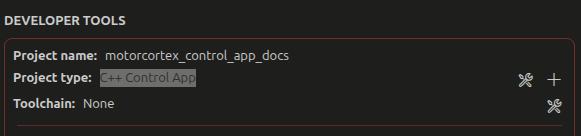
When you have created the project, open the folder in VSCode. The extension view should now show that a Motorcortex Control application is detected.
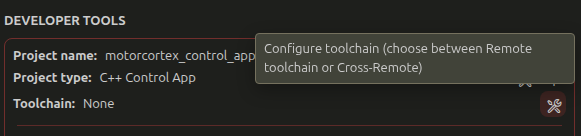
Setting up Toolchain
To build your project, you have three options based on your development setup:
-
Cross Remote Toolchain - Build on Local (preferred):
This creates a toolchain that builds the application on your local machine and deploys it to the target device for execution. Uses the Motorcortex cross-remote SDK.
-
Cross Remote Toolchain - Build on Target:
This creates a toolchain that builds the application on the target device itself, while you develop on your local machine. Uses the Motorcortex cross-remote SDK for IntelliSense.
-
Remote toolchain (Remote Development) - Build on Target:
This creates a toolchain that builds and runs the application on the target device itself, while you develop on your local machine. Uses VSCode Remote Development extension-pack, which is preinstalled with the Motorcortex extension.
The Cross Remote Toolchains both require the same setup as the distinction where the builds happens is done in the VSCode Extension.
This is the prefered way to develop Motorcortex control applications remotely. It uses the Motorcortex Cross-Remote SDK to provide IntelliSense and build support on your local machine, while deploying and running the application on the target device.
Prerequisites
From the Motorcortex store download the latest Motorcortex SDK for your system, for example mcx-rtos-glibc-x86_64-mcx-image-dev-corei7-64-mcx-intel-toolchain-2025.03-0-g0e9d0e9.sh.
Installing
- Press the
Configure Toolchainbutton in the Motorcortex extension view and chooseCross-Remote.
-
Choose whether to use a DevContainer or not. Using a DevContainer is recommended as it provides a consistent development environment. It is a built-in feature of VSCode and works cross-platform. If you choose to not use a DevContainer, make sure that you have all the required dependencies installed on your local machine.
-
Configure the Remote path and executable name.
- Remote Path: The path on the target device where the executable and configs will be synced to run/debug on the device. When building remotely, the entire workspace will be synced to this path.
- Executable Name: The name of the executable file that will be built and run on the target device. Make sure that this matches the name defined in your CMakeLists.txt file!
-
Depending on whether you chose to use a DevContainer or not, select the appropriate file:
- DevContainer: SDK install file:
**.sh - Not DevContainer: Environment file:
mcx-clion-environmentin the installed SDK folder.
- DevContainer: SDK install file:
-
Open the DevContainer (if chosen) by pressing the
Reopen in Containerbutton in the bottom right corner of VSCode. -
Select the CMake Kit:
ctrl+shift+p:CMake: Select a Kit→Motorcortex Cross-Remote
Usage
You can now build and run/debug your Motorcortex control application remotely using the VSCode build and debug features. The Motorcortex extension will handle the deployment and execution on the target device automatically. Convenient buttons have been added to the VSCode Extension view in the sidebar for easy access.
The buttons use Tasks and Launches that have been added to the .vscode folder to also provide a vscode-native way of developing.
This way to develop Motorcortex control applications is completely on the target machine. Only the VSCode UI will run on your local machine. The files will be stored on the target and even the terminals inside of VSCode will be running inside of the target. This issues with Git might occur.
Installing
-
Open the
Remote Explorerand selectRemotes (Tunnels/SSH)in the top bar: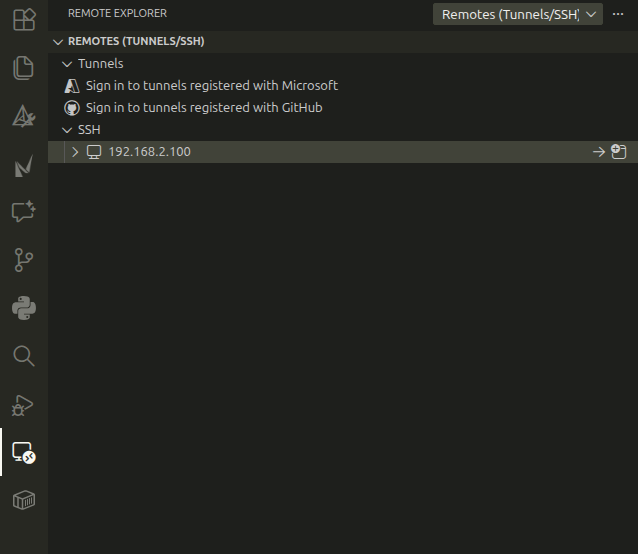
-
Add a new remote by clicking on the
+icon next toSSHand follow the instructions to set up an SSH connection to your target machine. -
Once the connection is set up, Open the newly created SSH Connection and either open it in the current window or in a new window.
-
Download the Motorcortex Extension again.
-
Transfer your project files to the target machine if you haven’t done so already or create a new project.
-
Press the
Configure Toolchainbutton in the Motorcortex extension view and chooseCross-Remote.
- Select
Remote Toolchainand enter the name of the executable. Make sure that this matches the name defined in your CMakeLists.txt file!
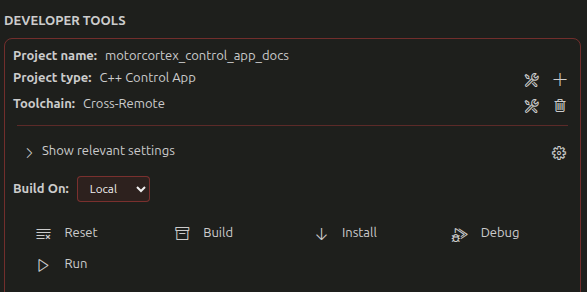
Settings
For ease of use, the sidebar Motorocortex view shows the relevant settings for the selected toolchain. You can change these settings here directly.
Note
When you change certain settings, a notification will pop-up to warn about potential influences the change has. Make sure to read propperly to prevent problems.
All settings for both Toolchains:
motorcortex.targetIp- IP address of your Motorcortex Target controllermotorcortex.targetUser- SSH username for your Motorcortex Target controllermotorcortex.cpp.default_args- Default program arguments when running/debuggingmotorcortex.cpp.executable_name- Name of the executable to build and run on the target controllermotorcortex.cpp.crossRemoteToolchain.sdk_installer_path- Path to the MotorCortex SDK installer (.sh file) for remote toolchain setup. Leave empty to be prompted each time.motorcortex.cpp.crossRemoteToolchain.remote_path- Remote path on the controller where files will be syncedmotorcortex.cpp.cmake_toolchain_path- Path to the CMake toolchain file for cross-compiling C++ Motorcortex Control Applicationsmotorcortex.cpp.mcx_packaging_install_prefix- Path prefix for installing MCX Packaging on the Motorcortex Target device
Troubleshooting
Error: “MainControlLoop.h: No such file or directory”
- This means you’re trying to compile with g++ directly
- Use CMake build tasks instead
Error: “mcx/core.h: No such file or directory”
- Make sure the SDK is installed correctly if you are using
Remote Toolchain. - Make sure Motorcortex installed on the controller. Deploy an Application if you are using
Remote Development Toolchain. - Make sure your
motorcortex.cpp.cmake_toolchain_pathsetting is correct and points to the SDK toolchain file - (if building works but IntelliSense fails) Make sure to have selected the correct CMake Kit:
ctrl+shift+p:CMake: Select a Kit→Motorcortex Cross-Remote
Cannot find executable when debugging
- Make sure to build first (Ctrl+Shift+B)
- Check that
build/**-debug/motorcortex_control_app_docsorbuild/**-release/motorcortex_control_app_docsexists
Breakpoints not working (red/unbound)
- Ensure you’re using the Debug configuration, not Release
- Delete the build folder and rebuild:
rm -rf build/debug && Ctrl+Shift+B
Failed to start the listener for URL: wss://*:5568 (Address in use)
- Make sure Motorcortex is not running:
sudo motorcortex stop - Make sure no other instances of your-program-name is running
Building takes a long time
- Make sure Motorcortex is not running:
sudo motorcortex stop - Make sure no other instances of your-program-name is running
Installing Motorcortex Plugins
There are two CLion plugins that make developing Motorcortex applications easier: Motorcortex Templates and Motorcortex ToolChains.
Both can be installed in the plugin menu of Clion.
-
In the
Main Menuon the top left corner open:File → Settings, then find thePluginsmenu. -
In the plugins menu search for
Motorcortex. -
Install both
Motorcortex TemplatesandMotorcortex ToolChainsplugins -
Press
restart IDE-> pressRestart.
Creating a New Motorcortex Project
Using the Motorcortex Templates plugin you can create a new Motorcortex project directly from CLion. This will setup a basic Motorcortex project structure for you with all necessary files. You an then easily develop, build and deploy your application from within CLion.
-
In the
Main Menuon the top left corner open:File → New Project. -
In the new project menu select
C++ Motorcortexon the left side. -
Fill in the Location and select the options you want.
-
Press
Create.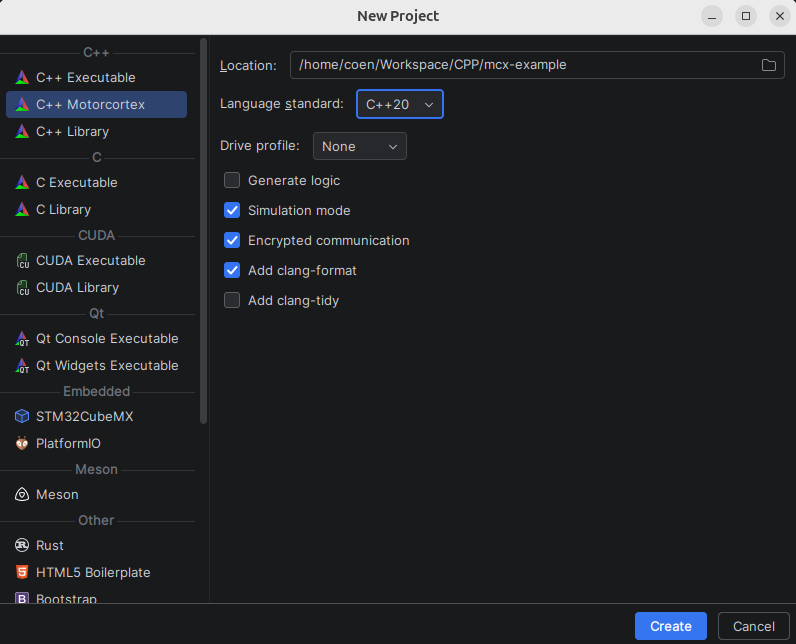
Setup-up Toolchains
There are two ways of building Motorcortex Control applications:
- Cross-Remote: A hybrid between cross-platform development and remote development. It will build the code on your local machine and run/debugs on the target machine.
- Remote: Builds and runs/debugs on the target machine.
In Clion you can setup different toolchains to build your Motorcortex applications. Using the Motorcortex ToolChains plugin you can easily setup the toolchains needed for cross-remote development.
Install Motorcortex SDK
-
From the Motorcortex store download the latest Motorcortex SDK for your system, for example
mcx-rtos-glibc-x86_64-mcx-image-dev-corei7-64-mcx-intel-toolchain-2025.03-0-g0e9d0e9.sh. -
Give the file execution permissions: (Replace the filename with the one you downloaded)
chmod +x mcx-rtos-glibc-x86_64-mcx-image-dev-corei7-64-mcx-intel-toolchain-2025.03-0-g0e9d0e9.sh -
Run the installer: (Replace the filename with the one you downloaded)
./mcx-rtos-glibc-x86_64-mcx-image-dev-corei7-64-mcx-intel-toolchain-2025.03-0-g0e9d0e9.sh -
Follow the instructions on screen to complete the installation. Make sure to remember the installation path, you will need it in the next step.
Make sure to install the SDK that matches your Motorcortex controller version. You can check your controller version by running
cat /etc/issueon the controller terminal.
System Toolchain
- In the
Main Menuon the top left corner open:File → Settings, then find theBuild, Execution, Deployment → Toolchainsmenu. - Add a new toolchain by pressing the
system. - Rename it to
motorcortex! (Do not give it another nam and this is case-sensitive) - Add environment by pressing
Add environmentand selectingfrom file. In the Environment file path enter the path to themcx-clion-environment.shfile in the Motorcortex SDK installation directory.
- Change the build tool to
makeif it is not already selected. (Ninja is supported but it will give a warning in the CMake window which can be ignored) - Press
Applyto save the toolchain settings.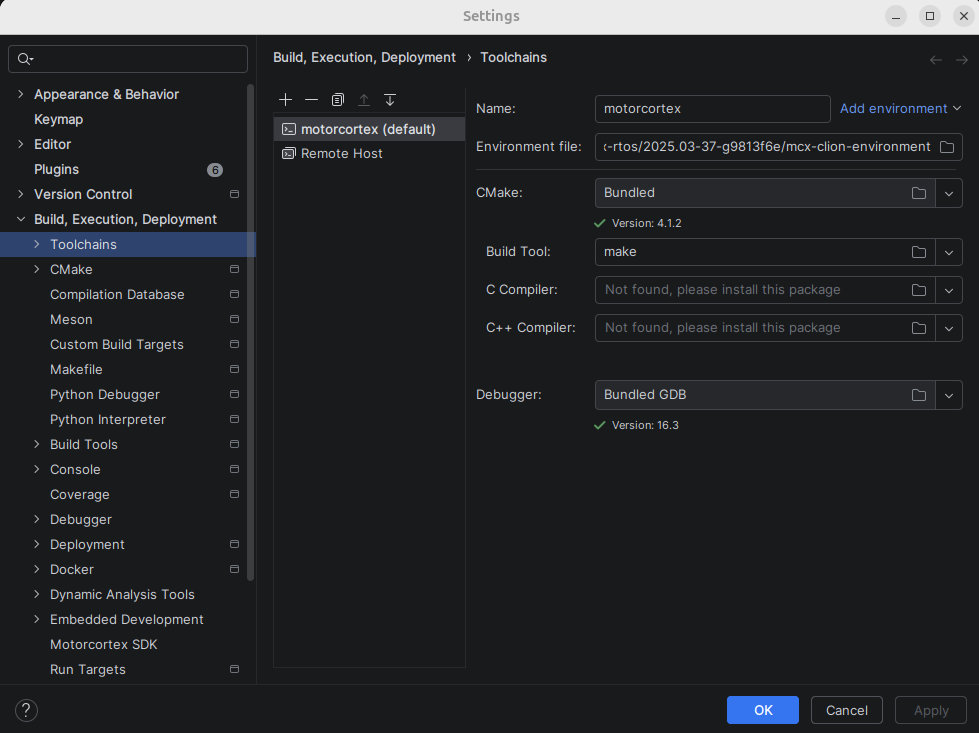
- Remove the default toolchain or move it below the
motorcortextoolchain to make sure the Motorcortex toolchain is used by default.
Remote Host
For this step, make sure you are connected to your Motorcortex controller via Ethernet. See Connecting to your Motorcortex Controller for more information.
-
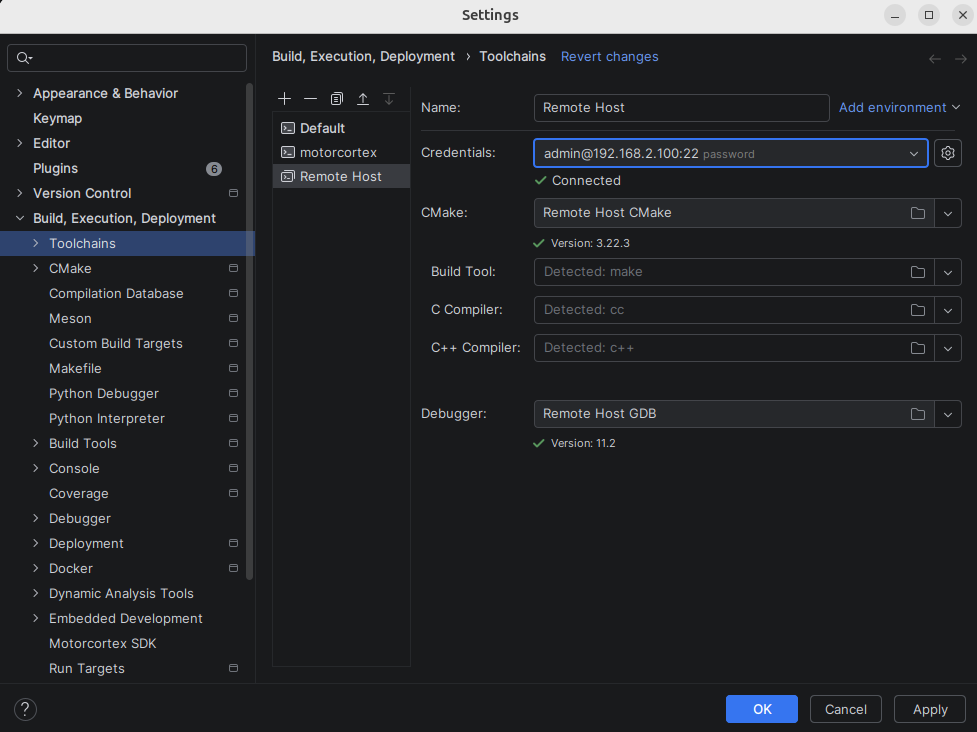
In the
Main MenuopenFile → SettingsunderBuild, Execution, Deploymentyou will find theToolchainsmenu. -
Add a new toolchain by pressing the
Remote Host. -
In the
Credentials:press theSSH Configurationsmenu. Add a new configuration by pressing the- Host:
192.168.2.100or the IP address of your Motorcortex controller if you changed it. - Port:
22 - User name:
adminor your custom username if you changed it. - Password:
vectioneeror your custom password if you changed it.
- Host:
-
Press the
Test Connectionbutton to make sure your connection isOK. If not, re-check your controller connection. -
If the connection is good you can press
OKto close theSSH Configurationsmenu. -
Wait for
Cmakeand theC/C++ Compilerto be detected:- CMake:
Remote host CMake - Build Tool: Default,
Detected: make - C Compiler: Default,
Detected: cc - C++ Compiler: Default,
Detected: c++ - Debugger:
Remote Host GDB
- CMake:
-
Press the
Applybutton to save theToolchainsettings.
Run/Debug Configurations
To easily build and run your Motorcortex application from within CLion you can setup Run/Debug configurations for both cross-compiling and remote development. With the Motorcortex ToolChains plugin this is also made easy.
-
In the
top barselectconfiguration edit....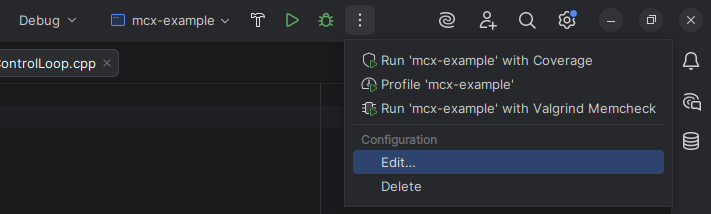
-
Press the
Motorcortex Remote Application. -
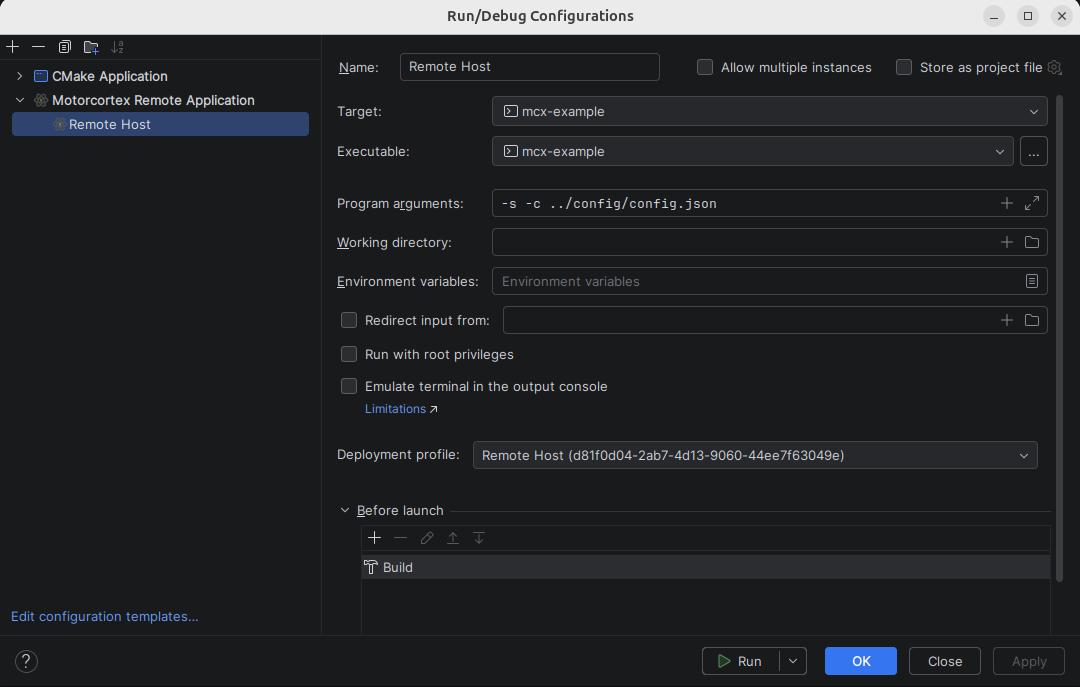
You can name the configuration as you like, for example
mcx-example. -
In the
Program argumentsfield add the following:-s -c /etc/motorcortex/config/config.json -
Make sure that the
Deployment profileautomatically selectedRemote Host ($ID$)as the option, with$ID$being the ID of your remote host toolchain.If you cannot see Remote Host for your IP, see the instructions below.
-
Press
Applyto save the configuration.
When you pressed apply it should have automatically created two new folders in your project directory: cmake-build-crossdebug and cmake-build-crossrelease. In the Cmake window of Clion a warning might appear but this can be ignored:
CMake Warning:
  Manually-specified variables were not used by the project:

    CMAKE_VERBOSE_MAKEFILE
Create new Deployment profile
- In the
Main MenuopenTools → Deploymentand click onconfigurations.... - Add a new
SFTPand enter the prefered name, for exampleRemote Host. - Add the
SSH configurationthat you use to connect to the target machine. - Select
Use rsync for download/upload/sync. (This will make it faster) - Press
OK. - You should now be able to use the Remote Host in the Run/Debug Configurations menu
Using the Toolchains
Compiling and Debugging/Running
- In the top right corner of CLion select the
Run/Debug Configurationyou created earlier, for examplemcx-example. - To build the application press the
- To run or debug the application press the
Installing and Running your Application Remotely
-
In
control/MainControlLoop.cpp, change the currentiterateOpfunction to the following code:bool MainControlLoop::iterateOp_(const container::TaskTime &systemTime, container::UserTime *userTime) { log_info("Test"); return true; } -
In
CLionset yourRun/Debug ConfigurationtoRemote Host. -
Press
Install(Located underbuildin the top bar). This will install the application on the Motorcortex controller. -
After installation is complete, open a terminal, either in CLion or your system terminal.
-
Run the following command to ssh into the the Motorcortex controller: (Update the Username and IP address if needed)
ssh admin@192.168.2.100 -
Once logged in, run the following command to restart the Motorcortex application:
sudo motorcortex restart -
Run the following command to view the output logs:
mcx-lastlog -
You should see the
Testlog message appearing every control loop iteration.
For more information on control application development, please refer to the Developing Control Applications section of the documentation.
Common issues
If you encounter issues while setting up or using the Motorcortex toolchains in CLion, here are some common problems and their solutions:
-
fatal error: mcx/core.h: No such file or directory: This error indicates that the Motorcortex SDK is not properly configured in the toolchain. Make sure you have the
motorcortextoolchain as the top priority toolchain and that the environment file path is correctly set to themcx-clion-environment.shfile in the Motorcortex SDK installation directory. Remove theDefaulttoolchain if necessary or move it below themotorcortextoolchain. Remove the cmake-build directories and pressReload CMake Projectin CLion. -
Removing Cmake-build directories: If you encounter build issues, try removing the
cmake-build-crossdebugandcmake-build-crossreleasedirectories in your project folder. This will force CLion to regenerate the build files and can resolve various build-related problems.
-
In the
Main MenuopenFile → SettingsunderBuild, Execution, Deploymentyou will find theToolchainsmenu. -
Add a new toolchain by pressing the
Remote Host.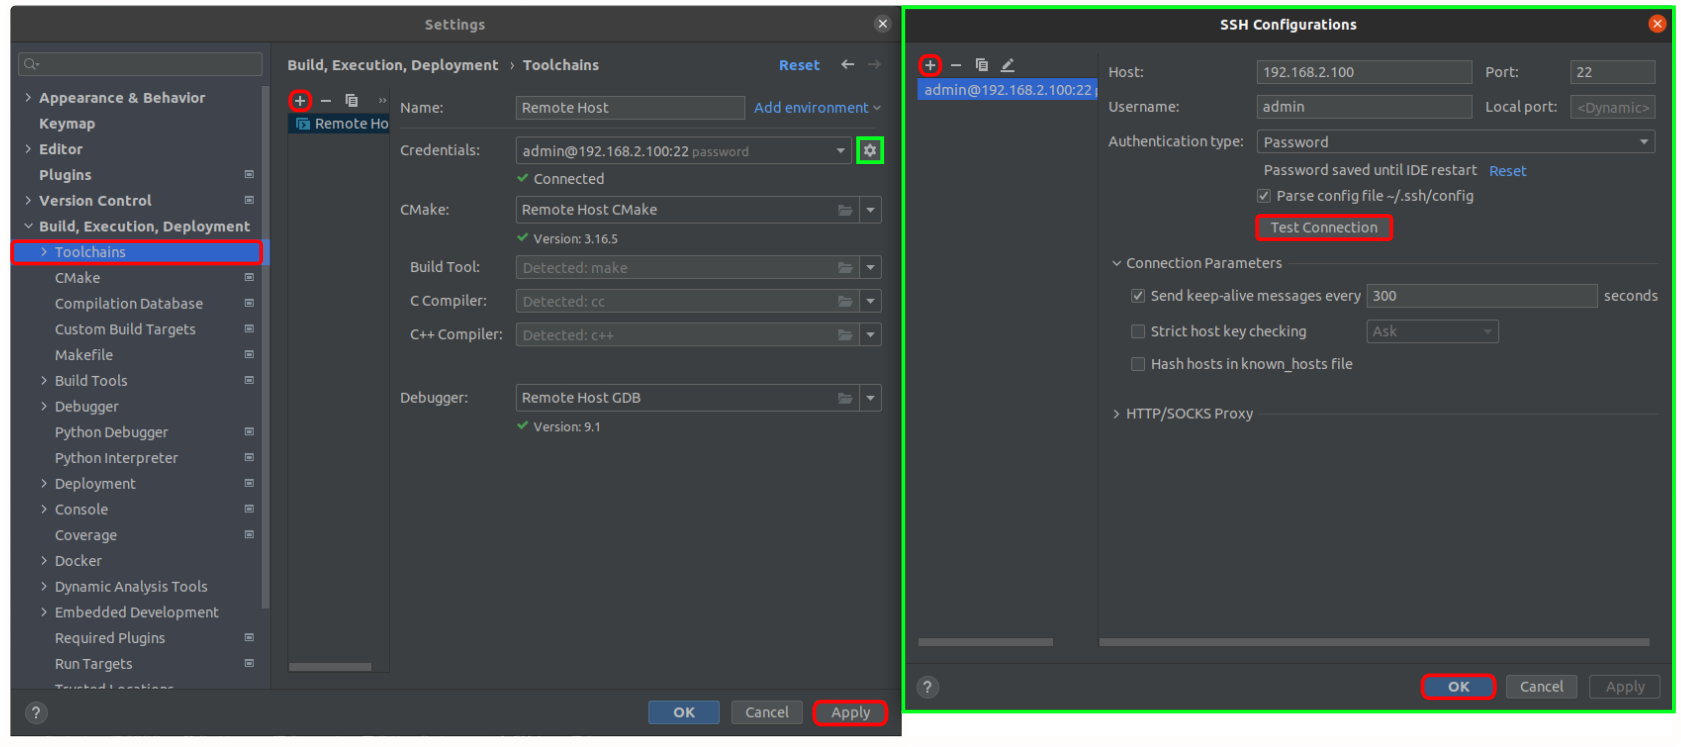
-
In the
Credentials:press theSSH Configurationsmenu. Add a new configuration by pressing the- Host:
192.168.2.100 - Port:
22 - User name:
admin - Password:
vectioneer
- Host:
-
Press the
Test Connectionbutton to make sure your connection isOK. If not, re-check your controller connection. -
If the connection is good you can press
OKto close theSSH Configurationsmenu. -
Wait for
Cmakeand theC/C++ Compilerto be detected:- CMake:
Remote host CMake - Build Tool: Default,
Detected: make - C Compiler: Default,
Detected: cc - C++ Compiler: Default,
Detected: c++ - Debugger:
Remote Host GDB
Press the
Applybutton to save theToolchainsettings. - CMake:
-
Under
Build, Execution, Deploymentopen theCmakemenu, setToolChain, toRemote Hostwithdropdownfunction. Set other parameters to (default):- Build type:
Debug - Generator:
Use default Unix Makefiles - Cmake options:
-G "CodeBlocks - Unix Makefiles" -DCMAKE_BUILD_TYPE=Debug - Build directory:
cmake-build-debug-remote-host - Build options:
-- -j 9
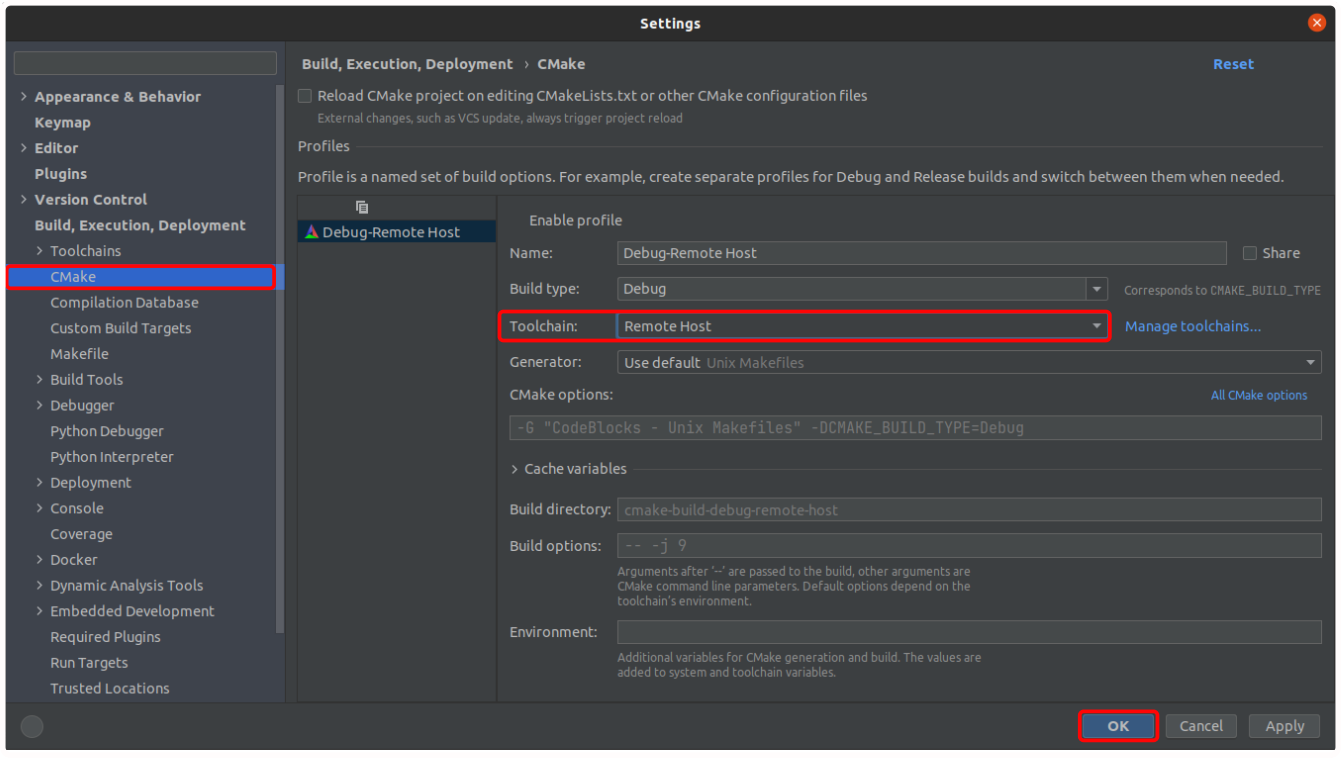
- Build type:
-
Press the
OKbutton to save theCMakesettings and close theSettingswindow. -
Wait for a couple of seconds while remote and local systems are synchronized.
-
Make sure that your controller is not running a Motorcortex application. Open the
TerminalinCLionand run the following command:
ssh admin@192.168.2.100
sudo motorcortex stop
-
In
CLionset yourRun/Debug ConfigurationtoDebug-Remote Host.
-
Press
playtobuildandrunthe application. -
To compile code with the latest modifications press
Rebuild Project.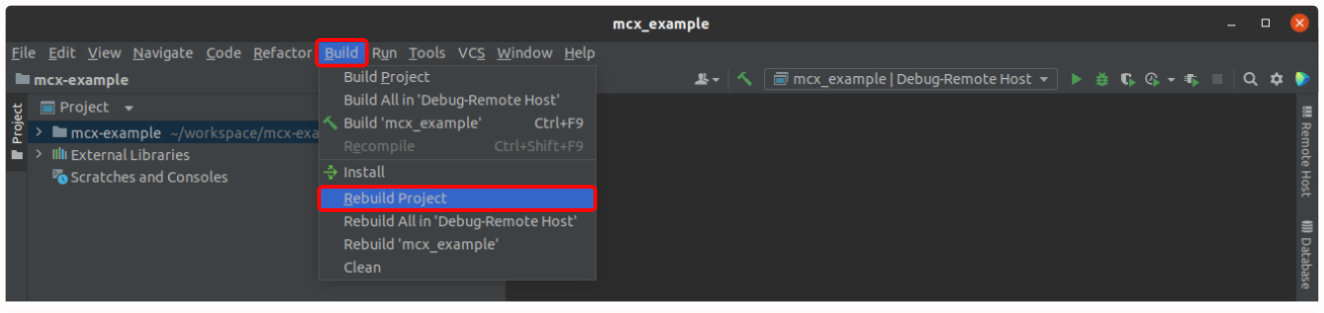
-
Congratulations you are now ready to start remote developing your Motorcortex application.